
Table of Contents
Table of Contents
1. Introduction
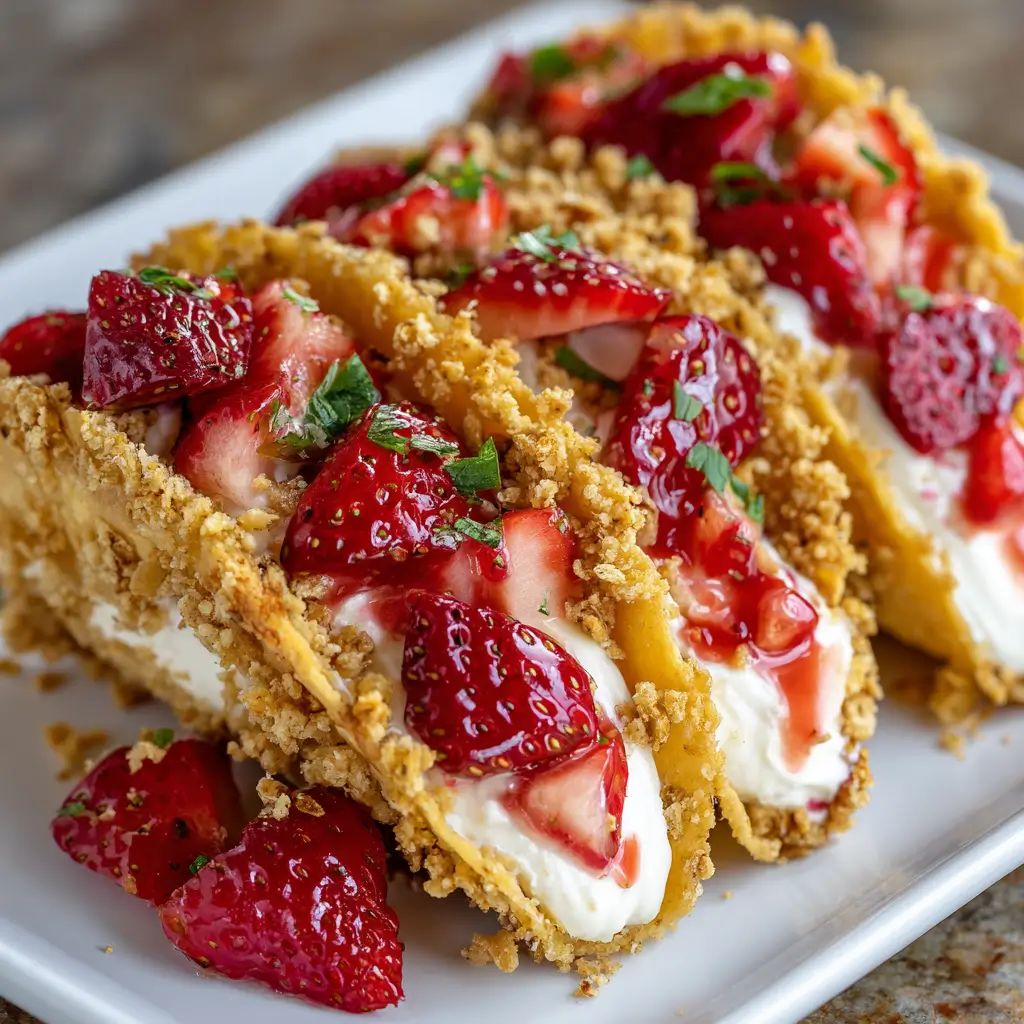
Step into a world where classic dessert artistry meets playful innovation, and prepare to be enchanted by the Strawberry Crunch Cheesecake Tacos. This isn’t just a recipe; it’s an invitation to experience a culinary phenomenon that has taken the internet by storm, blending nostalgic flavors with a whimsical presentation. Imagine the creamy, tangy delight of a traditional cheesecake, the irresistible crunch of a strawberry shortcake ice cream bar, all nestled within a crisp, golden “taco” shell. It’s a dessert mashup that defies expectations and delivers an explosion of texture and taste with every bite.
The charm of the Strawberry Crunch Cheesecake Tacos lies in their unique fusion. They brilliantly merge the beloved elements of a creamy cheesecake with the iconic strawberry crunch topping that reminds so many of childhood summers and ice cream truck jingles. But instead of a graham cracker crust or a simple pie shell, this creation reimagines the presentation by utilizing a “taco” made from Golden Oreos or Nilla Wafers, baked and shaped into an unconventional yet utterly delightful vessel. This creative twist elevates a familiar dessert into something extraordinary, making it not just a treat for the palate but also a feast for the eyes.
The origin of dessert tacos can be traced back to the burgeoning trend of deconstructed and fusion cuisine, where chefs and home cooks alike are constantly seeking innovative ways to present classic dishes. While savory tacos have been a staple for centuries, the idea of transforming them into a sweet indulgence is a more recent phenomenon, gaining massive popularity through social media platforms. The Strawberry Crunch Cheesecake Tacos specifically rose to viral fame because they tap into a collective nostalgia while offering a fresh, exciting experience.
They symbolize a playful approach to cooking, encouraging experimentation and bringing a sense of joyful discovery to the dessert table. It’s a recipe that tells a story of creativity, community, and the simple pleasure of a perfectly crafted sweet treat. Whether you’re looking to impress guests, delight your family, or simply indulge in a moment of pure bliss, these dessert tacos are guaranteed to be a showstopper, proving that sometimes, the most unexpected combinations create the most memorable culinary magic.
2. Recipe Summary
The Strawberry Crunch Cheesecake Tacos offer a delightful and inventive dessert experience, blending familiar flavors with an exciting presentation.
- Cuisine: American Dessert Fusion
This recipe creatively combines elements from classic American desserts – cheesecake and strawberry shortcake ice cream bars – with the playful format of a taco, resulting in a unique fusion dish that is both nostalgic and innovative. - Difficulty Level: Medium
While the individual components (the crunch, the shells, the cheesecake filling, and the strawberry topping) are relatively straightforward to prepare, bringing them all together requires a few distinct steps and some attention to detail, particularly when forming the taco shells. This makes it a rewarding project for intermediate home bakers or enthusiastic beginners looking to expand their skills. - Total Preparation and Cooking Time:
- Active Preparation: Approximately 60-90 minutes
This includes making the strawberry crunch, preparing the taco shells, whipping up the cheesecake filling, and concocting the strawberry topping. - Baking/Chilling Time: Approximately 15-20 minutes (for taco shells) + 2-4 hours (minimum chilling for cheesecake filling)
The shells require a brief bake to set their shape. The cheesecake filling needs ample time in the refrigerator to firm up properly, ensuring a luscious, stable texture. For best results, overnight chilling is recommended. - Yield: Makes 12 dessert tacos
This recipe is perfectly scaled for a family treat, a small gathering, or a delightful party dessert. - Dietary Classification: Vegetarian
This recipe is inherently vegetarian, containing no meat products. - Potential Adaptations:
- Gluten-Free: Can be made gluten-free by using gluten-free Golden Oreos or Nilla Wafers for the shells and crunch topping. Ensure all other packaged ingredients (like sprinkles) are certified gluten-free.
- Dairy-Free/Vegan: While more challenging, dairy-free cream cheese and whipped topping can be used for the filling, and plant-based butter for the crunch. The shells would need to be made with a suitable vegan cookie alternative. This would significantly alter the original recipe’s flavor profile but is achievable for those with dietary restrictions.
3. Equipment and Utensils
Crafting these delightful Strawberry Crunch Cheesecake Tacos requires a few specialized tools to ensure perfection, along with standard kitchen utensils. Having the right equipment makes the process smoother and the results more impressive.
- Stand Mixer (or Hand Mixer): Essential for achieving a smooth, lump-free cheesecake filling and for whipping the heavy cream to stiff peaks. A stand mixer with a paddle attachment and a whisk attachment will make the process much easier, but a good quality hand mixer can certainly get the job done.
- Specification: A 4-quart or larger mixing bowl capacity is ideal.
- Large Mixing Bowls: You’ll need at least two large mixing bowls – one for the cheesecake filling and another for the strawberry crunch mixture or whipped cream.
- Food Processor: Crucial for finely crushing the Golden Oreos or Nilla Wafers into crumbs for both the taco shells and the crunch topping. This ensures a consistent texture.
- Specification: A 7-cup capacity or larger is convenient for handling larger batches of cookies.
- Baking Sheets: At least two large baking sheets are recommended. You’ll use one to bake the cookie circles for the taco shells and another for setting the shaped shells.
- Specification: Standard half-sheet (18×13 inches / 45×33 cm) is ideal.
- Parchment Paper or Silicone Baking Mats: To line the baking sheets, preventing sticking and making cleanup a breeze. This is especially important for the delicate cookie shells.
- Round Cookie Cutter (or Rim of a Glass): To cut out uniform circles for your taco shells.
- Specification: Approximately 3-4 inches (7.5-10 cm) in diameter.
- Taco Molds / Taco Stands / Inverted Muffin Tin: This is the specialized equipment for shaping your dessert tacos.
- Taco Molds: Specifically designed non-stick molds are the easiest for uniform shapes.
- Taco Stands: While primarily for serving, they can help hold the baked shells in shape as they cool, if you’re careful.
- Inverted Muffin Tin: A clever hack! Turn a muffin tin upside down, and drape the warm, pliable cookie circles between the muffin cups to cool and set into a taco shape.
- Specification: A standard 12-cup muffin tin works perfectly.
- Small Saucepan: For melting butter and potentially preparing the strawberry glaze if you opt for a homemade one.
- Specification: A 1-quart (1-liter) saucepan.
- Rubber Spatulas: Several spatulas will be useful for scraping bowls, folding ingredients, and transferring mixtures.
- Whisk: For combining dry ingredients and light mixing.
- Measuring Cups and Spoons: For accurate measurement of all ingredients.
- Piping Bag with a Large Round Tip (Optional but Recommended): For neatly filling the taco shells with the cheesecake mixture, giving them a professional, elegant finish. If you don’t have one, a spoon and offset spatula will work, but it might be a bit messier.
- Offset Spatula or Butter Knife: Useful for spreading the cheesecake filling evenly inside the shells if not piping.
- Wire Rack: For cooling the taco shells completely after baking.
- Small Bowls: For organizing the various components, like sprinkles, and for the strawberry crunch mixture.
Ensuring you have these tools ready before you begin will streamline the process of creating your stunning Strawberry Crunch Cheesecake Tacos, making the baking experience as enjoyable as the eating!
4. Serving Suggestions
The presentation of your Strawberry Crunch Cheesecake Tacos is just as important as their incredible taste, transforming them from a simple dessert into a show-stopping experience. These visually appealing treats deserve thoughtful plating and complementary pairings to truly shine.
Plating Recommendations:
- Arrange Artfully: Line up the tacos on a long serving platter or a beautiful charcuterie board (consider adding other sweet elements like fresh fruit or small candies for a truly festive charcuterie board). Arrange them slightly overlapping or standing upright in a taco stand for maximum visual impact.
- Garnish Generously:
- Extra Strawberry Crunch: Sprinkle additional strawberry crunch topping generously over and around the tacos for an irresistible texture and visual pop.
- Fresh Strawberries: Halved or sliced fresh strawberries, especially bright red, ripe ones, add a burst of color and reinforce the strawberry theme. You could even create a small fan of sliced berries on top of each taco.
- Whipped Cream Swirls: A dollop of freshly whipped cream or a elegant swirl from a piping bag on top of each taco adds a cloud-like finish and extra creaminess.
- Mint Leaves: A few small, vibrant mint leaves can provide a beautiful color contrast and a hint of fresh aroma.
- Chocolate Drizzle (Optional): A delicate drizzle of melted white chocolate or dark chocolate can add an artistic touch and another layer of flavor.
- Individual Servings: For a more elegant presentation, serve each taco on a small dessert plate, perhaps with a scattering of extra crunch and a single perfect strawberry alongside.
- Dessert Bar: If serving at a party, arrange the tacos on a tiered dessert stand or as part of a larger dessert bar, allowing guests to admire their unique design.
Side Dish Ideas (Complementary Sweet Elements):
While these Strawberry Crunch Cheesecake Tacos are robust enough to stand alone, a few simple additions can enhance the dessert experience:
- Fresh Berry Medley: A small bowl of mixed fresh berries (blueberries, raspberries, blackberries) offers a tart counterpoint and a refreshing cleanse for the palate.
- Vanilla Bean Ice Cream: A small scoop of high-quality vanilla bean ice cream could be served alongside for an extra indulgent experience, allowing the warm melting ice cream to mingle with the cool taco.
- Light Fruit Sorbet: A scoop of lemon or raspberry sorbet could provide a refreshing, palate-cleansing contrast to the rich cheesecake.
- Chocolate-Dipped Strawberries: For an even more decadent touch, a few chocolate-dipped strawberries elevate the presentation and add another layer of flavor and texture.
Beverage Pairings:
Choose beverages that complement the sweetness and creaminess of the Strawberry Crunch Cheesecake Tacos without overwhelming them.
- Milk: A classic and comforting pairing, especially for those who enjoy a nostalgic touch with their dessert. Cold milk perfectly cuts through the richness.
- Coffee or Espresso: A strong cup of coffee or a rich espresso can provide a wonderful bitter contrast that balances the sweetness of the tacos.
- Sweet Dessert Wine: A light, sweet dessert wine, such as a Moscato d’Asti or a Late Harvest Riesling, would complement the fruity and creamy notes beautifully.
- Sparkling Rosé or Champagne: For a celebratory touch, the effervescence and subtle fruit notes of a sparkling rosé or Champagne can be a delightful pairing, adding a touch of elegance.
- Herbal Tea: A mild, fruity herbal tea (like a berry or chamomile blend) can offer a calming, less intense option for those who prefer non-alcoholic pairings.
- Homemade Lemonade: A glass of tangy, homemade lemonade could be a refreshing choice, especially on a warm day, cutting through the richness with its bright acidity.
By considering these serving suggestions, you can elevate your Strawberry Crunch Cheesecake Tacos from a simple treat to an unforgettable culinary event, perfectly tailored for any occasion, from casual family gatherings to elegant dinner parties.
5. Nutritional Information
Understanding the nutritional aspects of an indulgent dessert like Strawberry Crunch Cheesecake Tacos can help in making informed choices about portion sizes and overall dietary balance. While these tacos are designed for enjoyment and treat-yourself moments, it’s good to be aware of their typical composition. Please note that these figures are approximate and can vary significantly based on exact ingredients, brands used, and portion sizes. This estimate is based on a serving size of one taco.
- Calories Per Serving: Approximately 400-600 calories
- The calorie count is primarily driven by the cookies (Golden Oreos/Nilla Wafers), butter, full-fat cream cheese, and heavy cream, along with the sugar content.
- Macronutrient Distribution (per serving, approximate):
- Carbohydrates: 40-60g
- This includes sugars from the cookies, added granulated sugar in the cheesecake filling and strawberry topping, and natural sugars from the strawberries. A significant portion will be from refined sugars.
- Fats: 25-40g
- Primarily saturated fats from cream cheese, heavy cream, and butter, along with some unsaturated fats from the cookies.
- Proteins: 5-8g
- Derived from the dairy products (cream cheese, heavy cream).
- Dietary Information:
- High in Sugar: Due to the cookies, added sugars in the filling, and often in the strawberry glaze, these tacos are a high-sugar dessert.
- High in Saturated Fat: The full-fat dairy components contribute significantly to the saturated fat content.
- Contains Dairy: Cream cheese and heavy cream are central ingredients, making this unsuitable for those with lactose intolerance or dairy allergies, unless dairy-free alternatives are used.
- Contains Gluten: The cookie shells typically contain gluten. As mentioned previously, gluten-free cookie alternatives can be used for a gluten-free version.
- No Significant Fiber: While strawberries offer some fiber, the overall fiber content in the entire taco is low due to the refined nature of the other ingredients.
- No Cholesterol Information: Varies significantly based on specific ingredients, but generally high due to dairy and butter.
- Sodium: Moderate, primarily from processed cookies and a pinch in the cheesecake.
- Health Benefits (Minor, primarily from strawberries):
- Antioxidants: Strawberries are an excellent source of Vitamin C and other antioxidants, which can help combat oxidative stress in the body. While the quantity in one taco might be modest, it still contributes to overall intake.
- Vitamins and Minerals: Strawberries also provide small amounts of manganese and potassium.
- Mood Boost: The psychological benefit of enjoying an indulgent treat cannot be overlooked. Occasional treats can contribute to mental well-being and satisfaction as part of a balanced diet.
It’s important to remember that Strawberry Crunch Cheesecake Tacos are a delightful treat meant for occasional indulgence rather than a staple food. Enjoying them mindfully and in moderation allows for the full enjoyment of their unique flavors and textures without compromising long-term dietary goals. For those monitoring specific nutritional intakes, making them at home allows for some control over ingredients (e.g., opting for reduced-fat cream cheese or less sugar in the topping), but it will still remain an indulgent dessert.
6. Storage and Reheating
Proper storage is key to maintaining the deliciousness and structural integrity of your Strawberry Crunch Cheesecake Tacos. Given their delicate nature and creamy filling, they require specific care.
Storage Instructions:
- Refrigeration is Essential: Due to the dairy-based cheesecake filling, these tacos must be stored in the refrigerator. The cheesecake filling needs to remain chilled to prevent spoilage and to maintain its firm, luscious texture.
- Airtight Container: The best way to store Strawberry Crunch Cheesecake Tacos is in an airtight container. This prevents them from absorbing odors from other foods in the refrigerator and, more importantly, keeps the cookie shells from becoming soggy.
- Tip: If you have tall enough containers, place a layer of parchment paper between stacked tacos to prevent sticking and protect the delicate crunch topping.
- Individual Wrapping (Optional for longer storage): For maximum freshness and to prevent sogginess, you can individually wrap each taco in plastic wrap before placing it in an airtight container. This extra step provides an additional barrier against moisture and air.
- Keep Crunch Separate (Optional): If you are making a large batch and anticipate storing some for more than a day, consider applying the strawberry crunch topping just before serving. Store the naked cheesecake tacos (with strawberry topping already on the cheesecake) in the fridge, and keep the extra crunch in an airtight container at room temperature. This ensures the crunch remains perfectly crispy.
- Duration: When stored correctly in an airtight container in the refrigerator, Strawberry Crunch Cheesecake Tacos will typically stay fresh and delicious for 3-4 days. Beyond this, the cookie shells may start to soften, and the overall texture might diminish.
Refrigeration/Freezing:
- Refrigeration: As noted above, refrigeration is the standard and necessary method for storing these dessert tacos. They are best enjoyed chilled, as the cold temperature enhances the creaminess of the cheesecake filling and provides a refreshing contrast to the sweet strawberry crunch.
- Freezing: Strawberry Crunch Cheesecake Tacos are generally NOT recommended for freezing.
- Texture Degradation: Freezing and thawing will significantly alter the texture of both the cookie shell (making it much softer and potentially crumbly) and the creamy cheesecake filling (which can become grainy or watery upon thawing). The strawberry crunch topping will also lose its desirable crispness and may become soggy.
- Moisture Issues: Thawing can introduce excess moisture, which will make the shells completely soggy and ruin the integrity of the tacos.
- If you absolutely must freeze components, you could potentially freeze just the cheesecake filling mixture in an airtight container for up to a month, but it would still require re-whipping and may not achieve the same silky smooth texture. The shells and crunch should always be made fresh or stored only in the refrigerator.
Reheating Methods:
- No Reheating: These are cold dessert tacos, designed to be enjoyed straight from the refrigerator. Reheating them is not only unnecessary but would also ruin their delicate structure and creamy texture. The cookie shells would soften and become unpleasant, and the cheesecake filling would melt and become liquid.
In summary, Strawberry Crunch Cheesecake Tacos are best enjoyed fresh, or after a maximum of 3-4 days when stored properly in an airtight container in the refrigerator. Avoid freezing to preserve their unique textural and flavor profile.
7. Expert Tips and Variations
Elevate your Strawberry Crunch Cheesecake Tacos from delicious to absolutely divine with these expert tips and creative variations. Avoiding common pitfalls and embracing customization will ensure your dessert tacos are a resounding success every time.
Professional Chef Tips:
- Perfecting the Cookie Shells:
- Don’t Overmix Cookie Dough: When combining crushed cookies with melted butter for the shells, mix just until combined. Overmixing can develop gluten in the minimal flour content (if using Nilla Wafers) or simply make the dough tough, leading to brittle shells.
- Even Thickness is Key: Press the cookie mixture into an even layer before cutting out circles. This ensures uniform baking and pliability.
- Work Quickly While Warm: After baking, the cookie circles will be pliable for only a short window. Immediately transfer them to your inverted muffin tin or taco molds. If they cool and harden, you can briefly warm them in the oven (15-30 seconds) to regain pliability, but be careful not to overbake.
- Preventing Saggy Shells: The ultimate enemy of a good dessert taco is a soggy shell. Ensure your shells are completely cooled and hardened before filling. Also, consider brushing a thin layer of melted white chocolate inside the shells before filling, then chilling until set. This creates a moisture barrier.
- Creamy Cheesecake Filling:
- Room Temperature Cream Cheese: Always start with truly room temperature cream cheese. This is paramount for a smooth, lump-free filling. Cold cream cheese will result in a lumpy mixture, no matter how much you beat it.
- Don’t Overwhip: Beat the cream cheese and sugar until just smooth and creamy. Once you add the heavy cream, whip until stiff peaks form, but stop immediately when they do. Overwhipping can cause the filling to become grainy or lose its structure.
- Chill Thoroughly: The cheesecake filling needs significant chilling time, ideally 4-6 hours or overnight, to firm up. This prevents it from oozing out of the tacos and ensures a rich, dense texture.
- Taste and Adjust Sweetness: Depending on the sweetness of your cookies and strawberry topping, you might want to adjust the sugar in the cheesecake filling. Taste as you go!
- The Strawberry Crunch Factor:
- Even Crumb Size: Use a food processor for the crunch ingredients to ensure a uniform crumb size. Too chunky, and it won’t adhere well; too fine, and you lose some texture.
- Toasting (Optional): For an extra depth of flavor and crispness, lightly toast the dry crunch mixture (before adding the butter) in a dry pan over medium heat for 3-5 minutes, stirring constantly, until fragrant. Let cool completely before proceeding.
- Make Extra: The crunch topping is so good, you’ll want extra for garnishing or even snacking! You can never have too much.
Common Mistakes to Avoid:
- Undercooked/Overcooked Shells: Undercooked shells will be too soft and break easily. Overcooked shells will be brittle and crack when shaped. Watch them closely.
- Not Chilling Enough: Rushing the chilling process for the cheesecake filling will lead to a runny, messy taco. Patience is a virtue here.
- Wet Strawberries: If using fresh strawberries for the topping, ensure they are thoroughly drained and patted dry to prevent excess moisture from making the shells soggy.
- Overfilling: Don’t overstuff the taco shells. Leave a little room at the top for the strawberry topping and crunch.
Recipe Variations:
- Different Crunch Flavors:
- Oreo Crunch Cheesecake Tacos: Use crushed Oreo cookies (remove cream) for both the shells and crunch, with a chocolate cheesecake filling.
- Biscoff Crunch Cheesecake Tacos: Crushed Biscoff cookies provide a caramel-spiced crunch.
- Peanut Butter Crunch: Use crushed peanut butter cookies or graham crackers mixed with peanut butter powder for a savory-sweet crunch. (Try our Butterfinger Caramel Cheesecake Bars for more crunch ideas!)
- Alternative Shells:
- Chocolate Shells: Use crushed chocolate wafers for a darker, richer taco shell.
- Waffle Cone Shells: Buy ready-made waffle cones, cut into circles, and gently warm to shape.
- Pancake/Crepe Shells: For a softer, more breakfast-inspired dessert taco, use thin pancakes or crepes.
- Cheesecake Filling Swaps:
- Chocolate Cheesecake: Add melted and cooled chocolate to the cream cheese mixture.
- Lemon Cheesecake: Incorporate lemon zest and a touch of lemon juice for a bright, tangy filling.
- Vanilla Bean Cheesecake: Use vanilla bean paste for an intense vanilla flavor.
- Pumpkin Spice Cheesecake: For a seasonal twist, add pumpkin puree and pumpkin pie spice to the filling. (Might pair well with a creamy pumpkin soup recipe during the fall!)
- Fruit Topping Alternatives:
- Raspberry or Blueberry: Swap fresh strawberries for raspberries or blueberries, or a mix of berries, creating a vibrant burst of different fruit flavors.
- Peach Crunch: During summer, use fresh peaches in a light glaze for a delightful peach cobbler cheesecake cones inspiration.
- Cherry: A simple cherry pie filling or fresh glazed cherries can offer a rich, deep fruit flavor.
- Boozy Tacos (Adults Only): Add a tablespoon of a liqueur like Frangelico (hazelnut), Grand Marnier (orange), or strawberry liqueur to the cheesecake filling for an adult twist.
Seasonal Adaptations:
- Summer: Emphasize fresh, seasonal berries like raspberries, blueberries, or even a mixed berry compote.
- Fall: Introduce flavors like pumpkin spice in the cheesecake, apple pie spice in the crunch, or a caramel drizzle.
- Winter: Peppermint extract in the cheesecake, white chocolate drizzle, or a cranberry swirl.
- Spring: Lemon zest in the cheesecake, or a hint of lavender.
By keeping these tips in mind and exploring these delicious variations, your Strawberry Crunch Cheesecake Tacos will not only be a hit but will also showcase your creativity in the kitchen. For more strawberry and crunch delights, check out our Easy Strawberry Crunch Brownies Recipe or our Strawberry Shortcake Cheesecake Rolls!
8. Ingredients Section
Creating the perfect Strawberry Crunch Cheesecake Tacos involves a few distinct components, each with its own specific ingredients. Accuracy in measurement and sourcing quality ingredients will make all the difference in the final taste and texture.
For the Strawberry Crunch Topping:
- Golden Oreos (or Nilla Wafers): 15-20 cookies (approximately 150g / 5.3 oz)
- Sourcing: Found in the cookie aisle of any grocery store.
- Substitutions: Graham crackers for a more traditional crust flavor, vanilla shortbread cookies, or even gluten-free vanilla sandwich cookies for a GF option.
- Freeze-Dried Strawberries: 1/2 cup (approximately 15g / 0.5 oz), crushed
- Sourcing: Health food stores, online retailers, or some larger supermarkets in the snack/dried fruit aisle.
- Substitutions: While freeze-dried strawberries provide intense flavor and color without adding moisture, you can omit them and use a few drops of red food coloring for color, and a little more strawberry extract for flavor.
- Granulated Sugar: 2 tablespoons (25g / 0.9 oz)
- Unsalted Butter: 4 tablespoons (56g / 2 oz), melted
- Vanilla Extract: 1/2 teaspoon (2.5ml)
- Red Food Coloring (Optional): 2-3 drops, for a more vibrant pink color
For the Taco Shells:
- Golden Oreos (or Nilla Wafers): 25-30 cookies (approximately 250g / 8.8 oz)
- Sourcing: Same as above.
- Substitutions: See crunch topping substitutions. Ensure cookies are finely crushed.
- Unsalted Butter: 6 tablespoons (84g / 3 oz), melted
For the Cheesecake Filling:
- Cream Cheese: 24 oz (680g), full-fat, softened to room temperature (typically three 8-oz blocks)
- Sourcing: Dairy aisle. Full-fat is crucial for a rich, stable filling.
- Substitutions: Reduced-fat cream cheese can be used but may result in a slightly less rich and firm filling. Dairy-free cream cheese for a vegan option.
- Granulated Sugar: 1 cup (200g / 7 oz)
- Heavy Cream (Cold): 1 cup (240ml / 8 fl oz)
- Sourcing: Dairy aisle. Must be heavy cream or whipping cream (minimum 36% fat).
- Substitutions: Avoid half-and-half or milk; they won’t whip. Dairy-free whipping cream can be used for a vegan option, but results may vary.
- Vanilla Extract: 1 teaspoon (5ml)
- Powdered Sugar (Confectioners’ Sugar): 2 tablespoons (25g / 0.9 oz)
- Sourcing: Baking aisle.
- Substitutions: Granulated sugar can be used in a pinch, but powdered sugar helps create a smoother, silkier texture in the whipped cream component and prevents graininess.
For the Strawberry Topping (Glaze/Drizzle):
- Fresh Strawberries: 1 cup (150g / 5.3 oz), hulled and diced
- Sourcing: Produce section. Choose ripe, firm strawberries.
- Substitutions: Frozen sliced strawberries (thawed and drained) can work in a pinch, but fresh provides better texture and flavor. Other berries like raspberries or blueberries.
- Granulated Sugar: 2 tablespoons (25g / 0.9 oz)
- Lemon Juice: 1 teaspoon (5ml), fresh squeezed
- Sourcing: Produce section.
- Substitutions: Bottled lemon juice will work, but fresh is always best.
- Cornstarch: 1 teaspoon (3g / 0.1 oz) (Optional, for thickening)
- Sourcing: Baking aisle.
- Substitutions: Arrowroot powder or tapioca starch can be used.
Optional Garnish:
- Fresh Mint Leaves: A few sprigs for garnish.
- Extra Strawberry Crunch: For sprinkling.
Preparation Notes for Ingredients:
- Room Temperature: Ensure cream cheese is at room temperature before you begin. Take it out of the fridge at least 30-60 minutes prior.
- Cold Cream: Heavy cream should be very cold to whip properly.
- Fine Crumbs: Use a food processor to get very fine, consistent crumbs for both the crunch and the shells. This ensures uniform texture and easier shaping.
- Metric Conversions: All metric conversions are approximate for common home cooking. For precise baking, using a kitchen scale for grams is recommended.
With these ingredients gathered and prepared, you’re ready to embark on the exciting journey of creating your delicious Strawberry Crunch Cheesecake Tacos!
Share this Delicious Strawberry Crunch Cheesecake Tacos Recipe with your friends on Facebook or save it to your Pinterest boards for a sunny treat!
9. Step-by-Step Instructions
Get ready to transform simple ingredients into the show-stopping Strawberry Crunch Cheesecake Tacos! Follow these detailed steps for each component to achieve perfectly crispy shells, a luscious filling, and that irresistible strawberry crunch.
Step 1: Prepare the Strawberry Crunch Topping
- Crush Cookies: In a food processor, combine the 15-20 Golden Oreos (or Nilla Wafers) and the freeze-dried strawberries. Process until you have fine, uniform crumbs.
- Combine Wet Ingredients: In a small bowl, melt 4 tablespoons (56g) of unsalted butter. Stir in 2 tablespoons (25g) of granulated sugar and 1/2 teaspoon (2.5ml) of vanilla extract. If desired, add 2-3 drops of red food coloring for a more vibrant pink.
- Mix Crunch: Add the wet butter mixture to the cookie and strawberry crumbs in the food processor. Pulse a few times until the mixture is well combined and has a coarse, crumbly texture. It should resemble wet sand.
- Spread and Bake (Optional): For extra crispness, spread the crunch mixture evenly on a small parchment-lined baking sheet. Bake at 300°F (150°C) for 8-10 minutes, stirring halfway through, until lightly toasted and fragrant. This step is optional but highly recommended.
- Cool: Remove from the oven and let the crunch cool completely on the baking sheet. It will crisp up as it cools. Set aside. (You might even want to make extra of this, it’s so good! Like in these Easy Strawberry Crunch Brownies.)
Step 2: Make and Shape the Taco Shells
- Preheat Oven & Prep: Preheat your oven to 350°F (175°C). Line a large baking sheet with parchment paper. Have your inverted muffin tin or taco molds ready.
- Crush Cookies for Shells: In a food processor, finely crush 25-30 Golden Oreos (or Nilla Wafers) until they form very fine crumbs.
- Combine for Shell Dough: In a medium bowl, combine the cookie crumbs with 6 tablespoons (84g) of melted unsalted butter. Mix thoroughly until the crumbs are evenly moistened and resemble wet sand.
- Form Circles: Press a portion of the mixture firmly into a 3-4 inch (7.5-10 cm) round cookie cutter directly on the parchment-lined baking sheet, or flatten small balls of the mixture and cut circles using the rim of a glass. Aim for 12 uniform circles, about 1/8 inch (3mm) thick.
- Bake Shells: Bake for 6-8 minutes, or until the edges are lightly golden and the centers are just set. Do not overbake, as they will become too brittle.
- Shape Tacos: Work quickly! Immediately remove the hot cookie circles from the oven. Using a thin spatula, carefully transfer each warm, pliable cookie circle to drape over the inverted cups of your muffin tin or place them into taco molds to cool and set into a taco shape. If a cookie hardens before you can shape it, return it to the oven for 15-30 seconds to soften slightly.
- Cool Completely: Allow the taco shells to cool completely on the muffin tin/molds. They will firm up and become crispy. Once cool, gently remove and set aside.
Step 3: Prepare the Cheesecake Filling
- Cream Cheese Mixture: In the bowl of a stand mixer (or using a hand mixer) fitted with the paddle attachment, beat the 24 oz (680g) softened cream cheese and 1 cup (200g) granulated sugar on medium speed until smooth, creamy, and free of lumps, about 2-3 minutes. Scrape down the sides of the bowl as needed. Stir in 1 teaspoon (5ml) vanilla extract.
- Whip Heavy Cream: In a separate, chilled mixing bowl, combine the 1 cup (240ml) cold heavy cream and 2 tablespoons (25g) powdered sugar. Using the whisk attachment, beat on high speed until stiff peaks form. Be careful not to overbeat, or it will curdle.
- Combine: Gently fold the whipped cream into the cream cheese mixture using a rubber spatula. Fold just until no streaks of whipped cream remain. Overmixing here can deflate the filling.
- Chill Filling: Cover the cheesecake filling and refrigerate for at least 2-4 hours, or preferably overnight, to allow it to firm up properly. This is crucial for a stable filling.
Step 4: Make the Strawberry Topping (Glaze/Drizzle)
- Combine Ingredients: In a small saucepan, combine the 1 cup (150g) diced fresh strawberries, 2 tablespoons (25g) granulated sugar, and 1 teaspoon (5ml) lemon juice.
- Cook: Heat over medium-low heat, stirring occasionally, until the strawberries soften and release their juices, about 5-7 minutes.
- Thicken (Optional): If you prefer a thicker topping, whisk 1 teaspoon of cornstarch with 1 tablespoon of cold water in a small bowl to create a slurry. Stir the slurry into the strawberry mixture and continue to cook for another 1-2 minutes, stirring constantly, until thickened.
- Cool: Remove from heat and let the strawberry topping cool completely. It will thicken further as it cools.
Step 5: Assemble the Strawberry Crunch Cheesecake Tacos
- Fill Shells: Once the cheesecake filling is thoroughly chilled and firm, spoon it into a piping bag fitted with a large round tip (or use a spoon and offset spatula). Pipe or spoon a generous amount of cheesecake filling into each cooled taco shell.
- Add Strawberry Topping: Drizzle or spoon the cooled strawberry topping over the cheesecake filling in each taco.
- Sprinkle Crunch: Generously sprinkle the prepared strawberry crunch topping over the strawberry glaze. You can also press some onto the sides of the cheesecake filling.
- Garnish (Optional): Garnish with a fresh mint leaf on each taco for an extra touch of color and freshness.
- Serve and Enjoy: Arrange your beautiful Strawberry Crunch Cheesecake Tacos on a platter and serve immediately, or chill for a final 30 minutes for ultimate firmness. These are best enjoyed the day they are assembled for maximum crispness of the shells. For more dessert inspiration, check out our No-Bake Strawberry Cream Cheese Pie.
Troubleshooting Tips During Assembly:
- Shells Breaking: If shells are too brittle, they might have been overbaked. Try baking for slightly less time next round. If they snap when you try to shape them, gently reheat in the oven for 10-15 seconds to make them pliable again.
- Filling Too Soft: This almost always means the cheesecake filling wasn’t chilled long enough. Pop the assembled tacos (or just the filling) back in the fridge for another hour or two.
- Soggy Shells: Ensure shells are completely cool before filling. To add an extra moisture barrier, you can brush a thin layer of melted white chocolate inside each shell and let it set in the fridge before filling.
- Strawberry Topping Too Runny: If not using cornstarch, the topping can be thin. Let it cool completely, as it thickens upon cooling. If still too thin, gently reheat and whisk in a cornstarch slurry.
Congratulations! You’ve successfully created a batch of irresistible Strawberry Crunch Cheesecake Tacos!
10. Frequently Asked Questions (FAQ)
Here are some common questions about making and enjoying Strawberry Crunch Cheesecake Tacos, along with clear, helpful answers.
Q1: Can I make the Strawberry Crunch Cheesecake Tacos ahead of time?
A1: Yes, you can prepare several components in advance, but for the best texture, especially the crispy shells, it’s best to assemble them closer to serving time.
- The strawberry crunch topping can be made up to a week in advance and stored in an airtight container at room temperature.
- The cheesecake filling can be made 1-2 days ahead and stored, covered, in the refrigerator.
- The strawberry topping/glaze can also be made 1-2 days ahead and refrigerated.
- The taco shells are best made the day of assembly to ensure maximum crispness. If made a day ahead, store them in an airtight container at room temperature. Assemble the tacos no more than 2-3 hours before serving for optimal results, or store them unassembled.
Q2: What if I don’t have taco molds or an inverted muffin tin to shape the shells?
A2: While taco molds or an inverted muffin tin are ideal for achieving the perfect taco shape, you can improvise!
- Foil Molds: You can create your own temporary molds by shaping aluminum foil into “taco” stands. Drape the warm cookie circles over these foil shapes to cool.
- Rolling Pin: Carefully drape the warm cookie circles over a rolling pin or the handle of a wooden spoon placed between two elevated objects (like small cans) and let them cool in shape. The key is to find something to hold them in a V-shape while they cool and harden.
Q3: Can I use fresh strawberries instead of freeze-dried ones for the crunch topping?
A3: It’s highly recommended to use freeze-dried strawberries for the crunch topping. Fresh strawberries contain too much moisture, which would make the crunch soggy and prevent it from crisping up. Freeze-dried strawberries provide an intense strawberry flavor and vibrant color without introducing unwanted moisture, maintaining the crunch’s desired texture.
Q4: How do I prevent the taco shells from getting soggy once filled?
A4: Preventing soggy shells is a common concern! Here are a few tips:
- Thoroughly Chill Filling: Ensure your cheesecake filling is very firm and cold before piping it into the shells. A warmer, softer filling will release moisture more quickly.
- Cool Topping: Make sure your strawberry topping is completely cool before adding it to the tacos.
- Moisture Barrier (Optional but Recommended): For extra protection, you can brush a thin layer of melted white chocolate (or even milk/dark chocolate) inside each cooled taco shell and let it set completely in the refrigerator before adding the cheesecake filling. This creates a waterproof barrier.
- Assemble Close to Serving: The best way to maintain crispness is to assemble the tacos no more than 2-3 hours before you plan to serve them.
Q5: Can I make these Strawberry Crunch Cheesecake Tacos gluten-free?
A5: Yes, absolutely! To make them gluten-free, simply substitute the Golden Oreos or Nilla Wafers with your favorite brand of gluten-free vanilla sandwich cookies or gluten-free vanilla wafers. Ensure all other packaged ingredients (like sprinkles or any pre-made strawberry glaze) are also certified gluten-free. The rest of the recipe naturally accommodates a gluten-free diet.
Q6: My cheesecake filling isn’t firm enough. What went wrong?
A6: Several factors could contribute to a soft cheesecake filling:
- Insufficient Chilling Time: This is the most common reason. The filling needs ample time (minimum 2-4 hours, ideally overnight) in the refrigerator to properly set and firm up.
- Overmixing: Overmixing the cream cheese and especially the heavy cream can incorporate too much air, which can cause the filling to be less dense and stable. When folding in the whipped cream, stop as soon as it’s combined.
- Warm Ingredients: Using cream cheese that wasn’t at room temperature, or heavy cream that wasn’t very cold, can affect the emulsion and whipping consistency.
- Reduced-Fat Cream Cheese: If you used reduced-fat cream cheese, it contains more water and less fat, resulting in a softer set. Full-fat cream cheese is recommended for its richness and stability.
If your filling is too soft after chilling, you can sometimes carefully re-whip it with a small amount of powdered sugar, but this risks overmixing. The best solution is often more patience with chilling.
Q7: Can I use a different type of fruit topping?
A7: Absolutely! While strawberry is classic for Strawberry Crunch Cheesecake Tacos, you can definitely experiment with other fruit toppings.
- Raspberry or Blueberry: Create a similar glaze with fresh or frozen raspberries or blueberries.
- Peach: A diced peach topping with a touch of cinnamon is wonderful in summer. (Consider our easy summer peach watermelon salad for more peach inspiration!)
- Cherry: A simple cherry pie filling or a homemade cherry compote also works beautifully.
Just ensure your fruit topping is cooled before adding it to the tacos to prevent sogginess and maintain the cheesecake’s firmness.