
Table of Contents
Table of Contents
1. Introduction
There’s a certain magic that happens when classic comfort food meets a creamy, dreamy twist. Enter Queso Chicken Enchiladas – a dish that takes the beloved Mexican staple and elevates it to new heights of indulgence with the addition of a luxurious, velvety cheese sauce. Far from your everyday enchilada, this rendition marries the savory goodness of seasoned chicken and soft tortillas with a generous blanket of rich, molten queso, transforming a simple meal into an unforgettable culinary experience.
Enchiladas themselves boast a history as rich and layered as their flavors. Originating in Mexico, the concept of rolling ingredients into tortillas dates back centuries, even pre-dating the arrival of the Spanish. The word “enchilada” comes from the Spanish “enchilar,” meaning “to add chili.” Traditionally, these were corn tortillas dipped in chili sauce and filled with humble ingredients like cheese or beans. Over time, as culinary traditions evolved and merged, particularly in the border regions of the United States and Mexico, the Tex-Mex style of cooking emerged, bringing with it innovations like flour tortillas and the generous use of melted cheese, often in the form of a creamy sauce.
My own journey with Queso Chicken Enchiladas began years ago, during a quest to replicate the incredibly satisfying, comforting flavors I’d discovered in a small, bustling Tex-Mex diner. The enchiladas there weren’t just good; they were an experience – each bite a symphony of tender chicken, perfectly seasoned, encased in a soft tortilla, all swimming in a luscious, slightly spicy, utterly irresistible queso sauce. It wasn’t just cheese melted on top; it was a deeply integrated component that transformed the entire dish. This wasn’t merely a recipe; it became a personal challenge to capture that elusive, crave-worthy creaminess at home.
What makes these Queso Chicken Enchiladas unique is precisely that: the queso. Unlike traditional enchiladas where cheese might be sprinkled over or baked into the filling, here, a rich, homemade queso sauce plays a starring role, both in the filling and as a decadent topping. It ensures every single forkful is infused with a smooth, cheesy goodness that clings to the chicken and tortillas, preventing any dryness and creating a harmonious, melt-in-your-mouth texture.
The significance of this dish lies not just in its deliciousness but in its ability to bring people together. It’s a meal that speaks of warmth, celebration, and the simple joy of good food shared. Whether you’re hosting a family dinner, a casual get-together with friends, or simply seeking ultimate comfort food on a chilly evening, these creamy chicken enchiladas are guaranteed to be a crowd-pleaser. They honor the spirit of Tex-Mex cuisine – bold, flavorful, and generously cheesy – while offering a homemade touch that makes them truly special. Prepare to fall in love with the ultimate expression of cheesy, savory perfection.
2. Recipe Summary
Cuisine: Tex-Mex / Mexican-inspired
Difficulty Level: Medium. While the individual steps are straightforward, there are several components (cooking chicken, making sauce, assembly) that require attention. It’s perfectly manageable for intermediate home cooks and an excellent challenge for enthusiastic beginners.
Total Preparation and Cooking Time:
- Prep Time: Approximately 45 minutes (includes cooking and shredding chicken, chopping vegetables, preparing ingredients).
- Cook Time: Approximately 25-30 minutes (baking time for the enchiladas).
- Total Time: 1 hour 10 minutes to 1 hour 15 minutes.
Dietary Classification: This recipe is primarily meat-based (chicken) and dairy-rich (queso). It is not suitable for vegetarian, vegan, or strict gluten-free diets as written (unless specific gluten-free tortillas are used). It is high in protein and a decadent, savory meal.
3. Equipment and Utensils
Having the right tools on hand will make the preparation of your Queso Chicken Enchiladas a smooth and enjoyable process. Here’s a comprehensive list:
- 9×13 inch (23×33 cm) Baking Dish: Essential for baking the enchiladas. A ceramic or glass dish works best for even heat distribution.
![A 9x13 inch ceramic baking dish, ready for enchiladas] - Large Skillet (10-12 inch / 25-30 cm): For cooking the chicken and sautéing aromatics for the filling. A deep skillet with a lid is ideal.
- Medium Saucepan (2-3 quart / 2-3 liter): Crucial for preparing the creamy queso sauce. A heavy-bottomed pan prevents scorching.
- Whisk: For ensuring a smooth, lump-free queso sauce.
- Measuring Cups and Spoons: For accurate ingredient measurements.
- Cutting Board: A sturdy surface for chopping vegetables and shredding chicken.
- Sharp Chef’s Knife: For precise chopping of onions, garlic, and cilantro.
- Large Mixing Bowl: For combining the chicken filling.
- Small Mixing Bowls: For mise en place (prepping ingredients).
- Spatula or Wooden Spoon: For stirring ingredients in the skillet and saucepan.
- Tongs or Two Forks: For shredding cooked chicken.
- Grater: If you’re shredding your own cheese from a block, which is highly recommended for better melting.
- Aluminum Foil: For covering the enchiladas during part of the baking process.
- Serving Spatula or Tongs: For carefully transferring baked enchiladas to plates.
- Optional: Immersion Blender: If you prefer an extra smooth queso sauce or if you want to make your own enchilada sauce from scratch with chiles.
- Optional: Tortilla Warmer or Damp Paper Towels: To warm tortillas and prevent cracking during rolling.
4. Serving Suggestions
The beauty of Queso Chicken Enchiladas lies in their ability to be a complete meal in themselves, yet they truly shine when paired with complementary sides and beverages. Here are some ideas to make your meal even more spectacular:
Plating Recommendations:
- Serve two to three enchiladas per person.
- Spoon extra warm queso sauce over the top just before serving for an irresistible presentation.
- Garnish generously with fresh chopped cilantro, a sprinkle of cotija cheese, or a dollop of sour cream or Mexican crema. A few slices of fresh jalapeño or a sprinkle of paprika can add visual appeal and a touch of heat.
- Place the enchiladas on a vibrant platter or individual plates, ensuring any accompanying side dishes are neatly arranged.
Side Dish Ideas:
- Mexican Rice: A classic pairing that offers a fluffy, flavorful contrast to the rich enchiladas.
- Refried Beans or Black Beans: Creamy, savory beans are a staple and balance the meal perfectly.
- Fresh Salad: A crisp, light salad with a tangy vinaigrette can cut through the richness of the queso. Think mixed greens, cherry tomatoes, and a cilantro-lime dressing.
- Guacamole: The creamy, fresh avocado goodness is an absolute must-have. If you love fresh flavors with your meal, you might enjoy our Spicy Pomegranate Guacamole for a festive twist, or a classic version.
- Pico de Gallo or Salsa Fresca: The vibrant, chunky freshness of tomatoes, onions, cilantro, and jalapeños provides a zesty counterpoint.
- Corn Salad: A simple salad featuring fresh or roasted corn, red onion, bell peppers, and a light dressing. For a more adventurous and zesty side, consider our Easy Grilled Mexican Street Corn Elote Recipe, which offers smoky, tangy notes.
- Roasted Vegetables: Roasted bell peppers, zucchini, or sweet potatoes can add a healthy and flavorful element.
Beverage Pairings:
- Margaritas: A classic lime margarita (on the rocks or frozen) is the quintessential pairing for Tex-Mex cuisine.
- Mexican Beer: Light lagers or amber ales like Modelo Especial, Corona, or Pacifico complement the flavors without overpowering them.
- Agua Frescas: Refreshing non-alcoholic options like horchata (rice milk drink), jamaica (hibiscus tea), or fresh fruit waters (lime, watermelon) are excellent choices.
- Red Wine: A lighter-bodied, fruity red wine such as a Zinfandel or a Tempranillo can also be a surprising and delightful pairing.
- Sparkling Water with Lime: Simple, refreshing, and helps cleanse the palate between bites.
5. Nutritional Information
While Queso Chicken Enchiladas are undeniably delicious and deeply satisfying, they are also an indulgent dish. Understanding the approximate nutritional breakdown can help you enjoy them mindfully. Please note that these figures are estimates and can vary based on specific ingredient brands, portion sizes, and preparation methods.
Per Serving (Approx. 2 enchiladas, assuming 8-10 servings per 9×13 dish):
- Calories: 550-700 kcal
- Macronutrient Distribution (Approximate):
- Protein: 35-45g (High protein, largely from chicken and cheese)
- Fat: 35-45g (Significant fat content from cheese, butter, and chicken skin if not removed)
- Saturated Fat: 15-25g
- Carbohydrates: 30-40g (From tortillas, minimal from vegetables)
- Fiber: 3-5g
- Sugars: 3-5g
- Other Noteworthy Nutrients:
- Sodium: 1200-1800mg (Can be high due to cheese, canned enchilada sauce, and broth. Choose low-sodium options where possible.)
- Calcium: Excellent source (from cheese).
- Vitamin A & C: Present in smaller amounts from vegetables like onions, garlic, and optional bell peppers.
- Iron: Present from chicken.
Dietary Information and Considerations:
- High in Dairy: Not suitable for lactose-intolerant individuals unless dairy-free alternatives are used.
- Contains Gluten: As typically made with wheat or corn tortillas (most corn tortillas contain some gluten or are processed in facilities that handle wheat). For a gluten-free version, ensure 100% corn tortillas are used and verify other ingredients (broth, spices, enchilada sauce) are certified gluten-free.
- Calorie-Dense: Best enjoyed as part of a balanced diet. Consider portion control.
Health Benefits (in moderation):
- Excellent Source of Protein: Chicken and cheese provide a substantial amount of protein, essential for muscle repair, growth, and satiety.
- Calcium for Bone Health: The generous amount of cheese contributes significantly to daily calcium intake, crucial for strong bones and teeth.
- Comfort and Satisfaction: While not a “health food,” comfort foods play a vital role in mental well-being and can provide a sense of satisfaction and happiness when enjoyed occasionally.
- Nutrient-Rich Ingredients: When made with fresh chicken, real cheese, and a homemade sauce, you control the quality of ingredients, potentially reducing artificial additives found in pre-made meals. Adding extra fresh vegetables to the filling or serving with a side salad can boost fiber and micronutrient intake.
To slightly lighten the dish, you can use lean chicken breast, low-fat dairy products (like skim milk for the queso sauce, or reduced-fat cheese), or opt for more vegetables in the filling. However, the true essence of Queso Chicken Enchiladas lies in their rich, indulgent nature, so savoring them as intended is part of the experience!
6. Storage and Reheating
Proper storage and reheating are key to enjoying your Queso Chicken Enchiladas long after they’ve emerged from the oven. This dish actually makes fantastic leftovers, sometimes even tasting better the next day as the flavors meld further.
Storage Instructions:
- Cool Completely: Before storing, allow the enchiladas to cool down to room temperature. This prevents condensation from building up, which can make them soggy.
- Airtight Container: Transfer leftover enchiladas to an airtight food storage container. If you plan to reheat individual portions, consider storing them separately to make the process easier.
- Original Baking Dish (if applicable): If there are many enchiladas left, you can simply cover the entire baking dish tightly with plastic wrap and then aluminum foil. This helps protect against freezer burn and odors.
Refrigeration:
- Duration: Cooked Queso Chicken Enchiladas can be safely stored in the refrigerator for 3-4 days.
- Tips: Ensure they are well-sealed to maintain freshness and prevent them from absorbing other fridge odors.
Freezing:
- Best for Unbaked (Preferred Method for Best Quality): For optimal results, freeze enchiladas before baking. Assemble the enchiladas according to the recipe, but do not bake them.
- Place the assembled enchiladas in a freezer-safe aluminum foil pan or an oven-safe dish.
- Cover tightly with a layer of plastic wrap directly on the surface of the enchiladas, then seal with aluminum foil.
- Label: Don’t forget to label with the date and cooking instructions.
- Duration: Unbaked frozen enchiladas can be stored for up to 2-3 months.
- To Cook from Frozen: Thaw overnight in the refrigerator, then bake as directed. If baking from frozen, cover tightly with foil and bake at 375°F (190°C) for 45-60 minutes, then uncover and bake for an additional 15-20 minutes, or until heated through and bubbly.
- Baked and Frozen (Also an Option): You can also freeze leftover baked enchiladas.
- Allow them to cool completely.
- Portion them into individual servings in freezer-safe containers, or freeze the entire baking dish as described above.
- Duration: Baked frozen enchiladas are best consumed within 1-2 months.
Reheating Methods:
- Oven (Recommended for Best Quality): This method helps maintain the texture of the tortillas and ensures even heating.
- From Refrigerator: Preheat oven to 350°F (175°C). Place enchiladas (covered with foil to prevent drying out) in an oven-safe dish. Heat for 20-30 minutes, or until bubbling and heated through. Remove foil for the last 5-10 minutes if you want the cheese on top to crisp slightly.
- From Frozen (Baked): Thaw first if possible. If reheating from frozen, cover tightly with foil and bake at 350°F (175°C) for 40-50 minutes, or until heated through.
- Microwave (Quickest Option for Single Servings):
- Place 1-2 enchiladas on a microwave-safe plate.
- Cover loosely with a microwave-safe lid or damp paper towel to retain moisture.
- Heat on high for 1-2 minutes, checking every 30 seconds, until heated through. Be cautious not to overheat, as this can make tortillas rubbery.
- Note: The texture won’t be as good as oven-reheated, and the cheese might not be as gooey.
- Stovetop (Less Common, but Possible for Individual Enchiladas):
- You can reheat individual enchiladas in a non-stick skillet over medium-low heat. Add a splash of broth or water and cover to create steam, helping to warm them without drying out. This method is best for crisping the bottom if desired, but might not re-melt the top cheese perfectly.
Always ensure that leftovers are reheated to an internal temperature of 165°F (74°C) to ensure food safety.
7. Expert Tips and Variations
Creating the perfect batch of Queso Chicken Enchiladas involves a bit of finesse and understanding of how flavors and textures work together. Here are some expert tips to elevate your dish, common mistakes to sidestep, and exciting variations to keep things fresh and appealing.
Professional Chef Tips for Perfection:
- Shred Your Own Cheese: Pre-shredded cheeses often contain anti-caking agents that prevent them from melting as smoothly as block cheese. Grating your own Monterey Jack, Colby, or even cheddar will result in a much creamier, more luxurious queso.
- Warm Your Tortillas: Before rolling, briefly warm your corn or flour tortillas. This can be done in a dry skillet for 10-15 seconds per side, in the microwave (stacked with a damp paper towel for 30 seconds), or by quickly dipping them in warm enchilada sauce. Warm tortillas are more pliable and less likely to crack when rolled.
- Don’t Overfill: While tempting to stuff them, overfilling enchiladas makes them difficult to roll and more prone to bursting during baking. Aim for a manageable amount of filling in the center.
- Season in Layers: Season your chicken, your filling, and even taste your queso sauce as you go. This builds depth of flavor throughout the dish. Don’t rely solely on the sauce for all the seasoning.
- Let it Rest: After baking, allow the enchiladas to rest for 5-10 minutes before serving. This allows the sauce to settle, the cheese to firm up slightly, and makes them easier to cut and serve without falling apart.
- Homemade Queso is Key: While store-bought queso can be convenient, making your own creamy queso sauce from scratch (as outlined in the instructions) offers unparalleled flavor and texture. It allows you to control the spice level and consistency.
- Sauce on Top and Bottom: Pouring a thin layer of enchilada sauce on the bottom of the baking dish prevents tortillas from sticking and adds flavor. Drowning them in sauce on top before baking keeps them moist and ensures they absorb all that deliciousness.
Common Mistakes to Avoid:
- Soggy Tortillas: This usually happens if tortillas aren’t warmed before rolling (they crack, allowing too much moisture in) or if the enchiladas are completely submerged in too much liquid and baked for too long. A good balance of sauce and proper baking time is key.
- Bland Filling: Undersalted or unseasoned chicken and filling will result in a flat-tasting dish, even with amazing queso. Taste and adjust seasoning at each stage.
- Dry Chicken: Overcooked chicken breast can be dry. If using pre-cooked chicken, ensure it’s not over-shredded or cooked again for too long in the filling. Rotisserie chicken is a great option for moisture and flavor. For another fantastic use of chicken, consider making Creamy Garlic Parmesan Chicken as a main course on its own.
- Lumpy Queso: Not whisking continuously when adding cheese to the sauce can lead to clumps. Low and slow heat, constant whisking, and gradually adding cheese are crucial for a silky-smooth texture.
Recipe Variations and Adaptations:
- Protein Swaps:
- Beef: Use seasoned ground beef or shredded slow-cooked pot roast for a richer flavor.
- Pork: Carnitas (slow-cooked shredded pork) would be incredible in this recipe.
- Vegetarian: Substitute chicken with black beans, roasted sweet potatoes, sautéed mushrooms, or crumbled plant-based meat substitutes. You might enjoy an Easy Mexican Casserole Quick Family Dinner Recipe if you’re exploring other hearty meatless options.
- Cheese Play:
- Add a sprinkle of cotija cheese on top after baking for a salty, crumbly contrast.
- Mix in a small amount of cream cheese into the queso sauce for extra tang and creaminess.
- Experiment with different melting cheeses in the queso, like white cheddar or a blend.
- Spice Level Adjustments:
- Mild: Use mild enchilada sauce and omit additional jalapeños or chili powder.
- Medium: Add diced green chilies to the filling, a pinch of cayenne to the queso, or use a medium enchilada sauce.
- Spicy: Incorporate finely diced jalapeños or serrano peppers into the filling, add a dash of hot sauce to the queso, or use a spicier enchilada sauce.
- Tortilla Options: While corn and flour are standard, try using blue corn tortillas for a different look and slightly nuttier flavor. For a lighter version, you could even try wrapping in large lettuce leaves (though this would change the core concept).
- Veggie Boost:
- Sautéed bell peppers, corn, or black beans can be added to the chicken filling for extra texture and nutrients.
- Stir in some spinach or kale at the end of cooking the filling until wilted.
Seasonal Adaptations:
- Summer: Add fresh corn kernels and diced bell peppers to the filling. Serve with a bright Easy Summer Peach Watermelon Salad with Zaatar for a refreshing contrast.
- Autumn/Winter: Incorporate roasted butternut squash or pumpkin puree into the filling for an earthy, sweet note. Garnish with toasted pumpkin seeds. For a different kind of cozy meal, our Wild Mushroom and Red Wine Braised Beef Stew offers similar comfort.
8. Ingredients Section
To create truly spectacular Queso Chicken Enchiladas, the quality and freshness of your ingredients are paramount. Here’s a detailed list with measurement conversions, sourcing tips, and potential substitutions.
Yields: 8-10 servings
Prep time: 45 minutes
Cook time: 25-30 minutes
For the Chicken Filling:
- 1.5-2 lbs (680-900g) Boneless, Skinless Chicken Breasts or Thighs:
- Sourcing: Fresh, high-quality chicken. Thighs offer more flavor and moisture.
- Substitutions: Pre-cooked rotisserie chicken (shredded), ground chicken or turkey, shredded beef, or a vegetarian alternative like black beans and roasted sweet potatoes.
- 2 tbsp (30ml) Olive Oil or Vegetable Oil
- Sourcing: Standard cooking oil.
- 1 Medium Yellow Onion, finely diced
- Sourcing: Fresh, firm onion.
- 3 cloves Garlic, minced
- Sourcing: Fresh garlic for best flavor.
- Substitutions: 1 tsp (5g) garlic powder if fresh is unavailable.
- 1 (4 oz / 113g) can Diced Green Chiles, undrained
- Sourcing: Found in the international or canned goods aisle.
- Substitutions: Fresh mild chopped chilies like Anaheim or poblano (roasted and peeled).
- 1 tsp (5g) Cumin Powder
- Sourcing: Spice aisle.
- 1 tsp (5g) Chili Powder
- Sourcing: Spice aisle.
- ½ tsp (2.5g) Smoked Paprika (optional, for depth)
- Sourcing: Spice aisle.
- ½ cup (120ml) Chicken Broth or Water
- Sourcing: Low-sodium preferred.
- Salt and Freshly Ground Black Pepper, to taste
- ¼ cup (60ml) Fresh Cilantro, chopped (for filling)
- Sourcing: Fresh produce aisle.
- Substitutions: Dried cilantro (use less, about 1-2 tbsp / 15-30ml), but fresh is highly recommended.
For the Queso Sauce:
- 2 tbsp (30g) Unsalted Butter
- Sourcing: Dairy aisle.
- 2 tbsp (15g) All-Purpose Flour
- Sourcing: Baking aisle.
- Substitutions: Cornstarch for a gluten-free option (use 1 tbsp mixed with 1 tbsp cold water to make a slurry).
- 2 cups (480ml) Whole Milk
- Sourcing: Dairy aisle.
- Substitutions: Reduced-fat milk can be used, but whole milk yields a richer sauce.
- 1 (10 oz / 280g) can Mild Red Enchilada Sauce (approximately 1 ¼ cups)
- Sourcing: International or canned goods aisle. Choose a quality brand.
- Substitutions: Homemade red enchilada sauce for superior flavor and control over ingredients.
- 1 (4 oz / 113g) can Diced Green Chiles, undrained
- Sourcing: Same as above.
- 4 oz (113g) Cream Cheese, softened and cubed
- Sourcing: Dairy aisle. Full-fat preferred for creaminess.
- Substitutions: None recommended for the unique texture it provides.
- 2 cups (220g) Shredded Monterey Jack Cheese (or a blend of Monterey Jack and Colby)
- Sourcing: Buy a block and shred yourself for best melting.
- Substitutions: White cheddar, American cheese (for a classic diner queso feel), or a Mexican blend cheese.
- ½ tsp (2.5g) Cumin Powder
- ¼ tsp (1.25g) Chili Powder
- Pinch of Cayenne Pepper (optional, for heat)
- Salt, to taste
For Assembly:
- 10-12 (6-inch / 15cm) Corn or Flour Tortillas
- Sourcing: Tortilla aisle. Choose good quality, pliable tortillas. Corn tortillas are more traditional; flour tortillas are easier to roll.
- Substitutions: Gluten-free corn tortillas for those with dietary restrictions.
- 1.5 cups (165g) Shredded Monterey Jack or Colby Cheese (for topping)
- Sourcing: Buy a block and shred yourself.
- ½ cup (120ml) Mild Red Enchilada Sauce (for bottom of dish)
- Sourcing: Same as above.
For Garnish (Optional):
- Fresh Cilantro, chopped
- Sour Cream or Mexican Crema
- Diced Avocado or Guacamole
- Sliced Jalapeños
9. Step-by-Step Instructions
Get ready to assemble and bake the most incredibly creamy and satisfying Queso Chicken Enchiladas you’ve ever tasted! Follow these detailed steps carefully for a perfect result.
Part 1: Prepare the Chicken Filling
- Cook the Chicken:
- Season chicken breasts or thighs generously with salt and pepper.
- Heat 2 tbsp (30ml) olive oil in a large skillet over medium-high heat.
- Add chicken and cook for 5-7 minutes per side, or until cooked through and golden brown.
- Culinary Technique: Ensure chicken reaches an internal temperature of 165°F (74°C).
- Remove chicken from the skillet and set aside to cool slightly.
- Troubleshooting: If chicken sticks, add a little more oil. Don’t overcrowd the pan; cook in batches if necessary.
- Shred the Chicken: Once cool enough to handle, use two forks or your hands to shred the chicken into bite-sized pieces. Set aside.
![Shredded cooked chicken in a bowl] - Sauté Aromatics: In the same skillet (add a touch more oil if needed), reduce heat to medium. Add the diced yellow onion and sauté for 5-7 minutes, until softened and translucent.
- Add Garlic and Chiles: Stir in the minced garlic and diced green chiles (from the 4 oz can). Cook for another 1-2 minutes until fragrant.
- Season the Filling: Add cumin powder, chili powder, and smoked paprika (if using) to the skillet. Stir well and cook for 1 minute until spices are fragrant.
- Combine Filling Ingredients: Return the shredded chicken to the skillet. Pour in ½ cup (120ml) chicken broth or water. Stir everything together, ensuring the chicken is well-coated with the spices and aromatics. Simmer for 2-3 minutes to allow flavors to meld and liquid to slightly reduce.
- Finish Filling: Remove from heat and stir in ¼ cup (60ml) fresh chopped cilantro. Taste and adjust salt and pepper as needed. Set the chicken filling aside.
Part 2: Make the Creamy Queso Sauce
- Start the Roux: In a medium saucepan, melt 2 tbsp (30g) unsalted butter over medium heat.
- Once butter is melted, sprinkle in 2 tbsp (15g) all-purpose flour.
- Culinary Technique: Whisk continuously for 1-2 minutes to create a smooth roux. It should be a pale blonde color and smell slightly nutty. This will thicken your sauce.
- Add Liquids: Slowly pour in 2 cups (480ml) whole milk, whisking constantly to prevent lumps.
- Bring the mixture to a gentle simmer, still whisking. It will start to thicken.
- Incorporate Enchilada Sauce and Chiles: Stir in 1 (10 oz / 280g) can of mild red enchilada sauce and the second 1 (4 oz / 113g) can of diced green chiles. Continue to whisk until well combined and simmering.
- Add Cream Cheese and Spices: Reduce heat to low. Add the softened and cubed cream cheese, cumin powder, chili powder, and a pinch of cayenne (if desired). Whisk until the cream cheese is completely melted and smooth.
- Troubleshooting: If your cream cheese is not fully softened, it might be harder to whisk in. Gently heat and keep whisking.
- Melt in Shredded Cheese: Gradually add 2 cups (220g) shredded Monterey Jack cheese (or cheese blend) to the sauce, a handful at a time, whisking constantly until each addition is fully melted and incorporated before adding more.
- Culinary Technique: Keep the heat low to prevent the cheese from becoming oily or stringy. Slow and steady wins the race for creamy queso!
- Cooking Cues: The sauce should be smooth, thick enough to coat the back of a spoon, and utterly luscious.
- Season the Queso: Taste the queso sauce and season with salt as needed. Remember, cheese is salty, so add judiciously. Keep warm over very low heat, stirring occasionally, while you assemble the enchiladas.
![Creamy, smooth queso sauce in a saucepan]
Part 3: Assemble the Enchiladas
- Preheat Oven and Prep Dish: Preheat your oven to 375°F (190°C). Pour ½ cup (120ml) mild red enchilada sauce into the bottom of your 9×13 inch (23×33 cm) baking dish and spread evenly.
- Warm Tortillas: Briefly warm your tortillas to make them pliable and prevent cracking.
- Method 1 (Microwave): Stack 5-6 tortillas, wrap in a damp paper towel, and microwave for 30 seconds. Repeat with remaining tortillas.
- Method 2 (Skillet): Heat a dry skillet over medium heat. Warm each tortilla for 10-15 seconds per side until soft.
- Fill and Roll:
- Lay a warm tortilla flat. Spoon about ¼ – ⅓ cup (60-80ml) of the chicken filling down the center of the tortilla.
- Spoon 1-2 tbsp (15-30ml) of the creamy queso sauce over the chicken filling.
- Culinary Technique: Roll the tortilla tightly, starting from one end.
- Place the rolled enchilada seam-side down in the prepared baking dish.
- Repeat with the remaining tortillas and filling, arranging them snugly in a single layer in the baking dish.
![Rolled enchiladas arranged in a baking dish]
- Sauce and Cheese Topping:
- Pour the remaining creamy queso sauce generously over the rolled enchiladas, ensuring they are well-covered.
- Sprinkle 1.5 cups (165g) shredded Monterey Jack or Colby cheese evenly over the top of the queso sauce.
Part 4: Bake and Serve
- Bake the Enchiladas:
- Cover the baking dish loosely with aluminum foil.
- Bake for 20 minutes.
- Remove the foil and continue baking for another 10-15 minutes, or until the cheese is melted, bubbly, and lightly golden, and the enchiladas are heated through.
- Cooking Cues: Watch for the sauce bubbling up around the edges and the cheese becoming perfectly gooey.
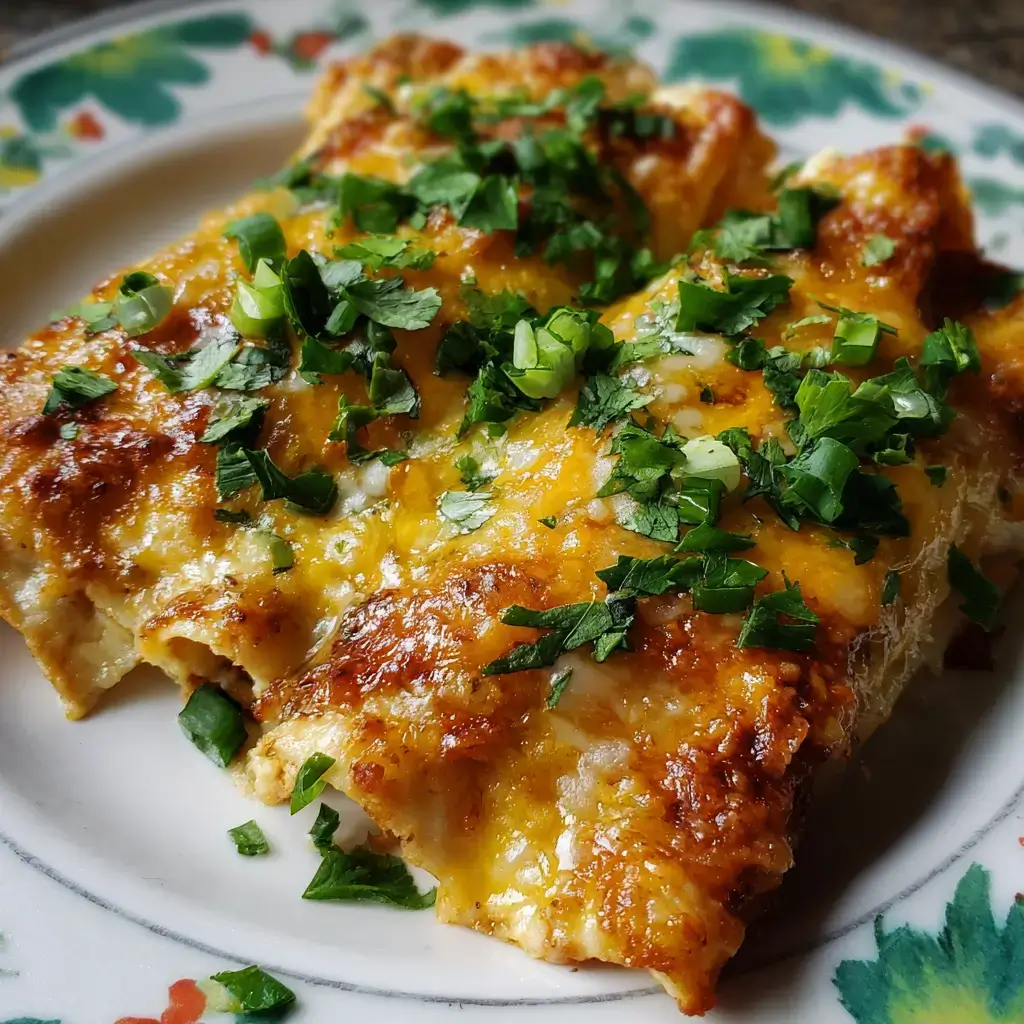
- Rest and Garnish:
- Remove from the oven and let the enchiladas rest for 5-10 minutes before serving. This allows the sauce to set slightly, making them easier to scoop.
- Garnish with extra fresh chopped cilantro, a dollop of sour cream or Mexican crema, and a few slices of fresh jalapeño if desired.
![Baked Queso Chicken Enchiladas, garnished and ready to serve]
- Serve Warm: Carefully spoon out the enchiladas and serve immediately with your favorite side dishes like rice, beans, or guacamole.
Enjoy your rich, creamy, and incredibly delicious Queso Chicken Enchiladas!
10. Frequently Asked Questions (FAQ)
1. What kind of tortillas are best for Queso Chicken Enchiladas?
Both corn and flour tortillas work well, and the choice often comes down to personal preference. Corn tortillas offer a more traditional Mexican flavor and texture, while flour tortillas are generally easier to roll without breaking and result in a softer enchilada. For this creamy queso version, flour tortillas are often favored for their ability to soak up the rich sauce without becoming too brittle. Always warm your tortillas slightly before rolling to increase their pliability.
2. Can I use pre-cooked chicken or rotisserie chicken for this recipe?
Absolutely! Using pre-cooked or rotisserie chicken is a fantastic time-saver. Simply shred about 4-5 cups of cooked chicken and incorporate it into the filling as directed in Step 6 of the instructions. This can significantly reduce your prep time without sacrificing flavor.
3. How can I prevent my enchiladas from getting soggy?
Several tips help prevent soggy enchiladas:
- Warm Tortillas: Ensure tortillas are warm and pliable before rolling to prevent cracking, which allows too much moisture in.
- Don’t Over-sauce the Dish Bottom: A thin layer of sauce on the bottom is good, but don’t drown them before baking.
- Bake Covered, Then Uncovered: Covering for the initial baking helps heat thoroughly, then uncovering allows excess moisture to evaporate and the cheese to brown without the tortillas becoming waterlogged.
- Don’t Overbake: Stick to the recommended baking times.
- Rest: Allow the enchiladas to rest for 5-10 minutes after baking; this helps the sauce settle.
4. Can I make the queso sauce from scratch instead of using canned enchilada sauce?
Yes, you can certainly make a completely homemade queso sauce! For a truly authentic experience, you could also make your own red enchilada sauce from dried chiles. If you prefer to skip the canned red enchilada sauce entirely, you can substitute the canned red enchilada sauce in the queso with additional milk or chicken broth and a bit more chili powder and cumin, or even a touch of tomato paste for color and depth.
However, using a good quality canned red enchilada sauce simplifies the process and provides a consistent flavor base for the queso. If you enjoy creating hearty, flavorful dishes from scratch, you might also be interested in our Creeper Pot Pie for a different kind of comforting main course.
5. What is Monterey Jack cheese, and can I substitute it?
Monterey Jack is a semi-hard, white, mild cheese with a slightly buttery flavor and excellent melting properties, making it ideal for queso. Yes, you can substitute it with other good melting cheeses like Colby, mild cheddar, or a Mexican blend. For an extra rich and smooth queso, you can even incorporate a small amount of authentic Queso Blanco or American cheese (like Velveeta for a classic Tex-Mex style queso, though not explicitly in this recipe, it’s an option).
6. Can I prepare Queso Chicken Enchiladas ahead of time?
Yes, this dish is great for make-ahead!
- Assemble and Refrigerate: You can assemble the entire dish (filling, rolling, saucing, and topping with cheese) and then cover it tightly with plastic wrap and refrigerate for up to 24 hours before baking. Add an extra 10-15 minutes to the baking time if baking straight from the fridge.
- Freeze Unbaked: As detailed in the “Storage and Reheating” section, freezing the assembled but unbaked enchiladas is also an excellent option for longer storage.
7. Is this recipe spicy? How can I adjust the heat level?
As written, this recipe is mild to medium, primarily getting its heat from the chili powder and diced green chiles. You can easily adjust the spice level:
- Milder: Use a mild enchilada sauce and omit the cayenne pepper in the queso. You can also use fewer diced green chiles or rinse them before adding.
- Spicier: Add fresh, finely diced jalapeños or serrano peppers to the chicken filling. Increase the amount of cayenne pepper in the queso, or add a dash of your favorite hot sauce to either the filling or the sauce.