
Table of Contents
Table of Contents
1. Introduction
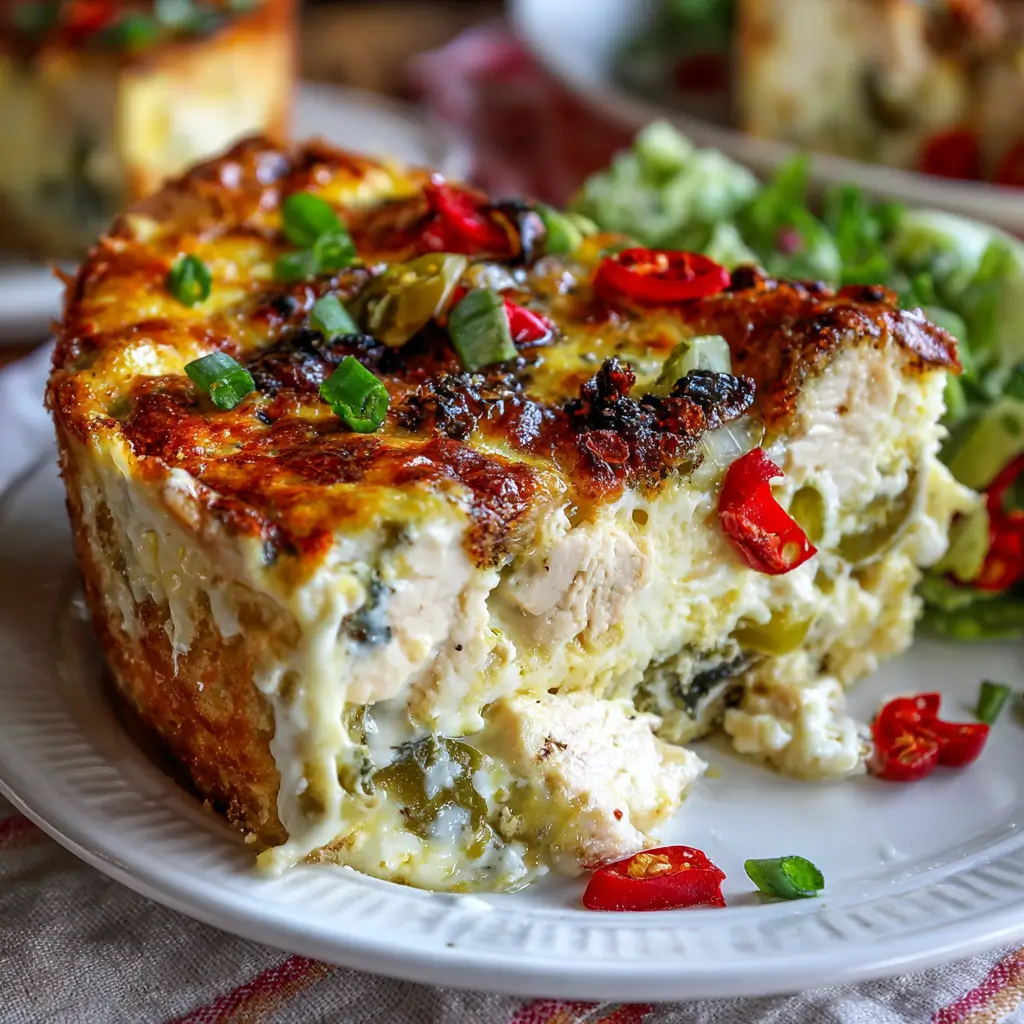
There are some dishes that, with a single bite, transport you to a place of pure culinary comfort, while simultaneously surprising your palate with an unexpected burst of flavor. The Creamy Pepperoncini Chicken Skillet is precisely one such masterpiece. It’s a dish that embodies the perfect marriage of rich, velvety creaminess and a tantalizing, tangy zest, all wrapped around succulent pieces of chicken. This isn’t just another chicken dinner; it’s an experience that elevates the humble weeknight meal into something truly extraordinary.
Imagine a busy Tuesday evening. You’re tired, hungry, and craving something utterly delicious yet simple to prepare. That’s where this Creamy Pepperoncini Chicken Skillet steps in as your culinary hero. Born from a desire to infuse everyday chicken with a vibrant, unforgettable character, this recipe quickly became a staple in our kitchen, and we believe it will become one in yours too. The secret lies in the humble pepperoncini – those delightful, mild chili peppers often found brined in jars, lending their distinctive sweet, tangy, and slightly spicy notes to a dish. While they might be more commonly associated with antipasto platters or sandwich garnishes, their potential to transform a creamy chicken sauce is nothing short of revelation.
The inspiration for this skillet sensation draws from the broad, welcoming arms of Italian-American cuisine, a culinary tradition renowned for its hearty, flavor-packed dishes that often marry simple ingredients with profound tastes. While not a traditional Italian dish in the classical sense, it takes cues from the generous use of bold flavors, the comforting embrace of cream-based sauces, and the sheer joy of a satisfying, fuss-free meal. The addition of pepperoncini, a staple in many Mediterranean-inspired pantries, brings a unique, briny acidity that cuts through the richness of the cream, creating a beautifully balanced profile that’s both indulgent and incredibly refreshing.
The beauty of a skillet meal lies in its efficiency and inherent charm. From searing the chicken to building the luxurious sauce, everything comes together in one pan, minimizing cleanup and maximizing flavor development. This method allows all the savory drippings and browned bits from the chicken to meld seamlessly into the sauce, forming a foundational layer of umami that a multi-pot approach simply cannot replicate.
The Creamy Pepperoncini Chicken Skillet isn’t just a recipe; it’s a testament to the power of a single pan and a few star ingredients to create an unforgettable dining experience. Its significance lies in its ability to bring gourmet-level flavors to the home kitchen without the fuss, making it accessible for both novice cooks and seasoned culinary enthusiasts alike. It’s a dish that invites sharing, celebrates flavor, and promises a comforting warmth that lingers long after the last bite.
2. Recipe Summary
This Creamy Pepperoncini Chicken Skillet is a delightful and surprisingly sophisticated dish perfect for any meal, from a quick weeknight dinner to a more relaxed weekend gathering.
- Cuisine: Modern American Comfort with Italian-American Influences
- This dish skillfully blends the comforting familiarity of American chicken skillet meals with the vibrant, zesty notes typical of Italian-American fare, particularly through its use of pepperoncini. It’s a fusion that feels both innovative and deeply satisfying.
- Difficulty Level: Easy to Moderate
- While the recipe involves a few distinct steps—searing, sautéing, and sauce-making—each is straightforward. We’ve ensured that even beginner cooks can achieve fantastic results with clear, concise instructions. The primary challenge lies in proper timing and heat management to ensure succulent chicken and a perfectly emulsified sauce.
- Total Preparation and Cooking Time: Approximately 45-55 minutes
- Preparation Time: 15-20 minutes. This includes trimming and seasoning the chicken, chopping aromatics, and preparing the pepperoncini.
- Cooking Time: 30-35 minutes. This covers searing the chicken, building the sauce, and allowing it to simmer and thicken. This efficient timeline makes it an ideal candidate for busy schedules without compromising on flavor or quality.
- Dietary Classification:
- Not Vegetarian: This recipe features chicken as its primary protein.
- Potentially Gluten-Free: The recipe traditionally uses a small amount of all-purpose flour for dredging. However, it can easily be made gluten-free by substituting the flour with an equal amount of cornstarch or a gluten-free all-purpose flour blend for the dredging step and for thickening the sauce. Always check labels for other ingredients like chicken broth to ensure they are certified gluten-free if catering to strict dietary needs.
- Nut-Free: This recipe is inherently nut-free, making it suitable for those with nut allergies.
- Dairy-Containing: Due to the heavy cream and cream cheese, this recipe is dairy-rich. Unfortunately, dairy-free substitutions for heavy cream and cream cheese may significantly alter the texture and flavor profile, so it is not easily adapted for a dairy-free diet without major modifications.
This comprehensive summary aims to give you a quick overview, helping you decide if this recipe fits your dietary needs and schedule before diving into the full culinary adventure.
3. Equipment and Utensils
Crafting the perfect Creamy Pepperoncini Chicken Skillet relies heavily on having the right tools at your disposal. While the beauty of a skillet meal is its simplicity, a few key pieces of equipment will ensure a seamless cooking experience and a superior final product.
- Large Skillet with Lid (10-12 inch / 25-30 cm): This is the star of our show. A heavy-bottomed skillet, preferably cast iron or a durable stainless steel, is essential. Cast iron provides excellent heat retention and even cooking, yielding a beautiful sear on the chicken and a consistent simmer for the sauce. A lid is crucial for simmering the chicken to tender perfection without drying it out. If you don’t have a lid that fits perfectly, foil can be used as a makeshift cover.
- Cutting Board: A sturdy, non-slip cutting board (wood, bamboo, or plastic) for prepping your chicken and vegetables. Ensure it’s large enough to handle your ingredients comfortably and is easy to clean.
- Sharp Chef’s Knife: A good quality, sharp knife is indispensable for trimming chicken, mincing garlic, and slicing onions. A dull knife is not only inefficient but also dangerous.
- Measuring Cups and Spoons:
- Dry Measuring Cups: For flour, cream cheese. (e.g., 1/4 cup, 1/3 cup, 1/2 cup, 1 cup sizes).
- Liquid Measuring Cups: For chicken broth, heavy cream, pepperoncini juice. (e.g., 1-cup / 250 ml, 2-cup / 500 ml sizes).
- Measuring Spoons: For salt, pepper, dried oregano, olive oil. (e.g., 1/4 tsp, 1/2 tsp, 1 tsp, 1 tbsp sizes).
- Whisk: A small to medium-sized whisk is vital for smooth sauce preparation, ensuring the cream cheese fully incorporates and the sauce thickens without lumps.
- Tongs: Heat-resistant tongs are incredibly useful for handling and turning the chicken breasts in the hot skillet, ensuring even searing without tearing the meat.
- Wooden Spoon or Heat-Resistant Spatula: For sautéing aromatics, scraping up fond (the flavorful browned bits at the bottom of the pan), and stirring the sauce without damaging your skillet’s surface (especially important for non-stick or cast iron).
- Shallow Dish or Plate: For dredging the chicken in flour. A pie plate or a wide, shallow bowl works perfectly.
- Small Bowl: For mixing the cream cheese with a bit of hot liquid before adding it to the sauce to prevent clumping.
- Meat Thermometer (Optional but Recommended): To ensure the chicken is cooked to a safe internal temperature of 165°F (74°C). This helps prevent overcooking and guarantees juicy results.
- Small Colander or Sieve: For draining canned pepperoncini if they come in a large jar.
- Serving Platter or Bowls: Once cooked, you’ll need something beautiful to present your culinary creation.
Having these tools ready before you begin will streamline your cooking process, allowing you to focus on the artistry of the dish rather than scrambling for equipment.
4. Serving Suggestions
The Creamy Pepperoncini Chicken Skillet is a star on its own, but its vibrant flavors truly shine when paired with complementary sides and beverages. Here’s how to create a complete and unforgettable meal:
- Plating Recommendations:
- Garnish with Freshness: A sprinkle of freshly chopped parsley or cilantro adds a pop of color and a fresh herbaceous note. For an extra kick, a few red pepper flakes can be scattered over the top.
- Whole Pepperoncini: Arrange a few whole or sliced pepperoncini on the side of each serving plate to emphasize the dish’s star ingredient and offer an extra tangy bite.
- Sauce Appeal: Ensure a generous ladle of the creamy sauce coats the chicken and pools enticingly around your chosen side, making every element rich and inviting.
- Visual Contrast: If serving with a light-colored side like pasta or rice, consider a dark, shallow bowl or a rustic white plate to make the golden-brown chicken and vibrant green pepperoncini stand out.
- Side Dish Ideas: The key is to choose sides that can either soak up the delicious creamy sauce or offer a refreshing contrast.
- Pasta: A classic pairing. Linguine, fettuccine, tagliatelle, or even penne work wonderfully. The ridges and curves of pasta are perfect for clinging to the rich sauce. Cook it al dente and toss directly with the chicken and sauce, or serve alongside.
- Rice: White rice, brown rice, or a delicate wild rice pilaf can absorb the sauce beautifully, providing a comforting base. Quinoa is also a fantastic, protein-rich alternative.
- Mashed Potatoes: Creamy mashed potatoes are an ultimate comfort food companion. Their smooth texture and ability to absorb the rich sauce make them an irresistible choice.
- Crusty Bread: A warm, crusty baguette or a loaf of focaccia is essential for soaking up every last drop of that incredible sauce. Garlic bread would also be a fantastic choice.
- Roasted or Steamed Vegetables: To balance the richness, offer a fresh, bright vegetable side.
- Green Beans: Steamed green beans with a hint of garlic or a luxurious side like Creamy Black Garlic Green Bean Bake with Panko Parmesan Topping would be excellent. For a simpler yet equally delicious option, try The Best Bacon Wrapped Green Beans.
- Asparagus: Roasted asparagus spears tossed with olive oil and lemon zest.
- Broccoli: Steamed or roasted broccoli florets.
- Brussels Sprouts: Crispy roasted Brussels sprouts or even a Maple Glazed Brussels Sprouts could add a lovely sweet and savory element.
- Simple Green Salad: A light salad with a vinaigrette dressing can cut through the richness of the chicken dish, offering a refreshing counterpoint. Consider a mixed green salad with cherry tomatoes, cucumber, and a lemon-herb vinaigrette. For something more substantial, a Thanksgiving Salad with Roasted Brussels Sprouts could work, even outside of Thanksgiving, offering hearty vegetables.
- Beverage Pairings:
- Wine:
- White Wine: A crisp, dry white wine like a Pinot Grigio, Sauvignon Blanc, or an unoaked Chardonnay would complement the acidity of the pepperoncini and the richness of the cream without overpowering it. The bright notes will refresh the palate.
- Red Wine: For those who prefer red, a light-bodied and fruity Pinot Noir or a chilled Lambrusco (dry, sparkling red) could provide a lovely contrast and a pleasant acidity.
- Beer: A light, crisp Lager or a clean Pilsner would be refreshing. For something with a bit more character, a Belgian Saison could offer intriguing fruity and spicy notes that play well with the pepperoncini.
- Non-Alcoholic: Sparkling water with a slice of lemon or lime, or a homemade ginger ale, would provide a delightful effervescence and clean finish.
By thoughtfully selecting your accompaniments, you can transform the Creamy Pepperoncini Chicken Skillet into a truly memorable dining experience.
5. Nutritional Information
Understanding the nutritional profile of the Creamy Pepperoncini Chicken Skillet can help you integrate it into a balanced diet. Please note that the following information is an estimate and can vary based on specific ingredient brands, exact measurements, and portion sizes. It’s always best to use a reliable nutrition calculator with your specific ingredients for precise data.
Estimated Nutritional Information (per serving, assuming 4 servings):
- Calories: 550-650 kcal
- Macronutrient Distribution:
- Protein: 45-55g (primarily from chicken)
- Total Fat: 35-45g (from heavy cream, cream cheese, olive oil, butter, chicken skin if used)
- Saturated Fat: 20-25g
- Total Carbohydrates: 15-20g (from flour, pepperoncini, onions, garlic)
- Dietary Fiber: 1-2g
- Sugars: 3-5g
- Cholesterol: 150-200mg
- Sodium: 800-1100mg (can be high due to chicken broth, pepperoncini brine, and added salt; adjust salt to taste)
- Potassium: 400-500mg
- Vitamin C: 10-15% Daily Value (DV)
- Calcium: 10-15% DV
- Iron: 10-15% DV
Dietary Information & Considerations:
- High Protein: Chicken is an excellent source of lean protein, essential for muscle repair, growth, and overall satiety.
- Moderate to High Fat: The recipe utilizes heavy cream and cream cheese, contributing to a rich texture and flavor but also a higher fat content, particularly saturated fat. Individuals monitoring fat intake might consider using half-and-half or a lighter cream cheese, though this will alter the sauce’s richness and thickness.
- Moderate Sodium: Be mindful of added salt, as chicken broth and pepperoncini brine already contribute significant sodium. Opt for low-sodium broth if available.
- Low Fiber: Unless served with high-fiber sides like whole wheat pasta or a generous portion of vegetables, the dish itself is not a significant source of dietary fiber.
Health Benefits:
- Excellent Source of Lean Protein: Chicken provides all nine essential amino acids, making it a complete protein vital for various bodily functions, including muscle maintenance and immune health.
- Rich in B Vitamins: Chicken is a good source of B vitamins, particularly Niacin (B3) and Vitamin B6, which are crucial for energy metabolism and nervous system function.
- Minerals: It offers essential minerals like phosphorus (for bone health) and selenium (an antioxidant).
- Antioxidants from Garlic and Onions: These aromatics provide allicin and other compounds known for their anti-inflammatory and immune-boosting properties.
- Potential Probiotics from Pepperoncini Brine: While not a primary source, brined foods like pepperoncini can contain beneficial bacteria that contribute to gut health, though processing and cooking will diminish these. The capsaicinoids in pepperoncini also contribute to their slight heat and are known for potential metabolic benefits.
- Satiety: The combination of protein and healthy fats helps promote a feeling of fullness, potentially aiding in portion control and preventing overeating.
This dish, while decadent, can be part of a balanced diet when portioned correctly and paired with nutritious, high-fiber side dishes like a large green salad or whole grains. Enjoy it as a delicious and satisfying meal that nourishes both body and soul.
6. Storage and Reheating
Proper storage and reheating are crucial for maintaining the quality, safety, and deliciousness of your Creamy Pepperoncini Chicken Skillet. This dish makes for fantastic leftovers, often tasting even better the next day as the flavors have more time to meld.
- Storage Instructions:
- Cool Down Quickly: Before storing, allow the cooked chicken and sauce to cool down to room temperature. This typically takes 30-60 minutes. Do not leave it out for more than 2 hours to prevent bacterial growth.
- Airtight Container: Transfer the chicken and sauce into a clean, airtight container. Glass containers are excellent as they don’t absorb odors or colors and can often go directly into the microwave or oven (check manufacturer’s instructions).
- Separate if Possible (Optional): If you anticipate not eating all the leftovers, you might consider storing the chicken separate from the sauce if you want to avoid the chicken becoming too soft in the sauce. However, for this dish, keeping them together is usually fine and often preferred as the chicken absorbs more flavor.
- Refrigeration:
- Duration: Stored properly in an airtight container in the refrigerator, the Creamy Pepperoncini Chicken Skillet will remain fresh and safe to eat for 3 to 4 days.
- Labeling: For best practice, label your container with the date you prepared the meal to keep track of its freshness.
- Freezing:
- Preparation for Freezing: While dairy-based sauces can sometimes change texture slightly upon freezing and thawing (they can become a bit grainy or separate), this recipe generally holds up well. Ensure the dish is completely cooled before freezing.
- Freezer-Safe Containers: Use heavy-duty freezer bags (squeeze out as much air as possible) or freezer-safe airtight containers. Leave a little headspace in containers if the sauce might expand slightly.
- Duration: When properly frozen, the Creamy Pepperoncini Chicken Skillet can be stored for up to 2-3 months. Beyond this, the quality may start to degrade, though it might still be safe to eat.
- Thawing: For best results, thaw frozen portions overnight in the refrigerator before reheating. If you’re short on time, you can carefully reheat from frozen using the stovetop method, adding a little extra liquid.
- Reheating Methods:
- Stovetop (Recommended for Best Quality):
- Transfer the desired portion of chicken and sauce to a skillet or saucepan.
- Add a splash of chicken broth, milk, or heavy cream (1-2 tablespoons per serving) to help rehydrate the sauce and prevent it from becoming too thick or breaking.
- Heat over medium-low heat, stirring occasionally, until the chicken is thoroughly heated through and the sauce is bubbling gently. Do not bring to a rapid boil, as high heat can cause dairy-based sauces to separate.
- Taste and adjust seasonings if necessary.
- Microwave (Quickest Option):
- Place a single serving of chicken and sauce in a microwave-safe dish.
- Add a small splash of liquid (broth or milk) if the sauce appears too thick.
- Cover the dish (a microwave-safe lid or damp paper towel works) to retain moisture and prevent splattering.
- Heat on medium power for 1-2 minutes, stir, and continue heating in 30-60 second intervals until thoroughly heated through. Be careful not to overheat, which can cause the sauce to separate or the chicken to dry out.
- Oven (For Larger Batches or if Serving from Freezer):
- Preheat your oven to 325°F (160°C).
- Transfer the chicken and sauce to an oven-safe dish. Add a splash of broth or cream.
- Cover tightly with foil.
- Heat for 20-30 minutes, or until thoroughly warmed through. Stir halfway through. This method is gentler on the sauce.
Always ensure that leftovers are reheated to an internal temperature of 165°F (74°C) for food safety. Enjoy your delicious leftovers!
7. Expert Tips and Variations
Elevate your Creamy Pepperoncini Chicken Skillet from great to truly extraordinary with these expert tips and exciting variations.
- Professional Chef Tips for Perfection:
- Don’t Overcrowd the Pan: When searing chicken, work in batches if necessary. Overcrowding lowers the pan’s temperature, steaming the chicken instead of searing it, which prevents that beautiful golden-brown crust (fond) that adds immense flavor to your sauce.
- Pat the Chicken Dry: Before dredging in flour, ensure your chicken breasts are thoroughly patted dry with paper towels. Moisture inhibits browning and prevents the flour from sticking properly.
- Deglaze with Purpose: After searing the chicken and sautéing the aromatics, deglazing the pan with a splash of chicken broth or even a dry white wine (like a Sauvignon Blanc or Pinot Grigio) is critical. Use a wooden spoon to scrape up all those flavorful browned bits (fond) stuck to the bottom of the pan. This is pure flavor gold that will infuse your sauce.
- Temper the Cream Cheese: To ensure a silky-smooth sauce without lumps, always temper the cream cheese. Before adding the whole block, whisk a few tablespoons of the hot broth/cream mixture into the softened cream cheese in a separate small bowl. Once smooth, slowly incorporate this mixture back into the main sauce. This prevents the cold cream cheese from seizing.
- Taste and Adjust Seasoning at Every Step: Don’t wait until the very end. Taste the chicken after searing, taste the aromatics, and most importantly, taste the sauce as it simmers. Adjust salt, pepper, and even a bit more pepperoncini juice to achieve perfect balance. Remember that pepperoncini brine is salty, so season judiciously.
- Finish with Fresh Herbs: A generous sprinkle of fresh parsley at the very end brightens the dish and adds a fresh, aromatic counterpoint to the rich sauce.
- Common Mistakes to Avoid:
- Overcooking the Chicken: Chicken breasts can dry out quickly. Sear them until golden, then finish simmering in the sauce until they reach an internal temperature of 165°F (74°C). Using a meat thermometer is your best friend here.
- High Heat on Dairy: When adding heavy cream and cream cheese, keep the heat at medium-low. Boiling dairy at high heat can cause it to separate or curdle, resulting in a grainy sauce. Slow and steady wins the race.
- Skipping the Brine: Don’t just use the pepperoncini; their brine is liquid gold! It provides the essential tangy, salty kick that defines this dish.
- Not Softening Cream Cheese: Ensure your cream cheese is at room temperature before adding it to the sauce. Cold cream cheese will be much harder to incorporate smoothly.
- Recipe Variations to Experiment With:
- Add More Vegetables:
- Spinach: Stir in a couple of handfuls of fresh spinach at the very end; it will wilt beautifully into the sauce.
- Mushrooms: Sauté sliced mushrooms (cremini or button) with the onions and garlic for an earthy depth.
- Sun-Dried Tomatoes: A few chopped oil-packed sun-dried tomatoes add a concentrated sweet-tart flavor that pairs wonderfully with pepperoncini.
- Roasted Red Peppers: Jarred roasted red peppers, roughly chopped, can add sweetness and color.
- Different Proteins:
- Chicken Thighs: For even juicier results and a richer flavor, substitute boneless, skinless chicken thighs for breasts. Adjust cooking time slightly as thighs take a bit longer.
- Pork Tenderloin: Sliced pork tenderloin medallions could also work beautifully, offering a different texture.
- Spice Level Adjustment:
- Spicier: Add an extra pinch of red pepper flakes with the garlic and onions, or choose hot pepperoncini if you can find them. A dash of your favorite hot sauce at the end can also work.
- Milder: Reduce the amount of pepperoncini juice and perhaps use fewer pepperoncini slices. Focus more on the creamy elements.
- Cheese Alternatives: While cream cheese provides unparalleled creaminess, you could experiment with a touch of freshly grated Parmesan or Pecorino Romano stirred into the sauce for a saltier, sharper finish. A bit of shredded mozzarella could also be added for a gooey, cheesy topping if desired.
- Herb Twist: While oregano is classic, try adding a pinch of dried basil or a mix of Italian herbs for a different aromatic profile. Fresh rosemary or thyme sprigs could also be added during the sauce simmering, then removed before serving.
- Gluten-Free Option: As mentioned in the summary, simply substitute the all-purpose flour for a gluten-free all-purpose blend or cornstarch when dredging the chicken. Ensure your chicken broth is also certified gluten-free.
- Seasonal Adaptations:
- Winter Comfort: Serve with hearty sides like mashed potatoes, polenta, or even a Savory Butternut Squash Ricotta and Sage Lasagna if you’re feeling adventurous. A side of roasted root vegetables would also be fantastic.
- Summer Lightness: Pair with a simple orzo pasta salad, a light quinoa pilaf, or a crisp green salad with a bright vinaigrette. Consider adding fresh tomatoes to the sauce for a lighter, fresher taste.
By embracing these tips and variations, you can tailor the Creamy Pepperoncini Chicken Skillet to your specific tastes and culinary preferences, making it a truly versatile and beloved dish in your repertoire.
8. Ingredients Section
The success of the Creamy Pepperoncini Chicken Skillet hinges on a carefully curated list of ingredients, each playing a crucial role in building its distinctive flavor profile. Quality matters here, so choose fresh, vibrant produce and good quality dairy.
Yields: 4 servings
Prep time: 15-20 minutes
Cook time: 30-35 minutes
Ingredients
- For the Chicken:
- 2 large (about 1.5 lbs / 680g total) boneless, skinless chicken breasts, sliced horizontally into 4 thinner cutlets (or pounded to 1/2-inch / 1.25 cm thickness)
- 1/2 teaspoon (2.5g) salt, or to taste
- 1/4 teaspoon (1.25g) black pepper, freshly ground
- 1/4 cup (30g) all-purpose flour (or gluten-free all-purpose flour/cornstarch for GF option)
- 2 tablespoons (30ml) olive oil, extra virgin
- 1 tablespoon (14g) unsalted butter
- For the Sauce:
- 1 medium yellow onion (about 1 cup / 160g), finely diced
- 4-5 cloves garlic (about 1 tablespoon / 15g), minced
- 1/2 cup (120ml) sliced pepperoncini (from a jar), drained, plus 1/4 cup (60ml) of the brine/juice
- 1 teaspoon (5g) dried oregano
- 1.5 cups (360ml) chicken broth, low sodium recommended
- 4 ounces (113g) cream cheese, full-fat, softened to room temperature
- 1/2 cup (120ml) heavy cream (also known as whipping cream)
- Fresh parsley, chopped, for garnish (about 2 tablespoons / 5g)
Sourcing Recommendations:
- Chicken: Opt for organic or free-range chicken breasts if possible for better flavor and quality. Ensure they are boneless and skinless for ease of preparation.
- Pepperoncini: Choose a reputable brand of jarred pepperoncini. Look for ones that are vibrant in color and have a good balance of tang and slight heat. The brine is crucial, so don’t discard it!
- Dairy: Full-fat cream cheese and heavy cream will provide the best richness and texture for the sauce. Ensure they are fresh and within their expiry dates.
- Aromatics: Fresh garlic and onion make a significant difference in flavor compared to dried alternatives.
Substitutions:
- Chicken Breasts: Boneless, skinless chicken thighs (about 1.5 lbs / 680g) can be used instead for a juicier, richer flavor. Adjust cooking time slightly.
- All-Purpose Flour: For a gluten-free version, use an equal amount of cornstarch or a gluten-free all-purpose flour blend.
- Olive Oil/Butter: While the combination provides excellent flavor and browning, you can use all olive oil or all butter if preferred, though adjusting the heat may be necessary to prevent butter from burning.
- Yellow Onion: Shallots (about 2-3 medium) can be used as a milder, sweeter alternative to yellow onion.
- Cream Cheese: While difficult to substitute without significantly altering texture, Neufchâtel cheese (a lower-fat cream cheese) can be used, but the sauce may be slightly thinner. Do not substitute with cottage cheese or ricotta, as they will not melt smoothly.
- Heavy Cream: Half-and-half can be used for a slightly lighter sauce, but it may not be as rich or thick. Whole milk is generally too thin for this recipe without additional thickening agents.
- Dried Oregano: 1 tablespoon (5g) of fresh oregano, finely chopped, can be used for a more vibrant herbal note. You can also use a generic “Italian seasoning” blend.
- Chicken Broth: Vegetable broth can be used as a vegetarian alternative (though the chicken protein itself is not vegetarian).
- Pepperoncini Brine: If you run out, a splash of white wine vinegar or apple cider vinegar combined with a pinch of salt can mimic some of the tang, but it won’t replicate the unique pepperoncini flavor fully.
Gathering all your ingredients and preparing them (mise en place) before you start cooking will make the entire process smoother and more enjoyable.
9. Step-by-Step Instructions
Follow these detailed steps to create a show-stopping Creamy Pepperoncini Chicken Skillet. Precision in each stage will ensure a perfectly tender chicken and a rich, velvety sauce.
Instructions
- Prepare the Chicken:
- Take your boneless, skinless chicken breasts. If they are thick (more than 1 inch / 2.5 cm), carefully slice each breast horizontally through the middle to create two thinner cutlets, aiming for about 1/2-inch (1.25 cm) thickness. This ensures even cooking and quicker searing.
- Pat the chicken cutlets thoroughly dry with paper towels. This step is crucial for achieving a good sear.
- Season both sides of the chicken generously with 1/2 teaspoon (2.5g) salt and 1/4 teaspoon (1.25g) black pepper.
- Place the 1/4 cup (30g) all-purpose flour (or GF alternative) in a shallow dish. Dredge each chicken cutlet in the flour, coating evenly on all sides, then shake off any excess. This light coating will help create a beautiful golden crust and thicken the sauce.
- Sear the Chicken:
- Heat a large (10-12 inch / 25-30 cm) cast iron or heavy-bottomed skillet over medium-high heat. Add 2 tablespoons (30ml) olive oil and 1 tablespoon (14g) unsalted butter. Let the butter melt and sizzle until it foams slightly.
- Carefully place the floured chicken cutlets into the hot skillet in a single layer. Do not overcrowd the pan; if necessary, sear in two batches.
- Sear for 3-4 minutes per side, or until beautifully golden brown and a crust has formed. The chicken does not need to be cooked through at this stage.
- Once seared, transfer the chicken to a plate and set aside. It will finish cooking in the sauce.
- Sauté Aromatics:
- Reduce the heat to medium. Add the finely diced 1 medium yellow onion to the same skillet (add a touch more olive oil if the pan is dry). Sauté for 3-5 minutes, scraping up any browned bits (fond) from the bottom of the pan with a wooden spoon, until the onion softens and becomes translucent.
- Add the minced 4-5 cloves garlic and 1 teaspoon (5g) dried oregano to the skillet. Sauté for another 1 minute, until fragrant, being careful not to burn the garlic.
- Build the Sauce Base:
- Pour in 1.5 cups (360ml) chicken broth. Increase the heat to medium-high and bring to a simmer, continuing to scrape up any remaining fond from the bottom of the pan. This deglazing step adds incredible depth of flavor to your sauce.
- Let the broth simmer for 2-3 minutes to slightly reduce and concentrate the flavors.
- Incorporate Cream Cheese and Heavy Cream:
- While the broth simmers, place the softened 4 ounces (113g) cream cheese in a small bowl. Ladle a few tablespoons of the hot broth from the skillet into the cream cheese and whisk vigorously until smooth. This tempering step prevents the cream cheese from clumping.
- Reduce the heat in the skillet to low. Stir the tempered cream cheese mixture into the simmering broth until fully incorporated and smooth.
- Pour in 1/2 cup (120ml) heavy cream and 1/4 cup (60ml) pepperoncini brine. Whisk everything together until the sauce is creamy and homogenous.
- Add Pepperoncini and Finish Cooking:
- Stir in the 1/2 cup (120ml) sliced pepperoncini.
- Return the seared chicken cutlets (along with any accumulated juices on the plate) to the skillet, nestling them into the creamy sauce.
- Cover the skillet with a lid, reduce the heat to low, and simmer gently for 8-12 minutes, or until the chicken is cooked through and reaches an internal temperature of 165°F (74°C) as measured by a meat thermometer. Ensure the sauce doesn’t boil rapidly.
- Serve:
- Once the chicken is cooked, remove the skillet from the heat.
- Taste the sauce and adjust seasonings (salt and pepper) if needed. The pepperoncini brine adds saltiness, so taste before adding more.
- Garnish generously with freshly chopped parsley.
- Serve immediately with your favorite side dishes, such as pasta, rice, or mashed potatoes, and a fresh green salad.
Troubleshooting Tips:
- Sauce Too Thin: If your sauce isn’t thickening enough, remove the chicken from the pan, increase the heat slightly, and whisk in a slurry of 1 teaspoon cornstarch mixed with 1 tablespoon cold water. Simmer for another minute until thickened.
- Sauce Too Thick: If the sauce becomes too thick, stir in an extra splash of chicken broth or heavy cream until it reaches your desired consistency.
- Chicken Not Browning: Ensure your skillet is hot enough and not overcrowded. If chicken steams instead of browns, it’s usually due to a cooler pan or too many pieces.
- Sauce Separating/Curdling: This often happens from too high heat or sudden temperature changes with dairy. Keep the heat low, especially after adding cream and cream cheese, and temper the cream cheese beforehand. If it separates, remove from heat, whisk vigorously, and sometimes adding a teaspoon of cold butter while whisking can help re-emulsify.
Enjoy your incredibly flavorful and comforting Creamy Pepperoncini Chicken Skillet!
10. Frequently Asked Questions (FAQ)
Here are some common questions about making and enjoying the Creamy Pepperoncini Chicken Skillet, along with clear and helpful answers to guide you to culinary success.
- What exactly are pepperoncini, and are they spicy?
Pepperoncini are a type of mild, sweet chili pepper, typically harvested when yellow-green and usually sold pickled in jars. They are characterized by their slightly sweet, tangy, and briny flavor with only a very mild heat level, often barely noticeable. They are much less spicy than jalapeños or serranos, making them accessible to almost all palates. The brininess from the pickling process is key to their unique flavor contribution in this dish. - Can I make this recipe spicier or milder?
Absolutely!
- For a Spicier Kick: You can add a pinch or two of red pepper flakes along with the garlic and onions, or choose “hot” pepperoncini if available. A dash of your favorite hot sauce stirred into the sauce at the end also works.
- For a Milder Flavor: Reduce the amount of pepperoncini slices and use slightly less of the brine. You can replace some of the brine with extra chicken broth. The dish will still retain a delightful tang but with less of the distinctive pepperoncini punch.
- Can I use chicken thighs instead of chicken breasts?
Yes, boneless, skinless chicken thighs are an excellent substitute! They tend to be juicier and have a richer flavor due to their higher fat content. The preparation steps remain largely the same, though you might need to adjust the cooking time slightly as thighs can sometimes take a little longer to cook through than breasts. Ensure they reach an internal temperature of 165°F (74°C). - How do I prevent the creamy sauce from curdling or separating?
The key to a smooth, uncurdled sauce lies in managing temperature and how you incorporate dairy.
- Temper the cream cheese: Always soften the cream cheese to room temperature, and then whisk a small amount of the hot broth into it separately before adding it to the main skillet. This gradually brings its temperature up.
- Low and Slow Heat: Once you’ve added the cream cheese and heavy cream, reduce the heat to low. Avoid bringing the sauce to a rapid boil. Gentle simmering is ideal. High heat can cause the dairy proteins to coagulate and separate. If you notice it starting to curdle, immediately remove it from the heat and whisk vigorously.
- Is this recipe suitable for a gluten-free diet?
Yes, this recipe can easily be made gluten-free. Simply substitute the all-purpose flour used for dredging the chicken with an equal amount of cornstarch or a gluten-free all-purpose flour blend. Always double-check the label of your chicken broth to ensure it is certified gluten-free, as some brands may contain gluten-containing ingredients. - Can I make this dish ahead of time?
Yes, this Creamy Pepperoncini Chicken Skillet is fantastic as a make-ahead meal. The flavors often deepen and meld even more after a day in the refrigerator. Follow the storage and reheating instructions in Section 6. For best results, allow it to cool completely before refrigerating in an airtight container for up to 3-4 days. When reheating, add a splash of broth or cream to restore the sauce’s consistency. - What kind of skillet is best for this recipe?
A heavy-bottomed skillet that retains heat well is ideal. A cast iron skillet (10-12 inches / 25-30 cm) is highly recommended as it provides excellent heat distribution, which is crucial for achieving a perfect sear on the chicken and even simmering for the sauce. A good quality stainless steel skillet with a heavy base also works very well. Using a non-stick skillet is an option, but it may not achieve the same level of browning (fond) which adds significant flavor to the sauce. Ensure your skillet has a lid or that you have one that fits.