Table of Contents
Table of Contents
1. Introduction
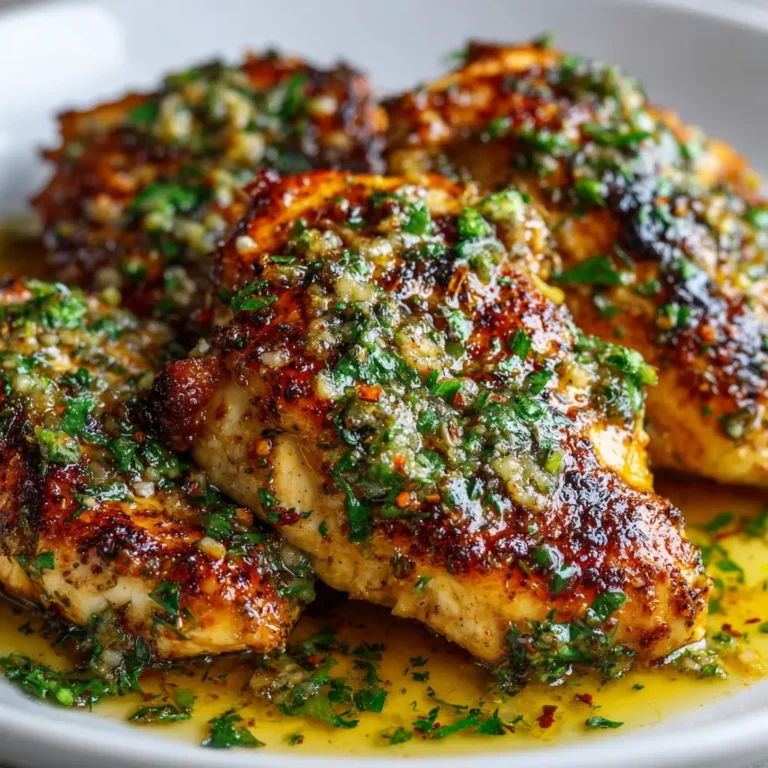
There are few dishes that evoke such universal comfort and satisfaction as a perfectly cooked chicken breast, especially when bathed in a rich, aromatic garlic butter sauce. This isn’t just a recipe; it’s a culinary embrace, a testament to how simple ingredients, when treated with respect and a touch of magic, can transform into something truly extraordinary. Imagine this: a tender, golden-brown chicken breast, seared to perfection, then lovingly draped in a velvety sauce infused with the pungent sweetness of garlic and the luxurious richness of butter. It’s a symphony of flavors and textures that dances on the palate, leaving you longing for just one more bite.
My personal journey with Garlic Butter Chicken Breast began during my college years. Like many students, I was on a tight budget and constantly seeking ways to make humble ingredients shine. Chicken breast was a staple—lean, versatile, and relatively inexpensive. However, it often fell victim to dryness and blandness in my early culinary experiments.
That all changed one evening when I stumbled upon a simple technique: searing the chicken fiercely and then finishing it in a pan sauce. The addition of garlic and butter, two ingredients I always had on hand, was a revelation. It wasn’t just a meal; it was a revelation. It transformed a mundane protein into a dish that felt gourmet, despite its effortless preparation. It quickly became my signature dish, impressing friends and family alike, and proving that deliciousness doesn’t always require complexity.
The beauty of Garlic Butter Chicken Breast lies in its deceptive simplicity. It transcends cultural boundaries, offering a comforting warmth that resonates with anyone who appreciates good food. While not tied to a single ancient culinary tradition, the combination of butter, garlic, and protein is a timeless trio found in countless cuisines worldwide, from the rich French “beurre blanc” to the aromatic Italian “scampi.” This particular rendition, focusing on the chicken breast, has become a modern classic in Western home cooking, celebrated for its speed, flavor, and elegance.
It’s a dish that symbolizes quick gourmet, a way to bring restaurant-quality taste to your dinner table in under 30 minutes. Its significance lies in its ability to elevate the everyday, turning a common weeknight ingredient into a memorable meal, proving that with a little know-how, anyone can create culinary magic. It’s more than just a meal; it’s an affirmation of how simple, quality ingredients can unite to create something truly magnificent, offering both nourishment and profound satisfaction.
2. Recipe Summary
This Garlic Butter Chicken Breast recipe embodies comfort and elegance in a single, convenient pan. It’s a dish that feels special enough for guests but is simple enough for the busiest weeknights.
- Cuisine: Modern American / European-inspired Comfort Food
- Difficulty Level: Easy
- Total Preparation and Cooking Time: Approximately 30 minutes
- Prep Time: 10 minutes
- Cook Time: 20 minutes
- Yield: 4 servings
- Dietary Classification:
- Gluten-Free: Naturally gluten-free, assuming all other ingredients (like broth) are also GF certified.
- Low-Carb: Excellent for low-carb diets.
- High Protein: A fantastic source of lean protein.
- Note: Contains dairy. Can be adapted for dairy-free diets with suitable butter substitutes (see “Substitutions” section).
3. Equipment and Utensils
Having the right tools can make all the difference in achieving that perfect golden sear and luscious pan sauce for your Garlic Butter Chicken Breast. Here’s a comprehensive list:
- Large Skillet (10-12 inches / 25-30 cm): A heavy-bottomed skillet is crucial for even heat distribution and a good sear.
- Recommendation: Cast iron, stainless steel, or a good quality non-stick pan. Cast iron provides superior heat retention and a beautiful crust.
- Cutting Board: For prepping chicken and herbs, ensuring hygiene by having a separate one for raw meat or cleaning thoroughly between uses.
- Sharp Chef’s Knife: Essential for butterflying or halving chicken breasts, mincing garlic, and chopping parsley.
- Meat Mallet or Rolling Pin: Used for pounding chicken breasts to an even thickness (about 3/4 inch or 2 cm). This ensures uniform cooking and prevents dry spots.
- Tongs: Indispensable for safely handling and flipping chicken breasts in the hot pan.
- Small Bowl: For mixing seasoning for the chicken.
- Measuring Spoons: For precise measurements of salt, pepper, garlic powder, and herbs.
- Liquid Measuring Cup: For accurately measuring chicken broth and lemon juice.
- Whisk: To emulsify the pan sauce, ensuring it’s smooth and well-combined.
- Heat-Resistant Spatula or Wooden Spoon: For scraping up flavorful browned bits from the bottom of the pan (fond) when deglazing.
- Internal Meat Thermometer: The most reliable way to ensure chicken is cooked through to a safe internal temperature of 165°F (74°C) without overcooking.
- Serving Platter: For presenting your beautifully cooked chicken.
- Aluminum Foil: For tenting the chicken during resting, allowing juices to redistribute.
4. Serving Suggestions
The versatility of Garlic Butter Chicken Breast makes it a fantastic centerpiece for a variety of meals, from a quick weeknight dinner to a more elaborate gathering. How you serve it can elevate the experience even further.
Plating Recommendations:
For a visually appealing presentation, consider these tips:
- Garnish Generously: A sprinkle of fresh, vibrant green parsley or chives adds a pop of color and freshness that contrasts beautifully with the golden chicken and rich sauce.
- Drizzle with Sauce: Before serving, spoon extra garlic butter sauce over each chicken breast and onto the plate. This ensures every bite is flavorful and moist.
- Create a Bed: Serve the chicken on a bed of mashed potatoes, creamy polenta, or fluffy rice to soak up all the delicious pan juices.
- Layer with Sides: Arrange your chosen side dishes neatly alongside the chicken for a balanced and attractive plate.
Side Dish Ideas:
The richness of the garlic butter sauce pairs wonderfully with both light and hearty accompaniments.
- Creamy Mashed Potatoes: The classic pairing. The potatoes absorb the luxurious sauce perfectly.
- Roasted Asparagus or Broccoli: Simple, elegant, and provides a healthy green contrast. Try these easy sautéed green beans for a quick and flavorful vegetable side.
- Garlic Parmesan Roasted Potatoes: Echoes the garlic flavor in the main dish while adding a satisfying carbohydrate.
- Pasta: A light pasta like angel hair or linguine tossed with a little olive oil or extra pan sauce.
- Steamed Rice or Quinoa: A simple, absorbent base that lets the chicken and sauce shine.
- Crusty Bread: Essential for soaking up every last drop of that incredible garlic butter sauce.
- Simple Green Salad: A crisp, fresh salad with a light vinaigrette (like lemon-herb) cuts through the richness of the chicken and refreshes the palate.
- Cauliflower Rice: A great low-carb alternative to traditional rice or potatoes.
Beverage Pairings:
To complement the rich, savory flavors of the Garlic Butter Chicken Breast, consider these beverage options:
- White Wine:
- Chardonnay (unoaked or lightly oaked): Its crispness and notes of apple or pear beautifully balance the butter.
- Sauvignon Blanc: Offers a refreshing acidity and herbaceous notes that can cut through the richness.
- Pinot Grigio: A light-bodied, dry white wine that pairs well without overpowering.
- Red Wine (light-bodied):
- Pinot Noir: Its earthy notes and red fruit flavors can complement chicken without being too heavy.
- Beer:
- Pilsner or Lager: A crisp, clean lager can be very refreshing.
- Wheat Beer: Offers a lighter, sometimes citrusy profile that works well.
- Non-Alcoholic Options:
- Sparkling Water with Lemon or Cucumber: A simple, refreshing choice.
- Iced Tea: Unsweetened iced tea can be a good palate cleanser.
- Lemonade: A slightly sweet and tart lemonade can provide a delightful contrast.
5. Nutritional Information
Understanding the nutritional profile of your meals is key to maintaining a balanced diet. Garlic Butter Chicken Breast, while indulgent in flavor, can be a surprisingly wholesome and beneficial part of your eating plan.
Estimated Nutritional Information Per Serving (approx. 4 oz chicken breast with sauce):
- Calories: 400-550 kcal (This can vary significantly based on the amount of butter and oil used, and the size of the chicken breast.)
- Macronutrient Distribution:
- Protein: ~40-50g (Very high, as chicken breast is an excellent lean protein source.)
- Fat: ~25-35g (Moderate to high, primarily from butter and olive oil. Using less butter or a lighter hand with oil can reduce this.)
- Carbohydrates: ~2-5g (Very low, making it ideal for low-carb or ketogenic diets.)
- Cholesterol: ~120-150mg
- Sodium: ~400-600mg (Can be controlled by adjusting the salt added and using low-sodium broth.)
Dietary Information & Health Benefits:
- High-Quality Protein: Chicken breast is one of the best sources of lean, high-quality protein. Protein is essential for muscle repair and growth, hormone production, and overall satiety. Including ample protein in your meals helps you feel fuller for longer, which can be beneficial for weight management.
- Rich in B Vitamins: Chicken breast is a good source of B vitamins, particularly Niacin (B3), Vitamin B6, and Vitamin B12. These vitamins are crucial for energy metabolism, nerve function, and red blood cell formation.
- Source of Selenium: Selenium is an important trace mineral found in chicken, acting as an antioxidant that helps protect cells from damage and supports immune function.
- Low in Carbohydrates: For those following low-carb, keto, or diabetic-friendly diets, this dish is an excellent choice as it contains minimal carbohydrates.
- Versatile and Customizable: While the base recipe contains butter, it’s possible to adjust the fat content or substitute ingredients (e.g., olive oil instead of butter, or plant-based butter alternatives for dairy-free options) to meet specific dietary needs.
- Bone Health: Chicken provides phosphorus, a mineral that works with calcium to build strong bones and teeth.
- Immune Support: The garlic in this dish is not just for flavor; it’s renowned for its immune-boosting properties due to compounds like allicin.
- Satiety: The combination of high protein and healthy fats helps promote feelings of fullness and satisfaction, reducing the likelihood of overeating or snacking between meals.
Always remember that these values are estimates and can vary based on specific ingredient brands, exact measurements, and cooking methods. For precise nutritional data, it is recommended to use a nutritional calculator with your exact recipe ingredients.
6. Storage and Reheating
Proper storage and reheating are crucial to maintain the delicious flavor and texture of your Garlic Butter Chicken Breast, ensuring it remains safe and enjoyable for future meals.
Storage Instructions:
- Cool Promptly: Allow the cooked chicken breast to cool down to room temperature within 2 hours of cooking. Do not leave it out for longer than this to prevent bacterial growth.
- Airtight Container: Once cooled, transfer the chicken breasts and any remaining garlic butter sauce to an airtight container. This helps prevent contamination, retains moisture, and keeps odors from spreading in your refrigerator.
- Refrigeration: Store the airtight container in the refrigerator for 3-4 days.
- Freezing: For longer storage, Garlic Butter Chicken Breast can be frozen.
- Preparation: Ensure the chicken is completely cooled. You can freeze individual chicken breasts wrapped tightly in plastic wrap or aluminum foil, then place them in a freezer-safe bag or container. Include the sauce if desired, perhaps in a separate small container or directly with the chicken.
- Duration: Store in the freezer for up to 3 months. Beyond this, quality may start to diminish, though it will likely still be safe to eat.
- Thawing: Thaw frozen chicken overnight in the refrigerator before reheating. Avoid thawing at room temperature.
Reheating Methods:
The key to reheating is to warm the chicken gently without drying it out, especially since chicken breast can be prone to becoming tough if overcooked.
- Skillet (Recommended for Best Results):
- Place the chicken breasts in a skillet over low-medium heat.
- Add a splash of chicken broth or water to the pan, along with a tiny knob of butter, to create some steam and moisture.
- Cover the skillet with a lid and heat gently for 5-7 minutes, or until warmed through, flipping once if desired. The liquid will help keep the chicken moist.
- This method helps re-crisp the exterior slightly and keeps the interior juicy.
- Oven:
- Preheat your oven to 300°F (150°C).
- Place the chicken breasts in an oven-safe dish. You can add a tablespoon of chicken broth or water to the bottom of the dish to create a steamy environment.
- Cover the dish tightly with aluminum foil.
- Heat for 10-15 minutes, or until heated through. Low and slow is the key to preventing dryness.
- Microwave (Quickest, but Can Affect Texture):
- Place chicken breast on a microwave-safe plate. If you have extra sauce, add some.
- Cover loosely with a microwave-safe lid or damp paper towel to trap moisture.
- Heat in short bursts (e.g., 30-60 seconds at a time) on medium power, checking and flipping between bursts, until warmed through.
- Be cautious not to overheat, as this is the method most likely to dry out the chicken.
Important Considerations:
- Internal Temperature: Always ensure reheated food reaches an internal temperature of 165°F (74°C) to be safe for consumption.
- Sauce Consistency: If the sauce has thickened too much during refrigeration, you can thin it out with a little extra chicken broth or water during reheating.
- Enjoy Freshly Made: While this dish reheats well, like most pan-seared dishes, it is always best enjoyed fresh.
7. Expert Tips and Variations
Elevate your Garlic Butter Chicken Breast from delicious to unforgettable with these expert tips and creative variations. Avoiding common pitfalls and embracing new flavors will make you a true master of this versatile dish.
Professional Chef Tips for Perfection:
- Pound for Evenness: Don’t skip pounding the chicken breasts to an even 3/4-inch (2 cm) thickness. This ensures uniform cooking, so one part isn’t dry while another is still undercooked. Place chicken between two pieces of plastic wrap and use a meat mallet or rolling pin.
- Pat Dry, Always: Moisture is the enemy of a good sear. Pat your chicken breasts thoroughly dry with paper towels before seasoning. This allows the chicken to develop a beautiful golden-brown crust, rather than steaming in its own juices.
- Don’t Overcrowd the Pan: Cook chicken in batches if necessary. Overcrowding lowers the pan’s temperature, leading to steaming instead of searing. Give each piece space to breathe and brown properly.
- High Heat, Then Medium: Start with medium-high heat to get a good initial sear, then reduce to medium to cook through. This creates a crispy exterior and tender interior.
- Rest the Meat: After cooking, transfer the chicken to a cutting board and tent it loosely with foil. Let it rest for 5-10 minutes. This allows the juices to redistribute throughout the meat, resulting in a more tender and juicy chicken breast.
- Deglaze with Flavor: After searing the chicken, the browned bits (fond) in the pan are pure flavor. Deglazing with chicken broth and lemon juice (as in the recipe) is crucial for building a rich pan sauce. Scrape vigorously with a wooden spoon or spatula.
- Fresh Garlic is Key: While garlic powder has its place, fresh minced garlic provides an unparalleled aromatic depth to this dish. Add it after searing the chicken to prevent it from burning and becoming bitter.
- Taste and Adjust Seasoning: Before serving, always taste your pan sauce. Adjust salt, pepper, and lemon juice as needed. A final squeeze of lemon brightens the flavors immensely.
Common Mistakes to Avoid:
- Overcooking: The most common culprit for dry chicken. Use a meat thermometer to ensure the internal temperature reaches exactly 165°F (74°C). Remove from heat just shy of this, as carryover cooking will do the rest.
- Burning the Garlic: Garlic burns quickly. Add it to the pan after the chicken has mostly cooked, allowing it to soften and become fragrant without turning bitter.
- Not Enough Fat: The butter and olive oil are essential for both searing and creating the luscious pan sauce. Don’t be too shy with them, but don’t drown the chicken either.
- Skipping the Rest: Rushing to cut the chicken immediately after cooking will cause all the precious juices to run out, leaving you with dry meat.
- Not Seasoning Enough: Chicken breasts are bland on their own. Be generous with salt and pepper, and consider adding garlic powder to the chicken itself for an extra layer of flavor. For even more flavor, consider making a homemade garlic scapes compound butter to use in this recipe.
Recipe Variations for Creative Cooks:
- Creamy Garlic Butter Chicken: After deglazing, whisk in 1/2 cup (120ml) heavy cream or half-and-half and simmer until slightly thickened. Add a sprinkle of Parmesan cheese for an extra layer of decadence, much like a creamy garlic parmesan chicken dish.
- Herbaceous Twist: Incorporate fresh herbs like chopped rosemary, thyme, or oregano along with the parsley. Add them to the pan with the garlic for a more complex aroma.
- Lemon Herb Infusion: Boost the lemon flavor with a teaspoon of lemon zest added to the butter sauce, or take inspiration from this easy lemon herb baked chicken breast for a brighter profile.
- Mushroom & Spinach: Sauté sliced mushrooms (cremini or shiitake) in the pan after removing the chicken, then add a handful of fresh spinach until wilted. Incorporate them into the pan sauce.
- Spicy Kick: Add a pinch of red pepper flakes with the garlic for a subtle heat, or a dash of your favorite hot sauce to the finished sauce.
- Sun-Dried Tomato & Basil: Stir in chopped sun-dried tomatoes (oil-packed, drained) and fresh basil at the end for a Mediterranean flair.
- Wine Deglaze: Substitute half of the chicken broth with dry white wine (like Pinot Grigio or Chardonnay) for deglazing. Allow it to simmer and reduce for a minute to cook off the alcohol.
- Cheesy Finish: After making the sauce, sprinkle the chicken with shredded mozzarella or grated Parmesan cheese, cover for a minute to melt, and serve.
Seasonal Adaptations:
- Spring/Summer: Serve with lighter sides like a fresh corn salad, grilled zucchini, or a vibrant mixed green salad. Emphasize fresh herbs and an extra squeeze of lemon.
- Autumn/Winter: Pair with heartier sides such as roasted root vegetables (carrots, parsnips), creamy polenta, or even a side of roasted butternut squash. Consider adding a pinch of dried sage or thyme to the sauce for a warmer, cozier flavor profile.
For more general knowledge about cooking chicken and how to get the most out of it, check out our ultimate grilled chicken guide.
8. Ingredients Section
Crafting the perfect Garlic Butter Chicken Breast starts with quality ingredients. Here’s what you’ll need, along with essential measurement conversions, sourcing tips, and clever substitutions.
Yields: 4 servings
Prep time: 10 minutes
Cook time: 20 minutes
Ingredients
- Chicken:
- 4 boneless, skinless chicken breasts (approx. 1.5 – 2 lbs / 680 – 900g total)
- Seasoning:
- 1 teaspoon (5g) salt, or to taste
- 1/2 teaspoon (2.5g) black pepper, freshly ground, or to taste
- 1/2 teaspoon (2.5g) garlic powder (optional, for extra flavor on chicken)
- For Searing:
- 1 tablespoon (15ml) olive oil
- Garlic Butter Sauce:
- 1/2 cup (113g / 1 stick) unsalted butter
- 4-6 cloves garlic, minced (approx. 1.5 – 2 tablespoons / 22-30g)
- 1/2 cup (120ml) chicken broth (low sodium recommended)
- 1 tablespoon (15ml) fresh lemon juice (from about 1/2 a lemon)
- 2 tablespoons (10g) fresh parsley, chopped, for garnish (plus extra for serving)
Measurement Conversions (Approximate)
Understanding both imperial and metric measurements ensures accuracy regardless of your preferred system.
- Chicken:
- 1.5 – 2 lbs ≈ 680 – 900 grams
- Salt:
- 1 teaspoon ≈ 5 grams
- Black Pepper:
- 1/2 teaspoon ≈ 2.5 grams
- Garlic Powder:
- 1/2 teaspoon ≈ 2.5 grams
- Olive Oil:
- 1 tablespoon ≈ 15 milliliters
- Unsalted Butter:
- 1/2 cup (1 stick) ≈ 113 grams
- Minced Garlic:
- 4-6 cloves ≈ 1.5 – 2 tablespoons ≈ 22 – 30 grams
- Chicken Broth:
- 1/2 cup ≈ 120 milliliters
- Fresh Lemon Juice:
- 1 tablespoon ≈ 15 milliliters
- Fresh Parsley:
- 2 tablespoons ≈ 10 grams
Sourcing Recommendations:
- Chicken Breasts: Look for ethically raised, antibiotic-free chicken breasts if possible. Fresh chicken will yield the best flavor and texture. If using frozen, thaw completely in the refrigerator before cooking.
- Butter: Use a good quality unsalted butter. European-style butters often have a higher fat content, contributing to a richer sauce. Unsalted allows you to control the seasoning precisely.
- Garlic: Fresh garlic is non-negotiable for this recipe. Choose firm, unblemished cloves. Avoid pre-minced garlic in jars, as the flavor is often diminished and can have an off-taste.
- Chicken Broth: Opt for low-sodium chicken broth or stock to prevent the sauce from becoming overly salty. You can always add more salt if needed.
- Lemon: Use a fresh lemon for its juice. Bottled lemon juice lacks the bright, vibrant flavor of freshly squeezed. A good quality lemon will feel heavy for its size.
- Parsley: Fresh flat-leaf (Italian) parsley is preferred for its robust flavor and beautiful green color.
Substitutions:
- Chicken Breasts:
- Chicken Thighs: You can easily substitute boneless, skinless chicken thighs. They tend to be more forgiving and stay juicier. Cooking time may need to be adjusted slightly (usually a bit longer).
- Pork Tenderloin: Slice pork tenderloin into medallions and cook similarly for a different white meat option.
- Unsalted Butter:
- Ghee: For a slightly nutty flavor and higher smoke point.
- Dairy-Free Butter Substitute: Use a high-quality plant-based butter for a dairy-free version. Ensure it’s suitable for sautéing.
- Olive Oil:
- Avocado Oil: A neutral-flavored oil with a high smoke point, excellent for searing.
- Grapeseed Oil: Another neutral, high-smoke-point option.
- Garlic:
- Garlic Powder (Emergency only): If fresh garlic is unavailable, use 1 teaspoon of garlic powder in the sauce, but add it with the broth to prevent burning. The flavor will not be as robust.
- Chicken Broth:
- Vegetable Broth: For a vegetarian-friendly option (though the chicken would need to be replaced too).
- Dry White Wine: For a more sophisticated flavor, use 1/4 cup (60ml) dry white wine (like Chardonnay or Pinot Grigio) for deglazing, then add 1/4 cup (60ml) chicken broth. Allow the wine to reduce completely before adding broth.
- Lemon Juice:
- White Wine Vinegar: In a pinch, a tiny dash (1/2 teaspoon) of white wine vinegar can provide acidity, but it won’t replicate the fresh lemon flavor.
- Fresh Parsley:
- Other Fresh Herbs: Fresh chives, dill, or even a mix of dried Italian herbs (use about 1/2 teaspoon, added with the garlic) can be used.
- Dried Parsley: While fresh is best, 1 teaspoon of dried parsley can be used for color, but it offers little flavor.

Share this Delicious Garlic Butter Chicken Breast Recipe with your friends on Facebook or save it to your Pinterest boards for a sunny treat!
9. Step-by-Step Instructions
Follow these detailed steps carefully to achieve a perfectly cooked, juicy Garlic Butter Chicken Breast with an irresistible pan sauce. Precision and attention to detail are your best allies here.
Servings: 4
Prep time: 10 minutes
Cook time: 20 minutes
Preparation (Before You Cook)
- Prepare Chicken Breasts:
- Place each boneless, skinless chicken breast between two sheets of plastic wrap or parchment paper.
- Using a meat mallet or the flat side of a rolling pin, pound the chicken breasts to an even thickness of about 3/4 inch (2 cm). This ensures even cooking and prevents the edges from drying out while the center cooks.
- Troubleshooting Tip: If you don’t have a mallet, a heavy-bottomed pan or even a wine bottle can work. Be gentle to avoid tearing the chicken.
- Pat Dry & Season:
- Thoroughly pat the chicken breasts dry with paper towels. This is crucial for achieving a good sear.
- In a small bowl, combine salt, black pepper, and optional garlic powder.
- Season both sides of each chicken breast generously with the seasoning mixture. Gently press the seasoning onto the chicken to adhere.
- Mise en Place:
- Mince your garlic.
- Chop your fresh parsley.
- Measure out your chicken broth and lemon juice. Having all your ingredients ready and within reach (mise en place) will make the cooking process smooth and enjoyable.
Cooking Instructions
- Sear the Chicken (Initial Cook):
- Heat the olive oil in a large (10-12 inch / 25-30 cm) skillet over medium-high heat until shimmering, but not smoking.
- Carefully place the seasoned chicken breasts into the hot skillet. If your pan is not large enough to hold all four chicken breasts without crowding, cook them in two batches. Overcrowding will lower the pan temperature and prevent a proper sear.
- Sear the chicken for 5-7 minutes per side, undisturbed, until a deep golden-brown crust forms and the chicken is cooked through.
- Culinary Technique: Listen for the sizzle; that’s the sound of a great sear. Resist the urge to move or flip the chicken too early.
- Cooking Cue: The chicken should release easily from the pan when it’s ready to flip. If it sticks, give it another minute.
- Check for Doneness & Rest:
- The internal temperature of the chicken should reach 165°F (74°C) when measured with an instant-read meat thermometer in the thickest part of the breast.
- Once cooked, transfer the chicken breasts to a clean cutting board.
- Resting: Tent the chicken loosely with aluminum foil and let it rest for at least 5-10 minutes. This allows the juices to redistribute, ensuring the chicken remains incredibly tender and juicy. Troubleshooting Tip: If you cut into the chicken immediately, all the delicious juices will run out, leading to dry meat.
- Make the Garlic Butter Sauce:
- While the chicken is resting, reduce the heat to medium-low.
- Add the butter to the same skillet (do not drain the pan drippings – these are liquid gold!). Let the butter melt, scraping up any browned bits (fond) from the bottom of the pan with a wooden spoon or spatula. These bits add immense flavor to your sauce.
- Add the minced garlic to the melted butter and sauté for 30-60 seconds, or until fragrant. Be very careful not to burn the garlic, as burnt garlic turns bitter.
- Culinary Technique: This process of scraping the fond and incorporating it into a liquid is called “deglazing.”
- Finish the Sauce:
- Pour in the chicken broth and lemon juice. Increase the heat slightly to medium and bring the sauce to a gentle simmer.
- Cook, stirring occasionally, for 2-3 minutes, or until the sauce has slightly reduced and thickened.
- Stir in the chopped fresh parsley.
- Taste and Adjust: Taste the sauce and add more salt, pepper, or lemon juice if desired. A final squeeze of lemon juice at the end can brighten all the flavors.
- Serve:
- Return the rested chicken breasts to the skillet, spooning the warm garlic butter sauce over them.
- Serve immediately with your favorite side dishes.
Enjoy your succulent and flavorful Garlic Butter Chicken Breast!
10. Frequently Asked Questions (FAQ)
Here are some common questions about making Garlic Butter Chicken Breast, along with expert answers to help you perfect this delicious dish.
Q1: Can I use bone-in chicken for this recipe?
A1: Yes, you can use bone-in, skin-on chicken breasts or thighs, but the cooking time will be significantly longer (around 25-35 minutes, depending on thickness). The bone helps keep the meat moist, and the skin will provide extra crispiness. Just ensure the internal temperature reaches 165°F (74°C). You might want to start on the stovetop for a good sear and then transfer the skillet to a preheated oven (around 375°F/190°C) to finish cooking through.
Q2: How do I prevent my chicken breast from being dry?
A2: Preventing dry chicken is key! Here are the most important tips:
- Pound Evenly: Pound the chicken to an even thickness so it cooks uniformly.
- Don’t Overcook: Use an instant-read meat thermometer and remove the chicken as soon as it reaches 165°F (74°C). Remember, carryover cooking will raise the temperature a few more degrees after it’s off the heat.
- Rest the Meat: Always let the chicken rest for 5-10 minutes after cooking. This allows the juices to redistribute throughout the meat, keeping it moist.
- Pan Sauce: Finishing the chicken in a flavorful pan sauce also contributes to its moisture and adds a layer of richness.
Q3: Can I make this recipe dairy-free or gluten-free?
A3:
- Dairy-Free: Yes, you can make this dairy-free. Substitute the unsalted butter with a good quality plant-based butter alternative that’s suitable for sautéing (e.g., Miyoko’s Kitchen Cultured Vegan Butter, Earth Balance Vegan Butter Sticks). The rest of the ingredients are naturally dairy-free.
- Gluten-Free: This recipe is naturally gluten-free as long as your chicken broth is certified gluten-free. Most commercial chicken broths are, but always double-check the label if you have a severe allergy or intolerance.
Q4: What kind of skillet is best for cooking Garlic Butter Chicken Breast?
A4: A heavy-bottomed skillet is best because it retains and distributes heat evenly, which is essential for a good sear.
- Cast Iron Skillet: Excellent for achieving a deep, crispy crust and superior heat retention.
- Stainless Steel Skillet: Also works very well, provides good browning, and is easy to clean.
- Non-stick Skillet: Can be used, but might not achieve as deep a crust as cast iron or stainless steel. Be careful not to overheat non-stick pans.
Q5: Can I add vegetables directly to the pan with the chicken?
A5: Yes, you can! This is a great way to make it a one-pan meal.
- For quick-cooking veggies: Asparagus, green beans, or spinach can be added to the pan after you’ve removed the chicken and are making the sauce. Sauté them briefly until tender-crisp, then toss with the sauce.
- For longer-cooking veggies: If you want to add heartier vegetables like mushrooms, bell peppers, or onions, sauté them in the pan after searing the chicken (and before making the sauce) until tender, then remove them and proceed with the sauce. Reintroduce them with the chicken when serving.
Q6: How do I get a good, crispy sear on my chicken?
A6: Achieving a perfect sear requires a few key steps:
- Pat Chicken Dry: Excess moisture prevents browning. Pat the chicken thoroughly dry with paper towels.
- Hot Pan, Hot Oil: Heat your skillet over medium-high heat until it’s hot, then add the olive oil and let it shimmer. The chicken needs to hit a hot surface.
- Don’t Overcrowd: Cook chicken in batches if necessary. If the pan is too full, the temperature drops, and the chicken steams instead of searing.
- Leave it Undisturbed: Once the chicken is in the pan, resist the urge to move it! Let it cook undisturbed for 5-7 minutes per side to allow a crust to form. You’ll know it’s ready to flip when it easily releases from the pan.
Q7: Can I prepare components of this recipe ahead of time?
A7: Yes, you can do some prep in advance:
- Pound and Season Chicken: You can pound and season the chicken breasts up to 12-24 hours ahead of time. Store them covered in the refrigerator.
- Mince Garlic and Chop Parsley: Prepare these aromatics and store them in separate airtight containers in the refrigerator for up to 1-2 days.
- Measure Liquids: Measure out the chicken broth and lemon juice and keep them ready.
This forward planning makes the actual cooking process much faster and more enjoyable.