Table of Contents
1. Introduction
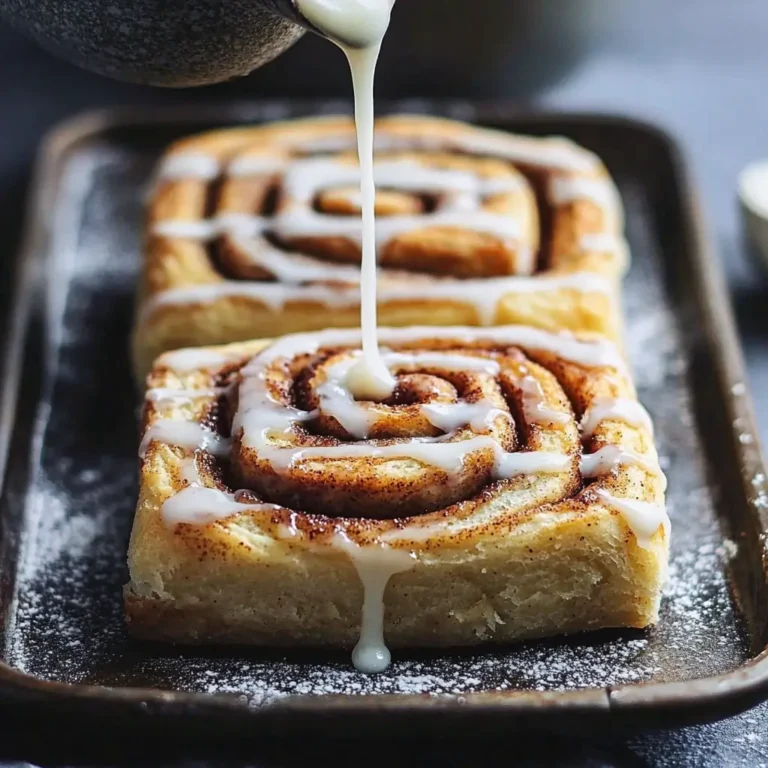
Imagine waking up to the scent of warm cinnamon and sugar, the promise of a melt-in-your-mouth treat. For many, classic cinnamon rolls embody pure comfort and a touch of morning magic. However, achieving that desired soft, fluffy texture in a gluten-free version can often feel like a baker’s challenge. Prepare to have your expectations not just met, but exceeded, with “The Softest Gluten Free Cinnamon Rolls.” This recipe is a triumph of gluten-free baking, delivering rolls so tender and yielding, so filled with gooey cinnamon goodness, that you’ll barely believe they’re gluten-free. It’s about bringing back that simple, irresistible joy of a warm cinnamon roll, making magical mornings accessible to everyone.
2. Recipe Summary
- Cuisine: American (Breakfast/Dessert)
- Difficulty Level: Easy to Intermediate (working with gluten-free yeast dough requires attention)
- Total Preparation and Cooking Time: Approximately 1 hour 15 minutes (20 minutes prep, 30 minutes rise, 25 minutes bake)
- Dietary Classification: Gluten-Free, Vegetarian
3. Equipment and Utensils
To create these incredibly soft gluten-free cinnamon rolls, gather the following tools:
- Large Mixing Bowl (minimum 3-quart volume, 5-6 inches height): The main bowl for mixing the dough.
- Stand Mixer or Hand Mixer with Dough Hooks: Highly recommended for effectively mixing and developing the gluten-free dough to achieve optimal softness. Manual mixing is possible but requires vigorous effort.
- Measuring Cups (standard US volumes): For accurate measurement of dry and liquid ingredients.
- Measuring Spoons (standard US volumes): For precise measurement of yeast, baking powder, salt, and extracts.
- Whisk: For combining the dry ingredients and later for whisking the glaze.
- Rubber Spatula: For scraping down the sides of the bowl and spreading the butter.
- Rolling Pin: For shaping the dough into a rectangle for the filling.
- Parchment Paper: Essential for rolling out the gluten-free dough, as it tends to be sticky.
- 8×8 inch Baking Pan (2 inches deep): The pan for the second rise and baking.
- Plastic Wrap: For covering the dough during the rest and rise periods.
- Sharp Serrated Knife or Dental Floss: For cleanly slicing the rolled dough into individual rolls. A serrated knife can saw through without squishing, while dental floss offers a very clean cut.
4. Serving Suggestions
These soft gluten-free cinnamon rolls are a treat straight from the oven, but here are some ideas to enhance the experience:
- Plating: Serve the warm rolls directly from the pan, allowing the glaze to pool enticingly. For individual servings, use a spatula to lift a roll onto a plate, ensuring plenty of gooey center and glaze are included.
- Side Dish Ideas: Fresh berries like raspberries or blueberries can provide a light, contrasting element.
- Complementary Side Dishes: For a brunch spread, consider adding a fruit salad or a yogurt parfait.
- Wine or Beverage Pairings: Classic pairings include coffee, tea, or a glass of cold milk. A hot apple cider would also be a comforting choice.
5. Nutritional Information
These gluten-free cinnamon rolls are a delicious indulgence. Based on the estimated calorie count of approximately 270 calories per roll, they are a treat meant to be enjoyed as part of a balanced diet. They provide carbohydrates from the flour and sugars, and fats from the butter and milk, with some minor protein from the milk and egg.
6. Storage and Reheating
To keep your soft gluten-free cinnamon rolls delightful, proper storage and reheating are key:
- Proper Storage Instructions: Once completely cooled, store any leftover cinnamon rolls in an airtight container at room temperature for 1-2 days. For longer storage, refrigeration is recommended due to the milk and butter content.
- Refrigeration Instructions: Store in an airtight container in the refrigerator for up to 4-5 days. The glaze may firm up when chilled.
- Freezing Recommendations: Unbaked or baked cinnamon rolls can be frozen.
- Freezing Unbaked Rolls: After arranging the sliced rolls in the greased baking pan, cover the pan tightly with plastic wrap and then aluminum foil. Freeze for up to 1 month. To bake from frozen, thaw overnight in the refrigerator, then let rise at room temperature for about 60-90 minutes (or until puffed up) before preheating the oven and baking as directed.
- Freezing Baked Rolls: Once completely cooled and preferably before glazing, wrap individual rolls tightly in plastic wrap and then place in a freezer-safe bag or container. Freeze for up to 2-3 months. Glazed rolls can also be frozen, but the glaze’s texture might change slightly upon thawing.
- Reheating Methods:
- Microwave: The best way to revive that soft, gooey texture. Place a roll on a microwave-safe plate and heat for 20-40 seconds, or until warmed through and soft.
- Oven: For multiple rolls, place them in a baking dish and cover loosely with foil. Reheat in a preheated oven at 300°F (150°C) for 10-15 minutes, or until warmed through. If frozen and baked, thaw first.
7. Expert Tips and Variations
Working with gluten-free dough can differ from traditional baking. Here are some tips and ideas for success:
- Tips from Professional Bakers:
- Ensure your gluten-free flour blend contains xanthan gum, or add it separately as it provides the necessary structure for gluten-free yeast dough.
- The dough will be softer and stickier than wheat dough; using parchment paper for rolling is highly recommended.
- Don’t add too much extra flour when rolling; a light dusting on the parchment paper is usually sufficient.
- Be gentle when rolling the dough into a log and slicing the rolls to maintain their shape.
- Allow sufficient time for the second rise; this is crucial for achieving fluffy rolls.
- Common Mistakes to Avoid:
- Using expired yeast or baking powder: These leavening agents are essential for the rolls’ rise and softness.
- Overmixing the dough after adding wet ingredients: While some mixing is needed, overmixing can negatively impact the texture of gluten-free dough.
- Not letting the dough rest: The initial rest allows the flour to hydrate and makes the dough easier to handle.
- Overbaking: This is the quickest way to dry out gluten-free baked goods. Bake only until lightly golden.
- Skipping the glaze: The glaze adds moisture and is a key part of the cinnamon roll experience.
- Creative Recipe Variations:
- Add Orange Zest: Incorporate the zest of one orange into the cinnamon filling for a brighter flavor.
- Different Spices: Add a pinch of nutmeg, cardamom, or allspice to the cinnamon filling for a more complex aroma and taste.
- Nutty Filling: Mix in ¼ cup of finely chopped pecans or walnuts with the cinnamon sugar filling for added texture and flavor.
- Chocolate Chips: Sprinkle mini chocolate chips over the cinnamon sugar filling before rolling the dough.
- Maple Glaze: Substitute some or all of the milk in the glaze with maple syrup for a maple cream cheese glaze.
- Seasonal Adaptations:
- Fall: Add a teaspoon of pumpkin pie spice to the cinnamon filling for an autumnal twist.
- Winter: Include a pinch of ground ginger and cloves in the filling for a warm, spiced flavor.
8. Ingredients Section
Here’s a detailed look at the ingredients for the dough, filling, and glaze:
For the Dough:
- 2 ½ cups (300g) Gluten-Free All-Purpose Flour: Ensure the blend explicitly states it contains xanthan gum, or add it separately according to package directions for your specific blend (usually about ¾ to 1 teaspoon per cup of flour). This is the primary structural component.
- ¼ cup (50g) Granulated Sugar: Provides sweetness to the dough and helps with browning.
- 2 ¼ tsp (7g) Instant Yeast: A fast-acting leavening agent that allows for a quicker rise time compared to active dry yeast.1 Ensure it is fresh.
- 1 tsp (5g) Baking Powder: Provides an extra lift to the gluten-free dough, contributing to its softness. Ensure it is fresh.
- ½ tsp (2.5g) Salt: Enhances the overall flavor and balances the sweetness.
- ¾ cup (180ml) Warm Milk (110°F / 43°C): The liquid base for the dough. The temperature is ideal for activating instant yeast quickly.
- ¼ cup (57g) Unsalted Butter, melted: Adds richness and moisture to the dough. Melted butter incorporates easily.
- 1 large Egg, room temperature: Binds the ingredients, adds richness, and contributes to the dough’s structure. Room temperature eggs emulsify better.
- 1 tsp (5ml) Vanilla Extract: Adds a classic flavor to the dough.
For Filling:
- ½ cup (100g) Brown Sugar, packed: Provides a moist, caramelized sweetness to the filling. Packing the sugar ensures accurate measurement.
- 2 tbsp (16g) Ground Cinnamon: The essential spice for that classic cinnamon roll flavor. Use fresh cinnamon for the best aroma and taste.
- ¼ cup (57g) Unsalted Butter, softened: Acts as a binder for the sugar and cinnamon, making it spreadable and creating that gooey layer when baked.
For Glaze:
- 1 cup (120g) Powdered Sugar: The base for the sweet glaze. Sift if lumpy for a smooth consistency.
- 2-3 tbsp (30-45ml) Milk: Used to thin the glaze to a drizzling consistency. Start with 2 tablespoons and add more as needed to reach your desired thickness.
- ½ tsp (2ml) Vanilla Extract: Adds a touch of flavor to the glaze.
Measurement Conversions:
- 1 cup = 240ml
- ¾ cup = 180ml
- ½ cup = 120ml
- ¼ cup = 60ml
- 2 tablespoons = 30ml
- 1 tablespoon = 15ml
- 1 teaspoon = 5ml
- ½ teaspoon = 2.5ml
- 1 stick butter = ½ cup = 113g2
- 1 ounce = 28g
Quality and Sourcing Recommendations:
- Use a reputable brand of gluten-free all-purpose flour blend specifically designed for baking with yeast.
- Ensure your instant yeast and baking powder are fresh and active.
- Choose good quality butter for optimal flavor and texture.
Possible Ingredient Substitutions:
- Gluten-Free All-Purpose Flour: Using a blend without xanthan gum will require adding it separately. Different blends can yield slightly different results, so stick with a trusted brand if possible.
- Granulated Sugar (in dough): Other granular sweeteners could be substituted, but they may affect the dough’s texture and how the yeast reacts.
- Instant Yeast: While instant yeast is recommended for the stated rise time, active dry yeast can be used. You would need to activate it in the warm milk with the tablespoon of sugar first until foamy (5-10 minutes) before adding it to the dry ingredients. The rise times may also be slightly longer.
- Warm Milk: A dairy-free milk alternative (like almond milk or soy milk) can be used, ensuring it is warmed to the correct temperature.
- Unsalted Butter (melted/softened): A good quality dairy-free butter substitute can be used for a dairy-free version.
- Egg: Egg substitutes are generally not recommended in yeast doughs as eggs play a crucial role in structure.
- Brown Sugar: Dark brown sugar can be used for a deeper molasses flavor.
- Powdered Sugar: Other powdered sweeteners might work, but the texture of the glaze could vary.
Notes on Ingredient Preparation:
- Measure your gluten-free flour blend accurately by spooning it into the measuring cup and leveling it off.
- Ensure your milk is warmed to the correct temperature (110°F / 43°C) for the instant yeast.
- Melt the butter for the dough and let it cool slightly before adding it to the mixture.
- Ensure the butter for the filling is softened, not melted, for easy spreading.
- Bring your egg to room temperature before using.
9. Step-by-Step Instructions
Follow these detailed steps to create your incredibly soft and fluffy gluten-free cinnamon rolls:
Preparation Steps:
- Combine Dry Ingredients: In a large mixing bowl (minimum 3-quart volume), whisk together the 2 ½ cups of gluten-free all-purpose flour, ¼ cup of granulated sugar, 2 ¼ tsp of instant yeast, 1 tsp of baking powder, and ½ tsp of salt. Whisking ensures all the dry leavening agents and salt are evenly distributed throughout the flour.
- Add Wet Ingredients & Mix Dough: Add the ¾ cup of warm milk (110°F / 43°C), ¼ cup of melted unsalted butter, 1 large egg, and 1 tsp of vanilla extract to the bowl with the dry ingredients.
- If using a stand mixer: Use the paddle attachment and mix on medium speed for 3 minutes until a smooth and sticky dough forms. The dough will be much softer than traditional wheat dough.
- If using a hand mixer with dough hooks: Mix on medium speed for 3 minutes until a smooth and sticky dough forms.
- If mixing by hand: Stir vigorously with a sturdy wooden spoon or spatula until all the ingredients are well combined and a cohesive, sticky dough forms.
- Rest the Dough: Cover the bowl tightly with plastic wrap. Let the dough rest at room temperature for 10 minutes. This short rest allows the flour to hydrate and makes the dough slightly easier to handle.
- Prepare Filling: While the dough is resting, mix the ½ cup of packed brown sugar and 2 tbsp of ground cinnamon together in a small bowl until well combined. This is your flavorful cinnamon sugar mixture.
- Roll Out Dough: Lightly flour a piece of parchment paper with gluten-free flour. Turn the rested dough out onto the floured parchment paper. Place another piece of parchment paper on top of the dough.
- Using a rolling pin, gently roll the dough into a rectangle about ¼ inch thick. Aim for approximate dimensions of 9×13 inches. Rolling between two sheets of parchment paper prevents the sticky gluten-free dough from sticking to your rolling pin and surface.
- Spread Filling: Remove the top layer of parchment paper. Use a rubber spatula or the back of a spoon to spread the ¼ cup of softened unsalted butter evenly over the rolled-out dough rectangle, going nearly to the edges.
- Evenly sprinkle the prepared cinnamon sugar mixture over the softened butter, covering the entire surface.
- Roll the Dough: Starting from a long edge, carefully roll the dough into a tight log. Use the bottom layer of parchment paper to help you lift and guide the dough as you roll. Roll as tightly as possible to create well-defined swirls in your cinnamon rolls.
- Slice the Rolls: Once rolled into a log, use a sharp serrated knife or dental floss to slice the log into 9 equal rolls. Each roll should be approximately 1 to 1.5 inches thick. If using dental floss, slide a piece under the log where you want to make a cut, cross the ends over the top of the log, and pull them in opposite directions to slice through cleanly.
- Arrange for Second Rise: Lightly grease an 8×8-inch baking pan (2 inches deep) with butter or cooking spray. Arrange the sliced rolls cut-side up in the prepared pan. Place them relatively close together as they will expand as they rise and bake.
- Second Rise: Cover the baking pan loosely with plastic wrap. Place the pan in a warm, draft-free place and let the rolls rise for about 30 minutes, or until they are visibly puffed up and are nearly touching each other in the pan. This second rise is crucial for achieving the soft and fluffy texture.
- Visual Cues: The rolls will look larger and more pillowy.
- Preheat Oven: Towards the end of the second rise, preheat your oven to 350°F (177°C).
- Bake: Remove the plastic wrap from the baking pan. Place the pan in the preheated oven.
- Bake for 22-25 minutes, or until the rolls are lightly golden brown on top and cooked through. Avoid overbaking to ensure they remain soft.
- Visual Cues: The tops will be a lovely golden color, and the rolls will appear set.
- Prepare Glaze: While the rolls are baking or immediately after they come out of the oven, whisk together the 1 cup of powdered sugar, 2-3 tbsp of milk, and ½ tsp of vanilla extract in a small bowl until smooth and has a drizzling consistency. Start with 2 tablespoons of milk and add more a teaspoon at a time until the desired consistency is reached.
- Glaze and Serve: Let the baked cinnamon rolls cool in the pan for about 5-10 minutes before drizzling generously with the prepared cream cheese glaze. The warmth of the rolls will allow the glaze to melt slightly and spread beautifully.
- Serve warm and enjoy the incredible softness and irresistible flavor of your homemade gluten-free cinnamon rolls!
10. Frequently Asked Questions (FAQ)
Get answers to common questions about making these soft gluten-free cinnamon rolls:
- Q1: Can I use active dry yeast instead of instant yeast?
- Yes, you can use active dry yeast, but the process will be slightly different. You’ll need to activate the active dry yeast in the warm milk with the tablespoon of sugar first (Step 1 in the previous recipe) until it’s foamy (5-10 minutes) before adding it to the dry ingredients. The rise times might also be slightly longer than with instant yeast.
- Q2: My dough is too sticky to roll. What can I do?
- Gluten-free dough is naturally stickier than wheat dough.3 Using parchment paper for rolling is essential. Ensure you’ve floured the parchment paper lightly. If the dough is still extremely difficult to handle, you can try lightly flouring your hands as well. Avoid adding too much flour directly into the dough.
- Q3: How can I tell if my yeast is still good?
- If using active dry yeast, you can test its freshness by activating it in warm milk with a pinch of sugar (as in Step 1 of the previous recipe). If it becomes foamy and bubbly within 5-10 minutes, it’s active. Instant yeast doesn’t require proofing, but if your dough doesn’t rise at all, expired yeast is a likely culprit.
- Q4: Can I make these dairy-free?
- Yes, you can substitute the milk with a dairy-free milk alternative (like almond or soy milk) and use a good quality dairy-free butter substitute for both the dough and the filling. Ensure your gluten-free flour blend is also dairy-free if needed. For the glaze, you’ll need a dairy-free cream cheese alternative and dairy-free milk.
- Q5: Why are my cinnamon rolls dense instead of fluffy?
- This could be due to several factors: inactive yeast or baking powder, overmeasuring the flour (leading to a dry dough), not allowing sufficient time for the second rise, or overmixing the dough. Ensure your leavening agents are fresh, measure your flour accurately, allow the rolls to rise until visibly puffed, and mix the dough just until combined.
- Q6: How do I get a really clean cut when slicing the rolls?
- Using dental floss is often the best method for clean cuts with soft doughs. Slide a piece of floss under the rolled log at the desired cutting point, cross the ends over the top, and pull them in opposite directions to slice through. A very sharp serrated knife used with a gentle sawing motion can also work.
- Q7: Can I add cream cheese to the glaze?
- This particular glaze recipe is a simple powdered sugar glaze. If you’d like a cream cheese glaze, you can use the glaze recipe provided in the previous “Heavenly Soft Gluten Free Cinnamon Rolls” prompt (combining softened cream cheese, butter, powdered sugar, milk, and vanilla).