Table of Contents
1. Introduction
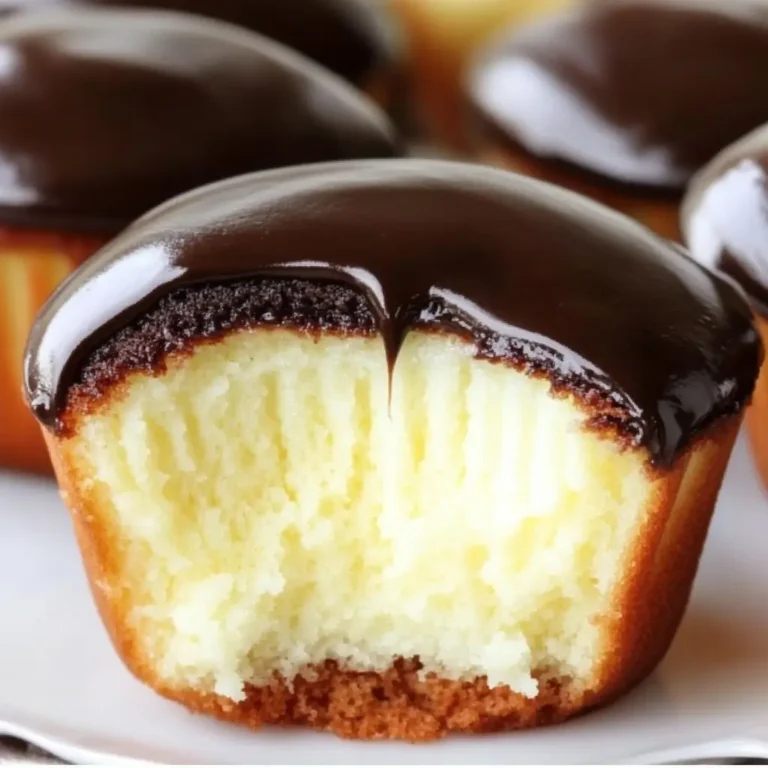
Transport yourself to a world of classic American dessert with these Boston Cream Pie Cupcakes. Taking inspiration from the iconic Boston Cream Pie, this recipe miniaturizes that beloved combination of moist vanilla cake, luscious pastry cream, and a glossy chocolate ganache topping into a perfect, handheld treat.
The original Boston Cream Pie, despite its name, is actually a cake, a brilliant invention credited to the Parker House Hotel in Boston in the mid-19th century. It was a novel creation at the time, combining sponge cake with a rich custard filling and a poured glaze. These cupcakes pay homage to that history, offering all the delightful elements in a convenient and utterly delightful form. They are a testament to enduring flavor combinations that continue to capture our hearts and tantalize our taste buds.
2. Recipe Summary
- Cuisine: American (Dessert/Baking)
- Difficulty Level: Intermediate (involves making pastry cream and ganache)
- Total Preparation and Cooking Time: Approximately 3.5 – 4 hours (includes chilling time for pastry cream)
- Dietary Classification: Contains dairy, eggs, and gluten. Not suitable for vegetarian, vegan, or gluten-free diets without significant modifications.
3. Equipment and Utensils
Having the right tools will make creating these layered delights a smooth process:
- Muffin Tin: A standard 12-cup muffin tin is needed for baking the cupcakes.2
- Cupcake Liners: Paper or foil cupcake liners make for easy removal and cleanup.
- Large Mixing Bowl: At least a 4-quart (approx. 4-liter) bowl for making the cupcake batter.
- Medium Mixing Bowl: For whisking dry ingredients and later for chilling the pastry cream.
- Hand Mixer or Stand Mixer: Essential for creaming butter and sugar and mixing the cupcake batter effectively.
- Whisks (2): One for dry ingredients and another for the pastry cream and ganache.
- Measuring Cups and Spoons: Accuracy is vital in baking. You’ll need:
- Dry measuring cups (1 ½ cup, ½ cup, ¼ cup)
- Liquid measuring cup (1 cup, ½ cup)
- Measuring spoons (teaspoon, ¼ teaspoon, 2 tablespoons)
- Medium Saucepan: For heating the milk for the pastry cream and the heavy cream for the ganache.
- Heatproof Bowl: For making the chocolate ganache.
- Rubber Spatula: For scraping bowls and folding ingredients.
- Wire Rack: For cooling the cupcakes completely.
- Small Knife or Cupcake Corer: To create the cavity for the pastry cream filling. A small paring knife or a dedicated cupcake coring tool will work.
- Piping Bag and Tip (optional but recommended): A piping bag with a round tip makes filling the cupcakes with pastry cream neat and easy. You can also use a spoon, but it will be messier.
4. Serving Suggestions
Presenting these Boston Cream Pie Cupcakes can be as elegant or as simple as you like:
- Plating: Arrange the cupcakes on a decorative plate or cake stand, showcasing the glossy ganache topping. The contrast between the dark chocolate and the light-colored cake is visually appealing.
- Side Dish Ideas: As a standalone dessert, side dishes aren’t typically needed.
- Complementary Side Dishes: If part of a larger dessert spread, they pair well with fresh berries, a dollop of whipped cream, or a scoop of vanilla ice cream.
- Wine or Beverage Pairings: Coffee is a classic pairing, echoing the flavors of the ganache. A glass of milk, a sweet dessert wine, or even a port could also be enjoyable.
5. Nutritional Information
These Boston Cream Pie Cupcakes are a rich and indulgent dessert. A precise nutritional breakdown would require calculating based on specific brands and measurements, but generally, you can expect them to be:
- Calories: High per cupcake due to the butter, sugar, eggs, milk, and chocolate.
- Macronutrient Distribution: High in carbohydrates and fats, moderate in protein (from eggs and milk).
- Dietary Information: Contain significant amounts of sugar and saturated fat.
- Potential Health Benefits: Primarily offer the benefit of bringing joy and satisfaction to those who enjoy them! Consume in moderation as a treat.
6. Storage and Reheating
Proper storage is key to maintaining the quality of these filled and frosted cupcakes:
- Proper Storage Instructions: Due to the pastry cream filling, these cupcakes must be stored in the refrigerator. Place them in a single layer in an airtight container to prevent them from drying out or the ganache from getting smudged.
- Refrigeration Instructions: Store in the refrigerator for up to 2-3 days.
- Freezing Recommendations: Freezing assembled Boston Cream Pie Cupcakes is not ideal as the texture of the pastry cream can change upon thawing, sometimes becoming watery. It’s best to enjoy them fresh. You could potentially freeze the unfrosted cupcakes and the ganache separately, but the pastry cream is best made fresh.
- Reheating Methods: Reheating is generally not recommended for these cupcakes as the pastry cream and ganache are best served chilled or at room temperature. Allow them to sit at room temperature for 15-20 minutes before serving if you prefer them slightly less cold.
7. Expert Tips and Variations
Master these techniques and explore variations to make these cupcakes your signature dessert:
- Tips from Professional Chefs:
- Ensure all your cold ingredients (butter, eggs, milk) are at room temperature for the cupcake batter – this helps create a smooth, well-emulsified batter and a tender crumb.
- When making the pastry cream, whisk constantly, especially as it thickens, to prevent scorching and lumps. Don’t rush the cooking process.
- Press the plastic wrap directly onto the surface of the pastry cream while it chills to prevent a skin from forming.
- Allow the ganache to cool and thicken slightly before spooning or dipping; this will help it set nicely on the cupcakes.
- Common Mistakes to Avoid:
- Overmixing the cupcake batter: This can lead to tough cupcakes.
- Not tempering the egg yolks for the pastry cream: Adding hot milk too quickly can scramble the eggs.
- Not whisking the pastry cream constantly while cooking: Can result in a lumpy or scorched cream.
- Filling cupcakes before they are completely cool: The heat can melt the pastry cream and ganache.
- Trying to move cupcakes with hot ganache too soon: The ganache needs time to set.
- Creative Recipe Variations:
- Different Extract: Use almond extract instead of vanilla in the cupcake or pastry cream for a different flavor twist.
- Chocolate Cupcakes: Use your favorite chocolate cupcake recipe instead of vanilla for a double chocolate variation.
- Flavored Pastry Cream: Infuse the milk for the pastry cream with orange zest, coffee beans, or even a cinnamon stick before heating for subtle flavor variations.
- White Chocolate Ganache: Use white chocolate chips instead of semi-sweet for a different topping.
- Caramel Swirl: Drizzle a little caramel sauce over the pastry cream before adding the ganache.
- Seasonal Adaptations:
- Summer: Top with fresh berries in addition to or instead of the ganache.
- Fall: Add a pinch of nutmeg or cardamom to the cupcake batter or pastry cream.
8. Ingredients Section
Here’s a detailed look at the ingredients for each component of these delightful cupcakes:
For the Vanilla Cupcakes:
- 1 ½ cups (188g) All-Purpose Flour: Spooned and leveled for accuracy. The primary structure of the cupcake.
- 1 ½ teaspoons (7.5ml) Baking Powder: The main leavening agent, providing lift and a tender texture. Ensure it’s fresh.
- ¼ teaspoon (1.25ml) Salt: Balances the sweetness and enhances the other flavors.
- ½ cup (1 stick or 113g) Unsalted Butter, softened to room temperature: Crucial for creaming with sugar and creating a tender crumb.
- 1 cup (200g) Granulated Sugar: Provides sweetness and helps with the structure and moistness of the cupcake.3
- 2 large Eggs, room temperature: Bind the ingredients together and contribute to richness and structure.
- 2 teaspoons (10ml) Vanilla Extract: Provides the classic vanilla flavor. Use pure vanilla extract for the best taste.
- ½ cup (120ml) Whole Milk, room temperature: Adds moisture and richness to the batter. Whole milk is recommended for a tender cupcake.
For the Pastry Cream Filling:
- 2 cups (480ml) Whole Milk: The base of the pastry cream. Whole milk provides richness.
- ½ cup (100g) Granulated Sugar: Sweetens the cream.
- 3 large Egg Yolks: Provide richness, color, and help to thicken the cream.
- ¼ cup (30g) Cornstarch: The primary thickening agent for the pastry cream. Ensure it’s not clumpy.
- 2 tablespoons (28g) Unsalted Butter: Adds richness and a smooth texture to the finished pastry cream.
- 1 teaspoon (5ml) Vanilla Extract: Flavors the pastry cream.
For the Chocolate Ganache Topping:
- ½ cup (120ml) Heavy Cream: The base of the ganache. The high-fat content is necessary for a smooth and glossy ganache.
- ¾ cup (approx. 130g) Semisweet Chocolate Chips (or chopped chocolate): Provides the chocolate flavor and structure for the ganache. Using good quality chocolate will result in a better ganache. Chopped chocolate often melts more smoothly than chips.
Measurement Conversions (Approximate):
- 1 cup = 240ml
- ½ cup = 120ml
- ¼ cup = 60ml
- 1 tablespoon = 15ml
- 1 teaspoon = 5ml
- 1 stick butter = ½ cup = 113g
- 1 ounce = 28g
Quality and Sourcing Recommendations:
- Use fresh, good quality ingredients for the best results.
- For the ganache, choose a good quality semi-sweet chocolate that you enjoy eating.
Possible Ingredient Substitutions:
- All-Purpose Flour: A 1:1 gluten-free baking blend may work, but the texture could be different.
- Whole Milk: Lower fat milk can be used in the cupcakes, but whole milk provides better richness. For the pastry cream and ganache, whole milk and heavy cream are highly recommended for the correct texture.
- Granulated Sugar: Other granular sweeteners might be substituted, but the ratio and impact on texture could vary.
- Eggs: Egg substitutes are not recommended for this recipe as eggs play a crucial role in structure and richness.
- Cornstarch: While not a direct substitute, some recipes use flour as a thickener for pastry cream, but cornstarch provides a smoother finish.
- Semisweet Chocolate Chips: Dark chocolate chips or even milk chocolate chips could be used, but the sweetness and intensity of the ganache will change.
Notes on Ingredient Preparation:
- Ensure butter, eggs, and milk for the cupcakes are at room temperature.
- Measure flour by spooning it into the measuring cup and leveling off, rather than scooping, to avoid using too much.
- Separate egg yolks carefully for the pastry cream.
- Chop chocolate finely if not using chips for the ganache to ensure even melting.
9. Step-by-Step Instructions
Follow these detailed steps to create each component and assemble your delicious Boston Cream Pie Cupcakes:
Step 1: Preheat Your Oven and Prepare for Cupcakes
- Preheat your oven to 350°F (175°C). Accurate oven temperature is essential for successful baking.
- Line a standard 12-cup muffin tin with cupcake liners or grease it lightly with butter or cooking spray. Liners make removal and cleanup much easier.
Step 2: Make the Vanilla Cupcakes
- In a medium bowl, whisk together the 1 ½ cups of all-purpose flour, 1 ½ teaspoons of baking powder, and ¼ teaspoon of salt. Set this dry mixture aside. Whisking ensures the leavening and salt are evenly distributed.
- In a large mixing bowl, using a hand mixer or stand mixer fitted with the paddle attachment, cream the ½ cup of softened unsalted butter and 1 cup of granulated sugar together on medium speed until the mixture is light and fluffy, about 2–3 minutes. This process incorporates air, contributing to the cupcakes’ texture.
- Add the 2 large eggs one at a time, beating well after each addition until fully incorporated.
- Mix in the 2 teaspoons of vanilla extract.
- With the mixer on low speed, alternate adding the dry ingredients and the ½ cup of whole milk to the wet ingredients, beginning and ending with the dry ingredients. Add approximately one-third of the dry ingredients, mix until just combined, then add half of the milk, mix until just combined, and repeat, ending with the last third of the dry ingredients. Mix just until everything is combined and no dry streaks of flour remain. Do not overmix.
- Divide the batter evenly among the prepared cupcake liners, filling each about ⅔ full. This allows room for the cupcakes to rise without overflowing.
- Bake in the preheated oven for 18–20 minutes, or until a toothpick inserted into the center of a cupcake comes out clean. The tops should be lightly golden4 and spring back when gently touched.
- Visual Cues: Look for a domed top and a light golden color. A clean toothpick test is the most reliable indicator of doneness.
- Troubleshooting: If cupcakes are browning too quickly, you can loosely tent the muffin tin with aluminum foil.
- Let the cupcakes cool in the pan for 5 minutes before carefully transferring them to a wire rack to cool completely. Cooling slightly in the pan helps them firm up before moving. Ensure they are completely cool before filling and frosting.
Step 3: Prepare the Pastry Cream Filling
- In a medium saucepan, heat the 2 cups of whole milk over medium heat until it just begins to simmer around the edges. Watch it carefully to prevent it from boiling over. Remove from heat once simmering.
- In a separate medium bowl, whisk together the ½ cup of granulated sugar, 3 large egg yolks, and ¼ cup of cornstarch until the mixture is smooth and pale yellow. The mixture should be free of lumps.
- This next step is crucial for tempering the egg yolks: Gradually whisk about half of the hot milk into the egg yolk mixture, whisking constantly. This slowly brings the temperature of the egg yolks up without scrambling them.
- Pour the tempered egg mixture back into the saucepan with the remaining hot milk.
- Return the saucepan to medium heat and cook, whisking constantly and vigorously, until the mixture thickens considerably and comes to a gentle boil, about 5–7 minutes. The cream will become very thick and custardy. Whisking constantly prevents lumps and scorching on the bottom of the pan.
- Visual Cues: The cream will visibly thicken and you will see large bubbles breaking the surface when it comes to a boil.
- Remove from heat and stir in the 2 tablespoons of unsalted butter and 1 teaspoon of vanilla extract until the butter is completely melted and the pastry cream is smooth and glossy.
- Transfer the pastry cream to a clean bowl. Immediately cover the surface of the pastry cream directly with plastic wrap, pressing the plastic wrap down so it touches the entire surface. This prevents a skin from forming as it cools.
- Chill in the refrigerator for at least 2 hours, or until completely cold and set. Chilling is essential for the cream to firm up to a pipeable consistency.
Step 4: Make the Chocolate Ganache Topping
- Heat the ½ cup of heavy cream in a small saucepan over medium heat or in a microwave-safe bowl in the microwave until it just begins to simmer around the edges. Do not boil.
- Pour the hot cream over the ¾ cup of semisweet chocolate chips (or chopped chocolate) in a heatproof bowl. Ensure all the chocolate is submerged in the hot cream.
- Let sit undisturbed for 2–3 minutes to allow the heat from the cream to melt the chocolate.
- After sitting, whisk the mixture gently starting from the center and working your way outwards until the ganache is completely smooth, glossy, and emulsified.
- Visual Cues: The ganache will transform from a separated mixture to a smooth, shiny, dark chocolate sauce.
- Let the ganache cool slightly at room temperature, whisking occasionally, until it thickens to a pourable or spoonable consistency that will coat the cupcakes without running off completely. This can take 15-30 minutes depending on room temperature.
Step 5: Assemble the Cupcakes
- Once the cupcakes are completely cool and the pastry cream is thoroughly chilled and set, you can assemble.
- Use a small knife or a cupcake corer to carefully cut a hole in the center of each cupcake. Cut down about two-thirds of the way into the cupcake, leaving a small border of cake around the edges and the bottom intact. Remove the small piece of cake. You can save these pieces for snacking or crumbling over the top if you like.
- If using, fill a piping bag fitted with a round tip with the chilled pastry cream. If you don’t have a piping bag, you can carefully spoon the pastry cream into the cavities, but it may be messier.
- Pipe or spoon the pastry cream into the hollowed-out centers of the cupcakes, filling them generously until the cream is flush with the top of the cupcake.
- Gently dip the tops of the filled cupcakes into the slightly thickened chocolate ganache, allowing any excess to drip off. Alternatively, you can spoon the ganache over the tops, spreading it gently with the back of a spoon to cover the pastry cream and cupcake top.
- Allow the ganache to set at room temperature or in the refrigerator for about 15-30 minutes before serving. The ganache will become more firm as it sets.
10. Frequently Asked Questions (FAQ)
Get answers to common questions about making Boston Cream Pie Cupcakes:
- Q1: Can I use milk chocolate for the ganache?
- Yes, you can use milk chocolate, but the ganache will be sweeter and less intensely chocolatey. You may also need a slightly different ratio of cream to chocolate as milk chocolate has a lower cocoa solid content and more sugar and milk solids than semi-sweet or dark chocolate.
- Q2: How can I make sure my pastry cream is lump-free?
- To ensure a lump-free pastry cream, make sure you whisk the egg yolks, sugar, and cornstarch together until very smooth before tempering. When tempering, whisk the hot milk in gradually and constantly. Finally, whisk the mixture vigorously and constantly while it cooks on the stove, paying attention to the bottom of the pan.
- Q3: Can I use a different type of cake mix for the cupcakes?
- While this recipe provides a from-scratch vanilla cupcake, you could use a good quality vanilla cake mix according to package directions to save time. However, the texture and flavor of homemade cupcakes are often superior.
- Q4: My ganache isn’t thickening. What’s wrong?
- Ganache thickens as it cools. If it’s too thin, it might still be too warm, or the ratio of cream to chocolate might be off (too much cream). Try letting it cool longer, or if needed, you can gently melt in a few more chocolate chips to thicken it.
- Q5: Can I skip chilling the pastry cream?
- No, chilling the pastry cream is essential. It needs to be cold and firm to be properly piped or spooned into the cupcakes without being too runny. Skipping this step will result in a messy filling process and a less stable cupcake.
- Q6: How do I core the cupcakes without making a mess?
- Use a small, sharp paring knife and cut a cone shape from the center of the cupcake, being careful not to cut all the way through the bottom. Alternatively, a dedicated cupcake corer makes this process very neat and easy.
- Q7: How long do these cupcakes last?
- Stored properly in an airtight container in the refrigerator, these cupcakes are best enjoyed within 2-3 days. The quality of the pastry cream can deteriorate over time.
Creating these Boston Cream Pie Cupcakes is a rewarding experience, resulting in a dessert that’s sure to impress. Just like mastering the art of these layered treats, understanding fundamental cooking techniques is key in the kitchen. If you’re interested in expanding your culinary skills, consider exploring guides on simple yet essential processes, much like learning how long to grill chicken thighs for a perfectly cooked result, or even the basics of how to clean grill grates to keep your equipment in top shape.
For those who appreciate classic comfort foods, delving into the history and appeal of grilled cheese and tomato soup might be a fascinating read. And if you’re looking for more delightful baking projects, our recipe for Fluffernutter Cookies offers another sweet adventure. Enjoy your time in the kitchen!