
Table of Contents
1. Introduction
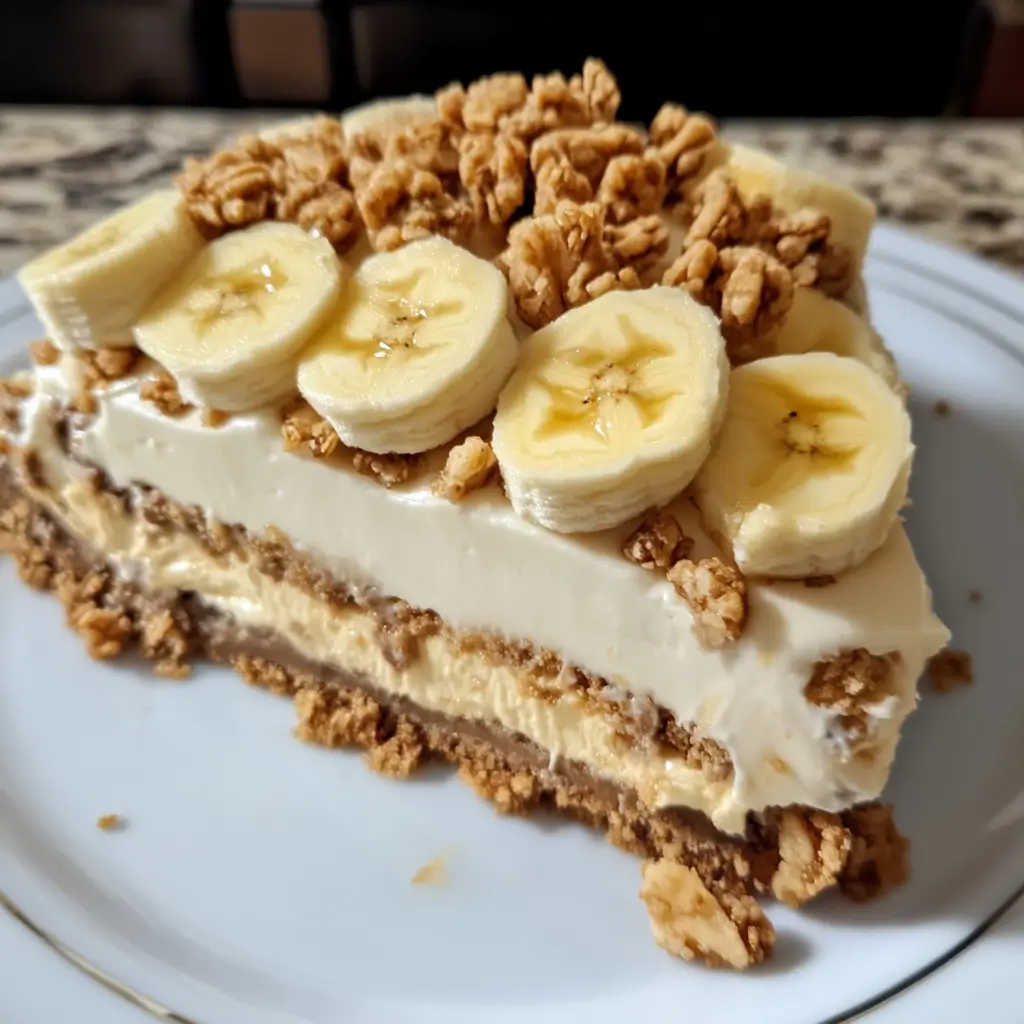
Imagine the comforting, nostalgic flavors of classic banana pudding, combined with the rich, velvety indulgence of a perfectly baked cheesecake, all crowned with an irresistible crunchy topping. That’s exactly what you get with this extraordinary Banana Pudding Crunch Cheesecake. This dessert is a true showstopper, a masterful fusion that takes two beloved American classics and elevates them into a single, unforgettable culinary experience.
This recipe is designed to delight on every level. It starts with a simple yet satisfying vanilla wafer crust, providing the perfect base for the star of the show: a smooth, creamy cheesecake filling infused with the subtle sweetness of mashed ripe bananas. But the magic doesn’t stop there. A light and airy banana pudding layer adds another dimension of banana flavor and luscious texture, reminiscent of grandma’s homemade treat. The grand finale is the “crunch” topping – a delectable blend of crushed vanilla wafers, toasted pecans, brown sugar, and butter, baked to golden perfection, adding a crucial textural contrast that makes each bite an adventure.
This isn’t just another cheesecake; it’s a multi-layered symphony of creamy, fruity, and crunchy sensations that will impress at any gathering. If you’ve loved our Kentucky Derby Pecan Pie Cheesecake Recipe, you’ll appreciate the thoughtful layering and delightful pecan crunch in this banana-infused masterpiece. It’s the ultimate dessert for holidays, celebrations, or whenever you want to truly spoil your taste buds and create lasting sweet memories.
2. Recipe Summary Block
- Cuisine: American Dessert
- Course: Dessert
- Difficulty Level: Medium (due to multiple layers and chilling times, but individual steps are straightforward)
- Prep Time: 30 minutes
- Cook Time: 1 hour 10 minutes (10 mins for crust, 55-65 mins for cheesecake, 8-10 mins for crunch topping)
- Chill Time: 5 hours (minimum, ideally overnight)
- Total Time: Approximately 6 hours 40 minutes (including minimum chill time)
- Servings: 12-14 servings
- Dietary Classification: Vegetarian (contains dairy and eggs). Can be adapted to be gluten-free (with GF vanilla wafers, GF pudding mix, etc.) or dairy-free (with vegan cream cheese, sour cream, milk, and whipped topping substitutes).
3. Equipment and Utensils Needed
To create this impressive Banana Pudding Crunch Cheesecake, you’ll need the following kitchen tools:
- 9-inch springform pan: Essential for easy removal of the cheesecake and maintaining its beautiful shape.
- Medium mixing bowl (for crust): For combining the vanilla wafer crumbs and butter.
- Large mixing bowl (for cheesecake filling): For beating the cream cheese and other filling ingredients.
- Electric mixer (handheld or stand mixer with paddle attachment): Highly recommended for achieving a smooth, lump-free cream cheese mixture.
- Spatula or rubber scraper: For scraping down the sides of bowls and smoothing the cheesecake filling.
- Small bowl (for banana pudding layer): For whisking the pudding mix and milk.
- Whisk: For thoroughly combining the instant pudding mix with milk.
- Baking sheet: For toasting the crunch topping.
- Parchment paper: (Optional) To line the baking sheet for easy cleanup when making the crunch topping.
- Measuring cups and spoons: For precise ingredient measurements.
- Vegetable peeler and sharp knife: For peeling and slicing the garnish bananas.
- Oven: For baking the crust, cheesecake, and crunch topping.
4. Ingredients Section
Gather these delightful ingredients to assemble your Banana Pudding Crunch Cheesecake masterpiece.
For the Crust:
- 2 cups (approx. 200g) vanilla wafer crumbs: Use store-bought vanilla wafer crumbs or finely crush whole vanilla wafers (like Nilla Wafers) in a food processor or by hand.
- 1/4 cup (50g) granulated sugar: Adds a touch of sweetness to the crust.
- 1/2 cup (113g) unsalted butter, melted: Binds the crumbs together to form a sturdy crust. Unsalted butter is preferred for better control over the overall saltiness.
For the Cheesecake Filling:
- 3 (8 oz / 227g each) packages cream cheese (total 24 oz / 681g), softened:1 Full-fat cream cheese is crucial for a rich, creamy, and stable cheesecake texture. Ensure it’s softened to room temperature for a smooth batter.
- 1 cup (200g) granulated sugar: Sweetens the cheesecake.
- 3 large eggs: Provide structure and richness to the cheesecake. Ensure they are at room temperature to incorporate smoothly.
- 1 teaspoon (5ml) vanilla extract: Enhances the sweet, creamy flavors.
- 1/2 cup (120g) sour cream: Adds tanginess, moisture, and a velvety texture to the cheesecake. Room temperature is best.
- 1/2 cup (approx. 1 medium banana / 110g) mashed ripe bananas: Use bananas that are ripe (yellow with a few brown spots) but not overly mushy. Mash them thoroughly for a smooth consistency.
For the Banana Pudding Layer:
- 1 (3.4 oz / 96g) package instant banana pudding mix: Ensure it’s “instant” for quick setting.
- 1 1/2 cups (360ml) cold milk: Whole milk or 2% milk works best for a creamy pudding.
- 1 cup (240g) whipped topping (or whipped cream): Such as Cool Whip, or use 1 cup of freshly whipped cream (made from 1/2 cup heavy cream, whipped with 1 tbsp powdered sugar and 1/4 tsp vanilla).
For the Crunch Topping:
- 1 cup (approx. 100g) vanilla wafers, crushed: Coarsely crushed for texture. You can use a food processor or place them in a bag and crush with a rolling pin.
- 1/2 cup (55g) pecans, chopped: Adds a nutty flavor and additional crunch.
- 3 tablespoons (42g) unsalted butter, melted: Binds the crunch topping ingredients and helps them crisp up when baked.
- 1/4 cup (50g) light brown sugar: Sweetens the topping and helps it caramelize.
For Garnish:
- Banana slices: Sliced just before serving to prevent browning.
- Whipped cream: Extra whipped cream or whipped topping for dollops around the edge.
Notes on Ingredient Preparation:
- Cream Cheese & Eggs: Allow these to come to room temperature for at least 30-60 minutes before starting.
- Bananas: Mash the banana well with a fork or potato masher.
- Butter: Melt the butter for both the crust and the crunch topping separately.
- Wafers: Crush the wafers for the crust into fine crumbs, and for the crunch topping, aim for a coarser, more varied texture.
5. Step-by-Step Instructions
Follow these detailed instructions to create your stunning Banana Pudding Crunch Cheesecake.
1. Prepare the Crust:
- Preheat Oven & Pan: Preheat your oven to 325°F (163°C).2 Lightly grease a 9-inch springform pan.
- Combine Ingredients: In a medium bowl, combine the 2 cups (200g) vanilla wafer crumbs, 1/4 cup (50g) granulated sugar, and 1/2 cup (113g) melted unsalted butter. Mix until the crumbs are evenly moistened and resemble wet sand.
- Press into Pan: Press the mixture firmly and evenly into the bottom of the prepared 9-inch springform pan. You can use the bottom of a flat-bottomed glass or a measuring cup to create a compact, even layer.
- Bake Crust: Bake the crust in the preheated oven for 10 minutes. This helps to set the crust and prevent it from becoming soggy.
- Cool: Remove the crust from the oven and set it aside to cool completely while you prepare the filling.
2. Make the Cheesecake Filling:
- Beat Cream Cheese & Sugar: In a large mixing bowl, using an electric mixer (stand or handheld with a paddle attachment), beat the 3 (8 oz) softened cream cheese packages and 1 cup (200g) granulated sugar together on medium speed until the mixture is very smooth, creamy, and free of any lumps. Scrape down the sides of the bowl frequently.
- Add Eggs: Add the 3 large eggs one at a time, beating on low speed after each addition just until incorporated. Do not overmix the eggs, as this can incorporate too much air, leading to cracks in the cheesecake.
- Incorporate Wet Ingredients: Mix in the 1 teaspoon (5ml) vanilla extract, 1/2 cup (120g) sour cream, and 1/2 cup (110g) mashed ripe bananas. Beat on low speed until everything is fully incorporated and the filling is smooth and uniform.
- Pour into Crust: Pour the cheesecake filling evenly over the cooled, prepared crust in the springform pan. Gently smooth the top with a spatula.
3. Bake the Cheesecake:
- Bake: Bake the cheesecake in the preheated oven (325°F / 163°C) for 55-65 minutes, or until the edges are set but the center is still slightly wobbly when you gently shake the pan. The slight wobble indicates it’s done, as it will continue to set as it cools.
- Cool in Oven: This step is crucial for preventing cracks. Turn off the oven, crack the oven door open by a few inches (you can use a wooden spoon handle to prop it open), and let the cheesecake cool inside the oven for 1 hour.
- Refrigerate: After 1 hour in the oven, remove the cheesecake and let it cool completely at room temperature on a wire rack. Once at room temperature, transfer the cheesecake (still in the springform pan) to the refrigerator to chill for at least 4 hours, or ideally overnight. Chilling thoroughly is essential for the cheesecake to set properly and for easy slicing. For a deeper dive into achieving perfect cheesecake textures, our Tangy Creamy Rhubarb Cheesecake Recipe also offers valuable insights.
4. Make the Banana Pudding Layer:
- Whisk Pudding: In a medium bowl, whisk together the 1 (3.4 oz) package instant banana pudding mix and 1 1/2 cups (360ml) cold milk for about 2 minutes, or until the mixture has thickened.
- Fold in Whipped Topping: Gently fold in the 1 cup (240g) whipped topping or whipped cream until well combined.
- Spread on Cheesecake: Carefully spread the banana pudding mixture evenly over the well-chilled cheesecake layer. Refrigerate again while you prepare the crunch topping.
5. Prepare the Crunch Topping:
- Preheat Oven (for topping): Preheat your oven to 350°F (175°C).
- Combine Ingredients: In a small bowl, mix the 1 cup (100g) crushed vanilla wafers, 1/2 cup (55g) chopped pecans, 3 tablespoons (42g) melted unsalted butter, and 1/4 cup (50g) light brown sugar. Stir until all the crumbs and nuts are evenly coated.
- Bake for Crunch: Spread the mixture evenly on a baking sheet (lined with parchment paper for easy cleanup, if desired). Bake for 8-10 minutes, stirring halfway through, until the topping is golden brown and crunchy. Watch it carefully, as it can burn quickly due to the sugar content.
- Cool: Remove from the oven and let it cool completely on the baking sheet. The topping will become crispier as it cools.
6. Assemble the Cheesecake:
- Add Crunch Topping: Once the crunch topping has cooled, sprinkle it evenly over the banana pudding layer on the cheesecake.
- Garnish: Just before serving, garnish the cheesecake with fresh banana slices around the edges or on top. Add dollops of whipped cream (or extra whipped topping) around the edge or on each slice. To prevent bananas from browning, you can dip slices in lemon juice diluted with water, though this should be done just before serving for best results.
7. Chill and Serve:
- Final Chill: Refrigerate the assembled cheesecake for an additional hour to allow all the layers to set completely and firm up before serving.
- Serve: Release the springform pan sides. Slice the cheesecake using a sharp, thin knife (you can dip the knife in hot water and wipe it clean between slices for neater cuts). Serve chilled.
6. Expert Tips and Variations
Elevate your Banana Pudding Crunch Cheesecake with these professional insights and creative twists.
Expert Tips from a Professional Chef:
- Room Temperature Ingredients for Smoothness: For the creamiest, lump-free cheesecake batter, ensure your cream cheese, eggs, and sour cream are all at room temperature. This allows them to emulsify properly and integrate smoothly, preventing a lumpy texture and minimizing cracks during baking.
- Don’t Overmix the Cheesecake Batter: Beat the cream cheese and sugar until smooth, but once you add the eggs, beat them in one at a time on low speed, mixing only until just incorporated. Overmixing after adding eggs incorporates too much air, which expands and then collapses during baking, often leading to dreaded cracks on the cheesecake surface.3
- The Gentle Cooling Method is Key: The gradual cooling of the cheesecake (first in the turned-off oven with the door cracked, then at room temperature, and finally in the refrigerator) is crucial for preventing cracks. Sudden temperature changes cause the cheesecake to contract too rapidly, leading to fissures.4
- Slice Bananas Just Before Serving: Bananas oxidize and turn brown very quickly once sliced. To ensure your garnish looks fresh and appealing, slice the bananas and arrange them on the cheesecake immediately before serving. A quick dip in lemon juice (diluted with water) can also help deter browning if you need to prepare them a few minutes in advance.
Common Mistakes to Avoid:
- Over-baking the Cheesecake: An over-baked cheesecake will often result in a dry, crumbly texture and cracks. The center should still have a slight jiggle when gently shaken.
- Not Chilling Long Enough: Insufficient chilling time (especially for the cheesecake layer) will make the cheesecake difficult to slice cleanly and can lead to a runny texture. Plan for at least 4-6 hours, but overnight is best.
- Applying Garnish Too Early: Adding fresh banana slices or whipped cream too far in advance will lead to brown bananas and potentially deflated whipped cream.
Creative Recipe Variations:
- Chocolate Twist: Add a layer of chocolate ganache over the cheesecake before the banana pudding, or drizzle melted chocolate over the crunch topping for a “chocolate banana” experience. You could also use chocolate graham crackers for the crust.
- Nutty Alternatives: If pecans aren’t your favorite, substitute them in the crunch topping with chopped walnuts, almonds, or even macadamia nuts for a different flavor profile.
- Caramel Drizzle: A generous drizzle of store-bought or homemade caramel sauce over the banana pudding layer, just before adding the crunch topping, would add another layer of decadent sweetness.
- Spiced Banana: Enhance the banana flavor in the cheesecake filling with a pinch of cinnamon or nutmeg.
- No-Bake Alternative: If you prefer a no-bake option for the cheesecake layer, you can adapt a standard no-bake cream cheese filling recipe (like the one for our No-Bake Strawberry Cream Cheese Pie), and proceed with the banana pudding and crunch layers. The texture will be different, but still delicious!
- Different Pudding Flavors: While banana pudding is classic, you could experiment with vanilla or even coconut instant pudding for a subtle variation.
7. Serving Suggestions
This Banana Pudding Crunch Cheesecake is a spectacular dessert designed to be the star of your table.
- Plating and Presentation: For the most impressive presentation, serve chilled slices directly from the springform pan. The distinct layers are beautiful. Garnish each slice with a fresh banana slice or two, a dollop of fresh whipped cream, and perhaps a light sprinkle of extra crunch topping or vanilla wafer crumbs.
- Complementary Pairings: The richness of this cheesecake pairs beautifully with simple accompaniments:
- Coffee: A strong cup of freshly brewed coffee, espresso, or a cappuccino complements the sweetness.
- Milk: A simple glass of cold milk is a comforting classic with banana-flavored desserts.
- Tea: A black tea or a lightly sweetened iced tea can be a refreshing contrast.
- Dessert Wine: A sweet dessert wine, such as a Late Harvest Riesling or a Moscato, could also be an elegant pairing.
- Occasions: This cheesecake is perfect for:
- Holiday gatherings (Thanksgiving, Christmas)
- Birthday celebrations
- Potlucks and family reunions
- Any special occasion where a truly memorable dessert is desired.
8. Nutritional Information (Per Serving)
Nutritional information is approximate and can vary based on specific ingredients and portion sizes used.
Estimated Nutritional Breakdown (per serving, assuming 14 servings):
- Calories: Approximately 450-550 kcal
- Protein: Approximately 8-12g
- Fat: Approximately 30-40g
- Saturated Fat: 18-25g
- Unsaturated Fat: 12-15g
- Carbohydrates: Approximately 40-55g
- Sugar: Approximately 30-45g
- Fiber: Approximately 1-2g
- Sodium: Approximately 200-300 mg (can vary based on wafer brand, cream cheese, and pudding mix)
This Banana Pudding Crunch Cheesecake is a rich and decadent dessert, as reflected in its higher calorie, sugar, and fat content. It’s a treat to be savored for special occasions, providing a delightful indulgence.
9. Storage and Reheating Instructions
Proper storage is key to maintaining the freshness and quality of your Banana Pudding Crunch Cheesecake.
- Proper Storage: Once the cheesecake has completely cooled and been chilled, cover it tightly with plastic wrap or aluminum foil. If still in the springform pan, cover the top securely.
- Refrigeration Guidelines: Store the cheesecake in the refrigerator for up to 3-4 days. The crunch topping may soften slightly over time due to moisture from the pudding layer.
- Freezing Recommendations:
- Cheesecake Only (No Garnish): The baked cheesecake (without the banana pudding layer, crunch topping, or fresh banana garnish) can be frozen. Allow the cheesecake to cool completely and chill thoroughly. Remove it from the springform pan. Wrap the cheesecake tightly in several layers of plastic wrap, then a layer of aluminum foil. Freeze for up to 1-2 months.
- Assembled Cheesecake: Freezing the fully assembled cheesecake (with the pudding layer, crunch topping, and especially fresh banana garnish) is generally not recommended. The pudding layer’s texture might change, the crunch topping will become soggy, and fresh bananas will brown and become mushy upon thawing.
- Freezing Slices: If you want to freeze individual slices, freeze them unwrapped on a baking sheet until firm, then wrap each slice tightly in plastic wrap and foil.
- Thawing Frozen Cheesecake:
- Thaw frozen cheesecake in the refrigerator overnight.
- Once thawed, proceed with adding the banana pudding layer, crunch topping, and fresh garnish as directed in the recipe. This method ensures the best texture and appearance.
- Reheating Instructions:
- Cheesecakes are typically served chilled and do not require reheating.5
10. Frequently Asked Questions (FAQ)
Here are some common questions about making and customizing your Banana Pudding Crunch Cheesecake:
- Why did my cheesecake crack? Cheesecakes often crack due to sudden temperature changes during cooling or over-baking.6 Ensure you follow the gradual cooling steps: turn off the oven, crack the door, cool in the oven for an hour, then at room temperature before refrigerating. Also, avoid overmixing the batter once eggs are added.
- Can I use fresh bananas in the pudding layer? It’s generally not recommended to mix fresh banana pieces into the instant pudding layer itself, as the enzymes in fresh bananas can react with the pudding mix and prevent it from setting properly. If you want more banana flavor, you can mash additional ripe bananas and fold them into the prepared pudding mixture after it has set slightly, but do this closer to assembly time.
- How can I prevent the banana slices on top from browning? To keep the banana slices looking fresh, slice and place them on the cheesecake just before serving. A quick dip in a solution of lemon juice diluted with water can also help, but immediate serving is best.
- Can I make this cheesecake gluten-free? Yes! You can make this cheesecake gluten-free by substituting the vanilla wafers with gluten-free vanilla cookies or gluten-free graham crackers for both the crust and the crunch topping. Ensure your instant banana pudding mix is also gluten-free.
- Can I use homemade whipped cream instead of store-bought whipped topping? Absolutely! Using fresh homemade whipped cream (made from heavy cream, powdered sugar, and vanilla) will provide a richer, more natural flavor for the banana pudding layer and for garnish.
- Can I make parts of this cheesecake ahead of time? Yes, you can. The crust can be baked a day in advance. The cheesecake itself can be baked and chilled overnight. The crunch topping can be baked a day or two in advance and stored in an airtight container at room temperature. The banana pudding layer is best made right before assembly.
- What if I don’t have a springform pan? While a springform pan is ideal for easy removal and presentation, you can bake this cheesecake in a regular 9×13-inch baking dish. The cheesecake will be shorter, and you’ll scoop it out to serve rather than slicing clean wedges. Adjust baking time slightly if needed.
This Banana Pudding Crunch Cheesecake is a true celebration of flavor and texture, offering a delightful twist on classic desserts. It’s a recipe that promises to impress and satisfy every sweet tooth!